
 For the last six weeks, I’ve been working with a new media compression program called ff-Works. It is tricky to install, difficult to use and the help files are written by programmers for programmers.
But, oh, my! The image quality is amazing, the file sizes are tiny, and the flexibility and control this program provides are second to none.
I now do almost all my compression in this program. If you want to improve the look of your final output, keep reading.
NOTE: I created an in-depth webinar showcasing how to use this software. You’ll find it here.
EXECUTIVE SUMMARY
ff-Works is a front-end to ffMPEG, a highly-regarded, open-source compression engine that is normally used by programmers to integrate into their software.
By itself, ff-Works allows in-depth technical analysis of media files. However, when combined with ffMPEG, which is developed by a separate organization, it is a powerful media compression tool.
Installation is cumbersome, there are only two video tutorials on the program that I’ve been able to find, help files are essentially non-existent and the user interface is overwhelming. But… like all powerful tools, if you invest the time to learn how to use it, you are rewarded with results you can’t get from Adobe Media Encoder or Apple Compressor.
ff-Works is a flexible, powerful and comprehensive software compression tool for power users who demand outstanding quality and are willing to spend the time to learn how to use it.
Software: ff-Works
Developer: OSBytes
Website: www.ffworks.net
Price: 18.99 Euros (about $22 US)
An 8-day free trial is available
NOTE: ffMPEG is a separate program and required for media compression. It is available for free. See the Installation section, below.
INSTALLATION
First, visit the ffWorks website and download the free trial to ff-Works. Then, download ffMPEG. (Once you get comfortable using it, you can make a more informed purchase decision.)
ffMPEG is a free, open-source program, designed for programmers, first developed by Fabrice Bellard, the originator of the FFmpeg project. It now has developers around the world contributing to the software.
ffMPEG download site: www.ffmpeg.org/download.html
As major updates occur every three months, with minor updates weekly, my recommendation is to download the latest static build, as a DMG file. This simplifies Mac installation.
Once you have downloaded both files, watch this tutorial on how to install ffMPEG.
The process is simple, but does take a few steps. The hardest part is figuring out which version of ffMPEG to download. Remember, download a DMG of a static binary compiled for your system: Mac, Windows or Linux.
INTERFACE
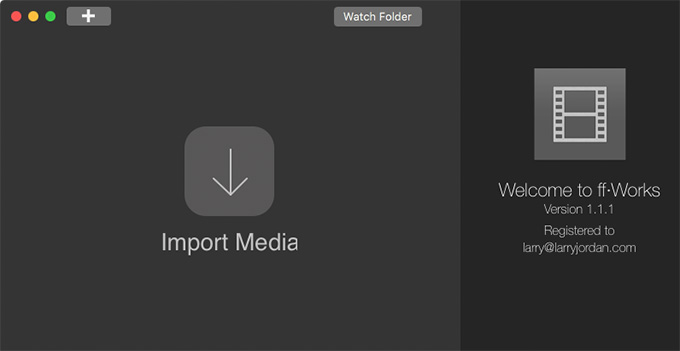
When you first start ff-Works, it looks like this. Obviously, the first thing we need to do is import a file.
(Click to see a larger image.)
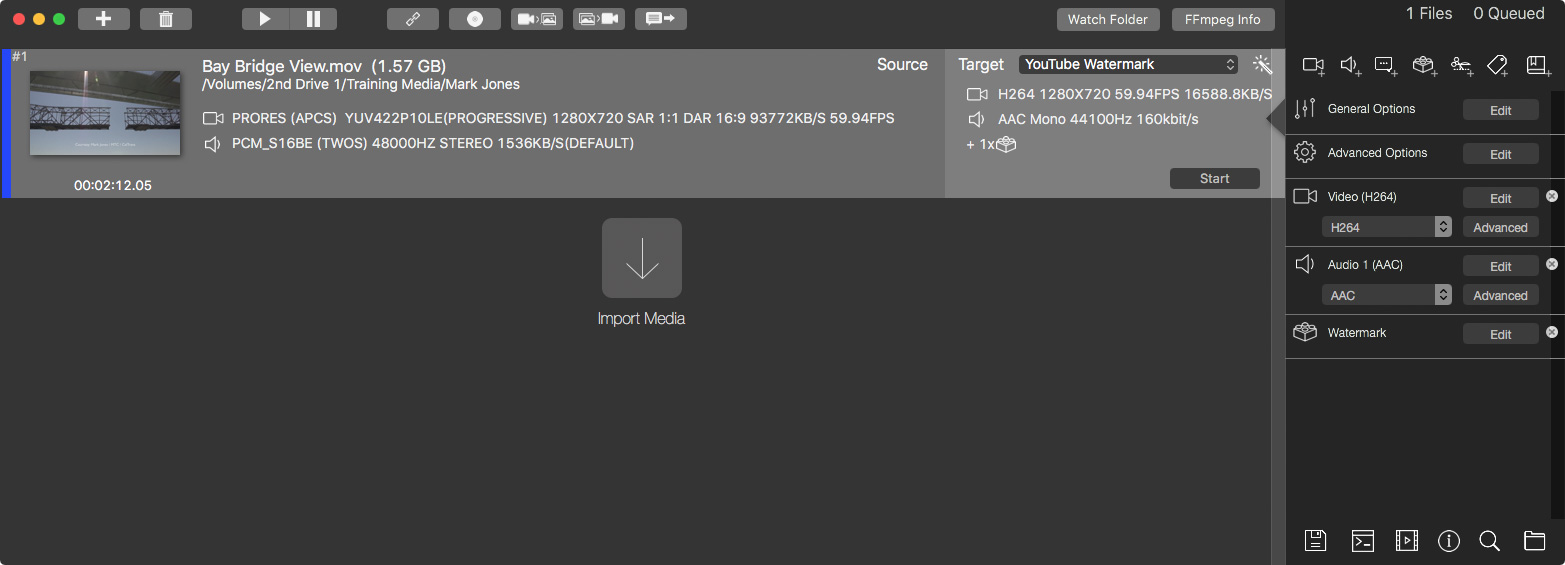
When we do, the interface gets much more interesting. The light gray band represents the video(s) you imported.
NOTE: Images in this tutorial are courtesy of Mark Jones, MTC/Caltrans — www.youtube.com/user/news4jones

The bar across the top allows you to (from left to right):
Of these buttons, the only one I really use is the the right arrow, which starts compression.
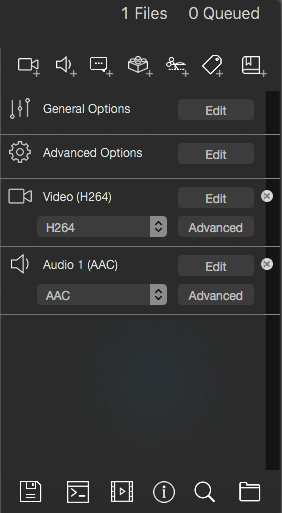
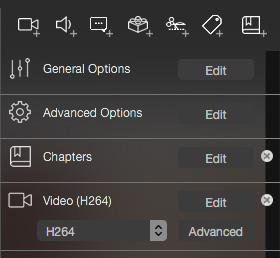
On the right are all the compression settings, grouped by function. I’ll get back to these in a minute.
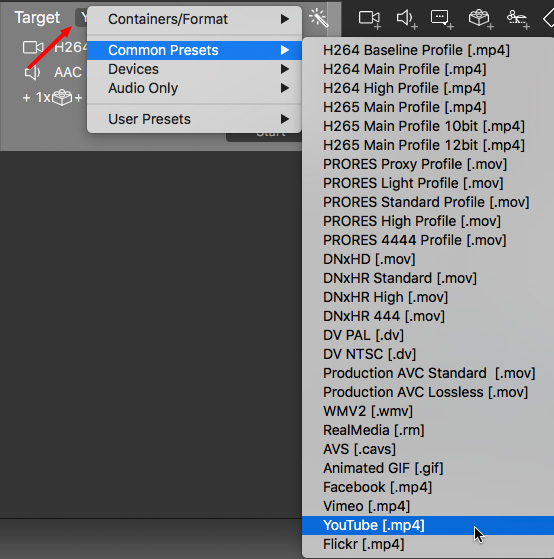
At the top right of each imported media file is the Target popup menu. These list presets in five categories:
There are more than 70 presets to choose from. Here are my suggestions to get you started:
IMAGE QUALITY
While my tests are not exhaustive, based on my experience with Apple Compressor and Adobe Media Encoder, as well as a variety of other compressors, I feel very comfortable in saying that the image quality is equal to, or better than any other compression software I’ve worked with, while file sizes are consistently smaller.
Let me give you one example.
Source file – Apple ProRes 4444

Apple Compressor

ff-Works
(Click to view larger images.)
In brief:
The Info box shows the specs for each image. Notice, not only is ff-Works image quality better, but the bit rate is about half that of Compressor, even though the original compression settings were set to the same value: 1850 kpbs.
There’s no comparison: ff-Works provides significantly better image quality, not just in this example, but across the board.

Source image – Apple ProRes 4444 (Scopes from Final Cut Pro X 10.4.2)
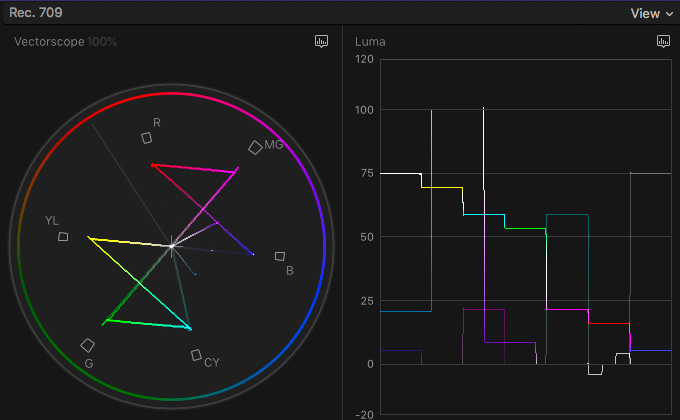
Split screen between source and compressed version
The top image is source bars for a Rec. 709 HD image.
The bottom image is a split screen between the source and compressed image. Compressed image created in ff-Works, using the YouTube preset. Compression always creates artifacts, especially along edges, but the overall image quality is excellent.
NOTE: ffMPJEG tends to make the image slightly darker and desaturate the color a bit. However, when rapidly switching between the two images, it is almost impossible to see these differences; as illustrated by the way they match on the scopes.
OTHER OBSERVATIONS
In terms of file sizes, while this varies by movie, my experience is that, when using the H.264 codec, ff-Works creates QuickTime files which are at least 40% smaller than Apple Compressor, using a bit rate between 40 – 60% lower, while still providing higher image quality.
ff-Works creates MP4 files which are significantly more compatible than those created currently by Apple Compressor.
ff-Works supports watermarking, chapter markers created by both Adobe Premiere Pro CC and Apple Final Cut Pro X, and subtitles. However, watermarks are displayed at 100% opacity, both Compressor and AME allow you to vary the amount of compositing opacity.
The only thing that it may not support – or, at least, I haven’t found it yet – is HTTP Live Streaming for mobile devices. I still use Apple Compressor for that.
OPERATIONS – COMPRESSION
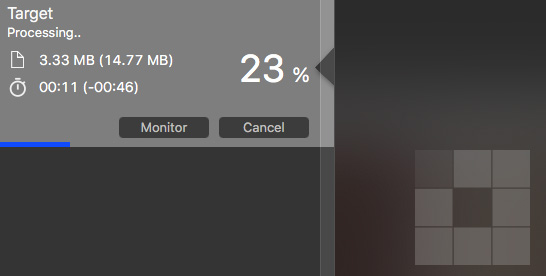
When you click the Start button, the software provides a very clear indication of compression status, estimated file size and how far along the process is.
Depending upon the machine you are using for compression, it will automatically determine how many files it can compress at the same time, queuing the rest for compression when the first files are complete.
NOTE: I haven’t stressed this system, but it easily handled four files, each an hour long, with different settings for each.
OPERATIONS – WATCH FOLDER
The easiest way to use ff-Works is to create a Watch Folder. This allows you to create a folder, assign compression settings to it, then, whenever a video file is dropped into the Watch Folder, it is compressed to those specs.
The only limitation to Watch Folders is that ff-Works must be running in order for Watch Folders to function. However, running ff-Works in the background requires between 0 and 2% of total CPU time, according to Activity Monitor, so there’s essentially no overhead required just to keep it open.
NOTE: However, if I’m not doing compression work, I will quit out of the program.
To create a Watch Folder:


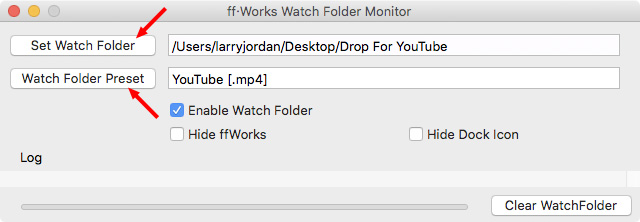
Close this window and ff-Works will continually monitor this folder. As soon as you add a file, it will start compressing it and deliver it to the default destination.
OPERATIONS – SET A DEFAULT COMPRESSION DESTINATION
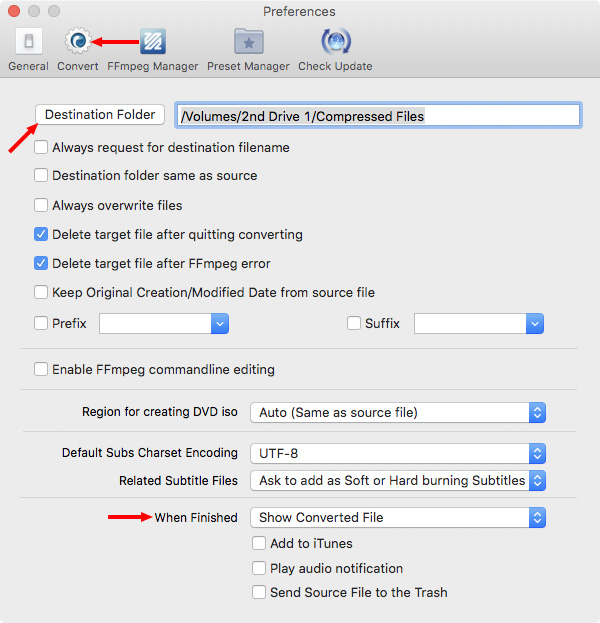
One of the things I like about ff-Works is that almost all the presets are fine to get started with. One you might want to change is the default destination folder for compressed files.
Open ff-Works > Preferences > Convert and change the Destination folder. In my case, I always store compressed files to a Compressed Files folder on one of my external drives.
Also, at the bottom, you can instruct ff-Works what you want it to do once its compressed a file.
OPERATIONS – TRIM A CLIP
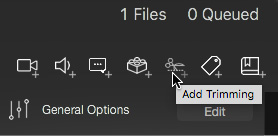
ff-Works uses a LOT of icons, fortunately, they have tool tips. To trim a clip, select the clip you want to trim, then click the Trim icon in the top right bar.
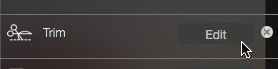
This add a Trim function in the controls window. Click the Edit button and the Trim window appears.
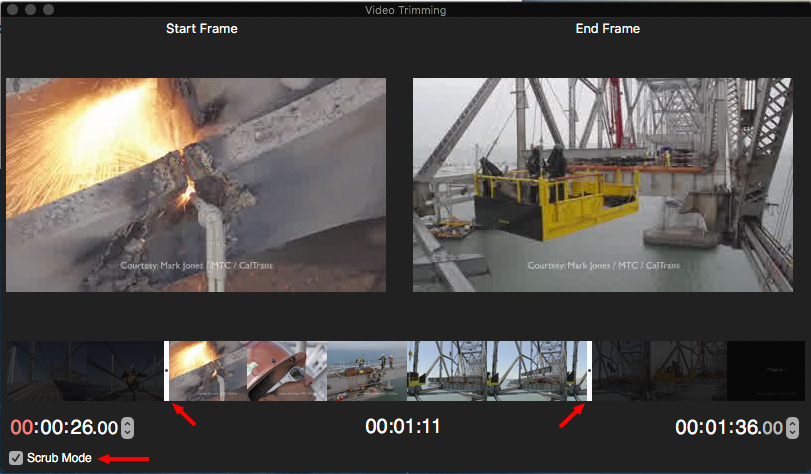
Click the checkbox for Scrub Mode, then drag the white In/Out sliders to the frame where you want the exported clip to start and end.
You can also add the In and Out numerically, using Timecode.
OPERATIONS – ADD CHAPTER MARKERS

To add chapter markers exported with the project media from either Premiere or Final Cut, click the Chapters icon.
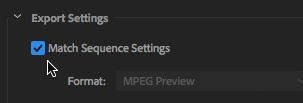
NOTE: To export media from Premiere Pro with chapter markers but without compressing it using Adobe Media Encoder check Match Sequence Settings in the Media Export window.
This adds the Chapters setting to the Settings panel. DON’T open this, or make any changes to these settings; you’ll only break it. All you need to do is turn this function on.
NOTE: The chapter markers created by ff-Works do not appear in QuickTime Player 7, but do appear in QuickTime Player.
OPERATIONS – ADD WATERMARKS
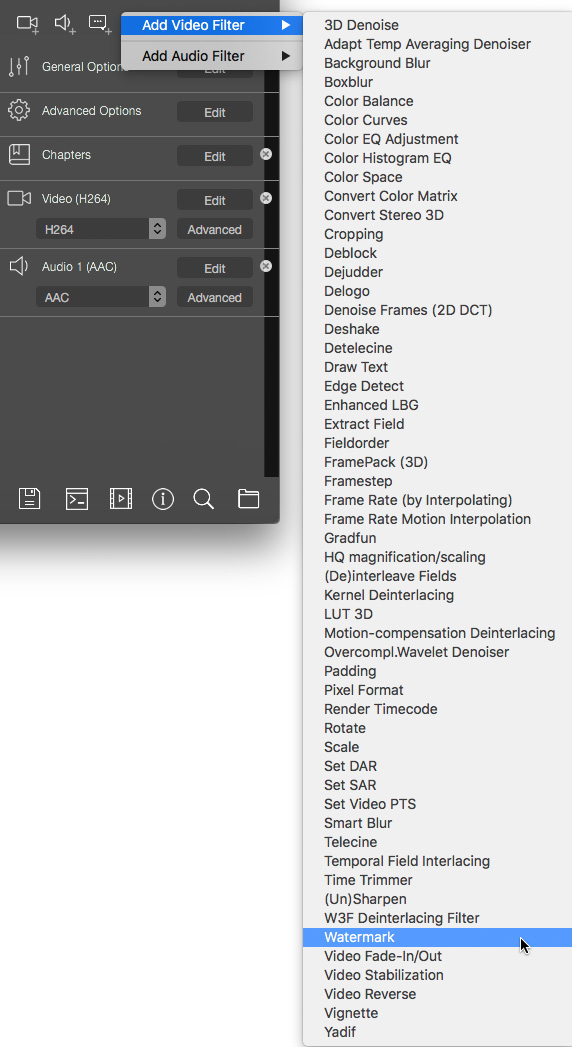
There are a LOT of video and audio filters you can apply! To add a watermark filter, click the Filters button at the top (fourth from the left) and choose Watermark.
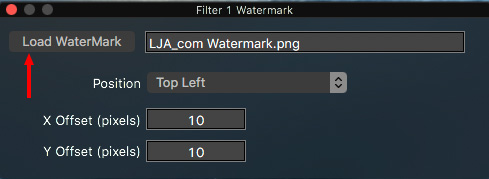
This opens the Watermark dialog. Select the watermark file you want to use, then close this dialog. Assuming the watermark is properly sized and positioned for the video you are adding it to, you don’t need to change any of the other settings.
NOTE: Watermark files need to be PNG, not PSD, with a transparent background. Be sure to position the watermark correctly when you create it.
OPERATIONS – VIDEO COMPRESSION SETTINGS
There are SO MANY possible settings to tweak, here are just the important ones.
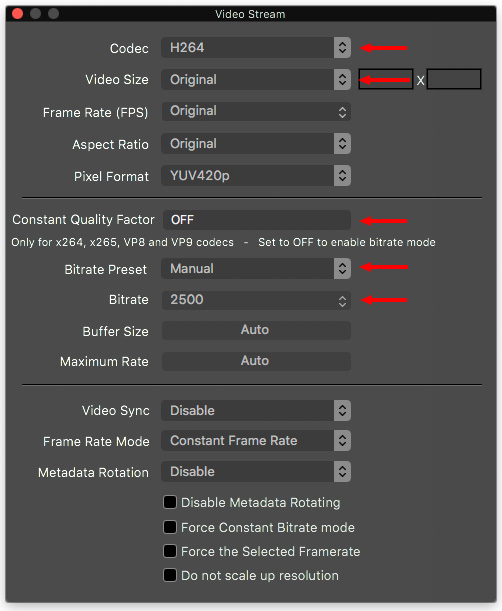
Most of the time, you can leave all the other settings alone.
OPERATIONS – AUDIO COMPRESSION SETTINGS
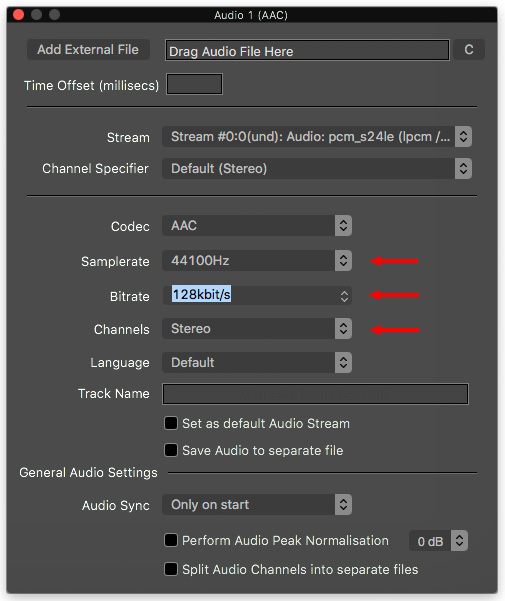
Like the rest of the program, there are lots of options here. To get started:
Leave the rest of the settings alone; the codec will vary depending upon the preset you choose.
If you are unsure, for stereo files going to social media:
For spoken word going to local websites:
WHAT I WISH THIS SOFTWARE DID
While I am very impressed with the results, the operation of the software is trickier than it needs to be. What I would like to see added are:
SUMMARY
It took me a while to figure this program out. But, to me, the effort was worthwhile. I’m very impressed with the overall speed, capability, options and image quality of ff-Works. I’ve been using it for all my webinars for the last month.
Within the last two weeks, I’ve expanded my use to include my YouTube postings, MP4 and QuickTime versions of my webinars and videos posted to my website.
For anyone looking for better images, more control and more options, ff-Works is the go-to app.

2,000 Video Training Titles
Edit smarter with Larry Jordan. Available in our store.
Access over 2,000 on-demand video editing courses. Become a member of our Video Training Library today!
Subscribe to Larry's FREE weekly newsletter and
save 10%
on your first purchase.
16 Responses to Product Review: Better Video Compression with ff-Works
Hi Larry,
I have booked into your ff-Works webinar.
Can this be used to compress video files to be hosted directly on my website and streamed from there please? I want to have 1080p files at approx 5Mbs and 720p files at approx 2.5Mbs – which are roughly the compressions that vimeo use. The idea is to self host the videos insted of using vimeo.
I have been experimenting with Apple Compressor but the quality of the compressed files are rubbish when compared with the same specification compression settings that vimeo use.
Thanks,
Andy
Andy:
The short answer is yes. A longer answer will be provided in the webinar – when I show you how and where to modify the settings. I stream MP4 files created by ff-Works directly from my website as part of my Video Training Library. Works great.
Larry
Thanks ever so much Larry, this is the answer to prayer.
Andy
Hi Larry, thank you for an excellent and enjoyable webinar and for answering my question during the question time.
I think I managed to write down all of what you said in your answer and the results I have been getting from the 720p videos is “good” but not as good as I had expected. The quality is almost as good as vimeo’s 720p transcode downloads but the file file size is nothing to write home about. The videos contain a normal amount of movement.
Do you have a “Typical settings” chart for the most important settings by any chance please?
Thanks,
Andy
Andy:
There is no one “magic” number – it varies for each movie. File size is essentially dependent upon bit rate, but image quality is dependent upon bit rate, compressed frame size, compressed frame rate, codec and the amount of movement between frames. Because of this, there may be several things impacting image quality.
Also, remember that compression always alters the image, hopefully slightly. Almost never will the compressed image look as good as the source – however, we want it to look as good as we can.
As a test, compress a portion of your file to H.264 with a bit rate between 10-16 megabits (Mbps) or 10,000 – 16,000 kbps. If the image still looks poor, then the bit rate isn’t the problem. I would look at how you are resizing it, or other compression filters.
Larry
Did you make any SPEED comparisons?
I vaguely remember some ‘ffmpeg uses multi-core whereas …” 😉
Karsten:
I haven’t had time to do anything formal, but it seems about as faster, or faster, than Adobe Media Encoder.
Larry
So, is the best workflow, to export a ProRes 422 Master File from FCPX, them import into ff-Works?
Michael:
Correct. I recommend this for all video editors, not just FCP X. This allows you to create a high-quality master file for archiving as well as use in creating new compressed derivatives. For example, I need to create four different versions of each of my webinars, for different distribution outlets.
Larry
Hi Larry, this article and a request at work had me wondering what current guidelines are for frame rate conversions? I know hardware is always better than software and the old version of compressor had all those frame rate controls. Nowadays it seems like I should just drop by 29.97 file into media encoder and change the frame rate to 25. I haven’t found or read any better methods using other software or ffmpeg.
Thanks!
Eric:
The BEST option is never having to convert frame rates in the first place. It ALWAYS introduces artifacts. Read this article to learn more:
https://larryjordan.com/articles/frame-rates-are-tricky-beasts/
and this one:
https://larryjordan.com/articles/the-history-behind-frame-rates/
As long as you don’t have a lot of motion between frames, AME will do an acceptable job. The more movement you have, the more the frame rate conversion will look awkward.
Larry
Thanks Larry! I found this app on my own, but this article’s deep study really made it clear that this is a super useful tool! We really like how fast it is, it uses all cores.
Great article. I’m trying out ff-works and it looks perfect for my needs, except I can’t figure out how to keep my source footage as interlaced. When I convert my MPEG 2 1080i HD Broadcast Master to an h.264 file, it also converts it to a progressive file. How do I stop it from doing that?
Nick:
Look more closely at the video compression settings, you should see an interlacing option there. Keep in mind that EVERYTHING posted to the web needs to be progressive. Interlacing should only be used for programs destined for broadcast.
Larry
Why does the h.264 it creates say that the codec is Lavc58.59.102 libx264 instead of just h.264?
Darren:
Because ffWorks is targeted at developers. This is flagging the library, version and build of the codec. Most of us don’t care. Developers and uber-compression-geeks do.
Larry