
![]() This started during a discussion with a YouTube viewer who asked if it was possible to use a second computer to “render” a Premiere sequence. The answer is: “YES!” (This is a very cool trick to know if you need to create a lot of videos in a hurry.)
This started during a discussion with a YouTube viewer who asked if it was possible to use a second computer to “render” a Premiere sequence. The answer is: “YES!” (This is a very cool trick to know if you need to create a lot of videos in a hurry.)
Here’s how to create a system that rapidly compresses files for YouTube, but this could also be used for creating master files, or any other format that AME supports.
NOTE: This is also a perfect application for a Mac Mini as a centralized compression station for multiple Premiere editors.
BACKGROUND
I was initially confused because, to me, “render” means to create the work files that Premiere uses internally for effects and transitions. However, the viewer was using “render” to mean outputting the finished project. Adobe Media Encoder (AME) can NOT be used for the first option, rendering, but CAN be used for the second, output.
In order for this technique to work:
SETUP ADOBE MEDIA ENCODER
On shared storage, NOT on the second computer’s desktop, create a folder that all computers can access. In my example, I created “Premiere Compression” – but you can name the file whatever you want.
Open Adobe Media Encoder.
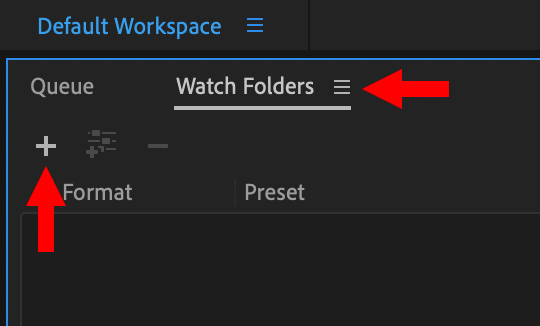
Click the Watch Folders text button, then the Plus key to create a new Watch Folder.
NOTE: A “Watch Folder” is a folder that AME monitors. Whenever a new file is added, AME will process that file based on the compression settings applied to it.
Navigate to the common folder you just created, “Premiere Compression” in my example.
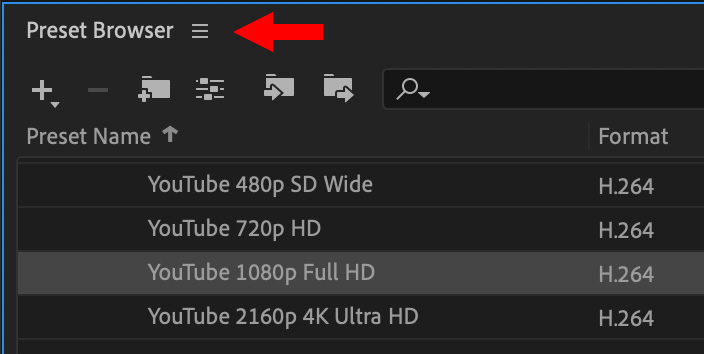
From the Preset Browser, select the compression preset you want to apply to all files saved into the Watch Folder. In this example, I’m using a YouTube 1080p preset, but we will adjust this in a minute to make it more flexible.
NOTE: You can apply multiple presets to the same Watch Folder. This would then create multiple versions of the same project; for example, a ProRes master file, along with files for YouTube and Twitter.
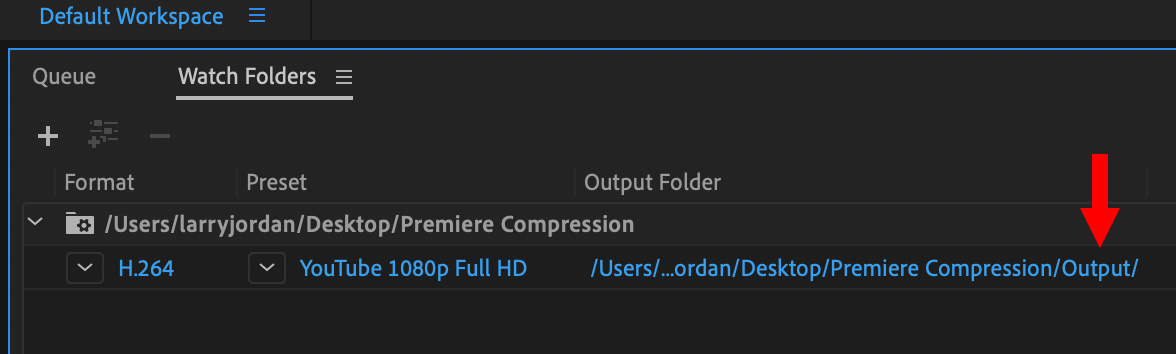
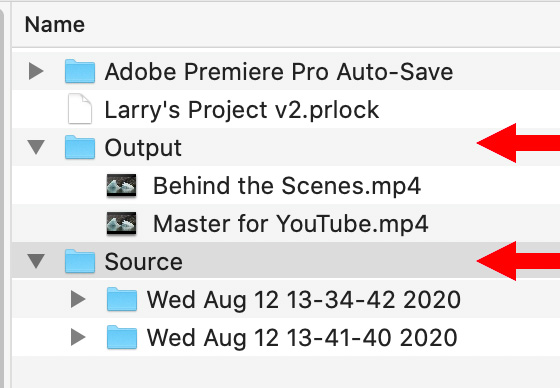
Here’s the preset applied to the Watch Folder. Notice that the Output folder is stored INSIDE the Watch folder. That’s the default location. You can move the output location, if you want, so that AME stores files in a different location; for example, in a “Ready to Upload” folder that your webmaster can use to verify and upload files.
By default, all social media compression presets compress files to a specific frame size. I find this too limiting. I want AME to match the settings of my Premiere sequence.
To correct this, double-click the blue Preset name attached to a specific Watch Folder.
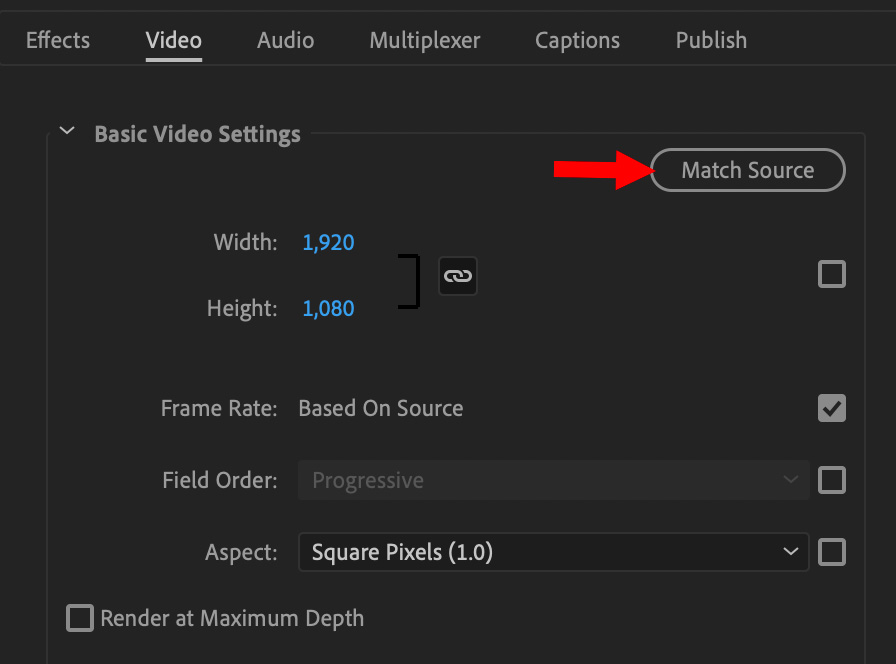
Then, in the Video section, click the Match Source button. This means that, during compression, AME will match frame size, frame rate, field order (progressive vs. interlaced), and Aspect Ratio (16:9 vs., say, 1:1).
Click OK to accept this change and configuration is done.
NOTE: In order for Watch Folders to run, AME must be running as well. So, while you can use that second computer for other things, keep AME running at all times. However, compression will be fastest if AME is the foreground application and nothing else is running.
DELIVERING FILES
Here’s the secret: You DON’T export files from Premiere. You save PROJECTS into the Watch Folder!
Create projects and sequences as usual in Premiere. In fact, you can have multiple Premiere editors all saving files to the same compression station.
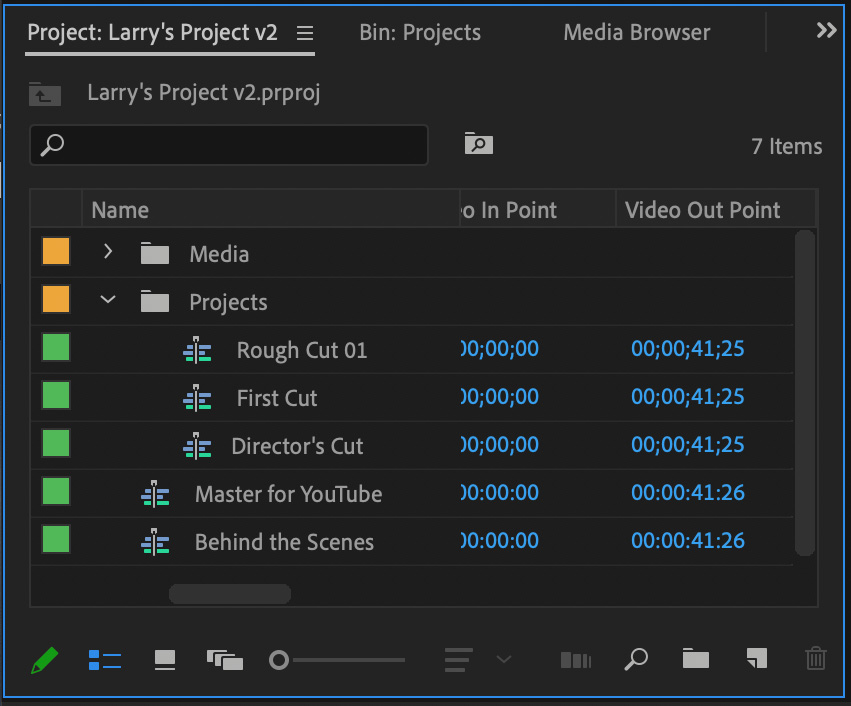
The way this works is that all sequences that are at the TOP LEVEL of the Projects panel will be compressed. All sequences inside a folder will be ignored. So, before saving this project, move the sequences around so that only the ones you want to output are stored at the top level.
NOTE: In my example, “Master for YouTube” and “Behind the Scenes” are at the top level, the three other sequences are stored inside the Projects folder.
Save the entire Premiere project into the Watch Folder.
NOTE: I generally make a copy of the project before saving it into the Watch Folder. You know, just in case.

A few seconds after you save it, AME starts encoding all those top-level sequences! No rendering or output is necessary!! AME handles everything.
SUMMARY
If you are creating lots of videos and have a second computer sitting around, this is a GREAT way to speed your output. You don’t need to render the Premiere project, AME will render any files that need it.
Remember, all media and projects must be stored on shared storage and visible to both computers.
NOTE: For extra speed, if you have an editorial workgroup, each editor can feed projects into this central compression system so that no editor needs to wait for rendering or export.
Very, very cool.

2,000 Video Training Titles
Edit smarter with Larry Jordan. Available in our store.
Access over 2,000 on-demand video editing courses. Become a member of our Video Training Library today!
Subscribe to Larry's FREE weekly newsletter and
save 10%
on your first purchase.
6 Responses to Premiere Pro: Use Two Computers to Speed Exports
thanks for this tutorial. Will this work for After Effects files as well?
Also what about apple Motion or FCPX?
Jim:
Yes, for After Effects.
No, for FCP X and Motion. Keep in mind that, unlike the Adobe apps, FCP X and Motion are designed to export in the background.
Larry
I haven’t got shared storage, but would this work if i copy the footage across to another drive and hook that up to the second computer?
Jo:
Not really. If the computers aren’t connected you’ll spend far more time transferring files than you will save in using two computers for export.
Larry
Unfortualy you article stops short of explaining 2 very important things critical to understanding how AME works. You say “NOTE: A “Watch Folder” is a folder that AME monitors. Whenever a new file is added, AME will process that file based on the compression settings applied to it.”
First “new files”, what type of new files? If I’m saving “projects” then those would be .prproj files NOT sequences as inferred by the screen shot you provided.
Second, where are those “compression setting” you refer to as being “applied”? Applied how? By what?
James:
I understand your confusion. Here’s an article that describes how to set up Watch Folders in Adobe Media Encoder:
https://larryjordan.com/articles/adobe-media-encoder-set-up-network-watch-folders/
In general, when running AME stand-alone using Watch Folders, it is looking for exported media files, not project files.
Larry