
![]() [ Note: This technique works in both Premiere Pro CS6 and CC. ]
[ Note: This technique works in both Premiere Pro CS6 and CC. ]
This article describes how to create a picture-in-picture effect in Premiere Pro, as well as adjust other motion parameters. Then, it shows how to save that effect as a preset you can use again in the future.
Plus, we have an Extra Credit section, at the bottom, that talks about adding drop shadows.
GET STARTED
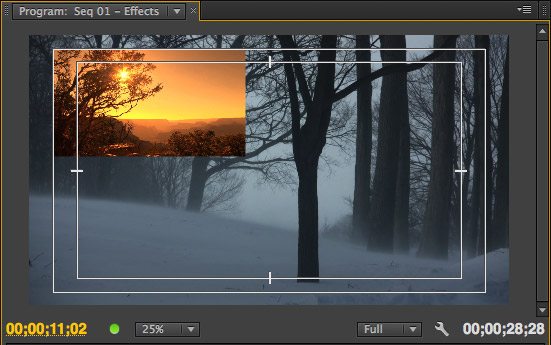
Here’s where we are going: to create a simple picture-in-picture effect inside Premiere Pro that is located just inside Action Safe.
NOTE: In this article, I’m using the CS6 version of Premiere to create the screen shots. However, aside from the look of the Action Safe boundaries, the process is the same in the Creative Cloud version.
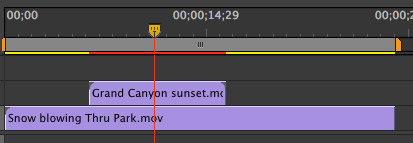
Whenever you want two or more images to appear on-screen at the same time, they need to be stacked in the Timeline. The foreground clip is always placed above the background clip in the Timeline. In this case, the sunset image starts later than the snowy trees image because I wanted the sunset image to fade into the snow image.
By definition, a clip placed on a higher track is always 100% full-screen and 100% opaque, blocking all clips below it. This means that if we want to see both clips at the same time, we need to do something with the foreground clip on the higher track.
NOTE: There is no limit to the number of clips you can scale and composite into a background. Premiere supports up to 100 video tracks.
CREATE THE EFFECT
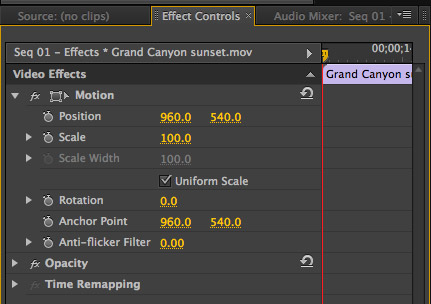
All effects are controlled from the Effect Controls tab (shortcut: Shift+5). To display a clip in this tab, simply select it in the Timeline (double-clicking is not necessary).
Unlike Final Cut Pro, Premiere defines the 0,0 point of an image as the top left corner. (Photoshop uses the same 0,0 point as Premiere.) This means that the easiest way to move images around the screen is not to enter numerical values, but to adjust images by dragging.
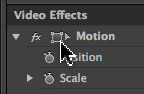
See this little box icon up here? This is the hidden secret to moving stuff around. Click it and a selection box appears around the clip in the Program Monitor.
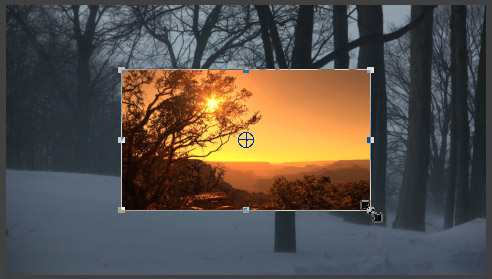
This selection box provides a variety of ways to scale and move an image:
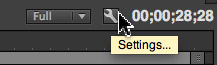
To display the Safe Zone, click the Wrench icon and select Safe Margins from the menu.
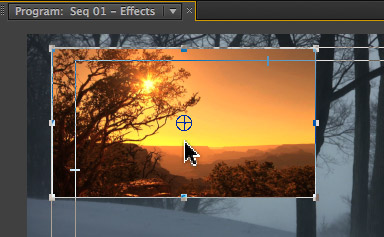
Drag the image up to the top left corner of Action Safe (the outer rectangle that is 5% in from each edge).
You can also make all these adjustments by entering values in the Effect Controls tab, but, most of the time, dragging will be faster.
NOTE: You can also change a numeric value by hovering the mouse over a numeric value (in the Effect Controls window, or any window), wait for the cursor to change into a double-pointing arrow, then press the mouse button while dragging. This tends to be the technique I use the most.
CREATE A PRESET
A preset is a saved effects parameter. The good news is that presets work great. The bad news is that presets only record the settings for a single parameter. So, you would need three presets for an image that:
Each bullet point would be a single preset.
Still, for effects you use a lot, creating a preset can save you time. Here’s how.
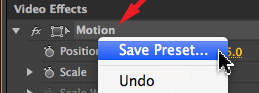
Create the effect so that it looks the way you want. Then, right-mouse-click the name of the parameter you want to save and select Save Preset.
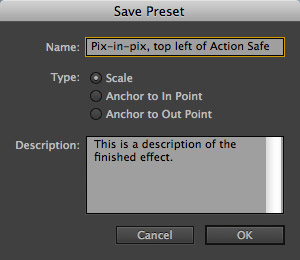
This opens the Save Preset window. Give the preset a name and description.
The middle three radio buttons are ONLY needed when you have added keyframes to this effect, otherwise, just leave this set to the default of Scale.
If you have added keyframes to modify the effect over time, here’s what these three radio buttons do. Assume, for the sake of this example, that your effect is keyframed to take one second and the total duration of the clip is four seconds.
Nothing changes the clip itself, you are only shifting keyframe positions for the duration of the preset effect. When you are done, click OK.
APPLYING A PRESET
When you want to apply an existing preset to a clip, display the Effects tab (Shift+7).
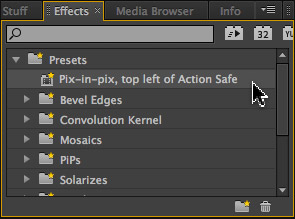
All custom presets are shown in the Presets tab. (You can add folders to organize presets within this folder, if you want.)
Drag the preset you want to apply to a clip in the Timeline and, poof! — you’re done.
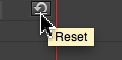
NOTE: To reset a parameter to its default settings, click the small hooked arrow to the right of the parameter you want to reset.
EXTRA CREDIT
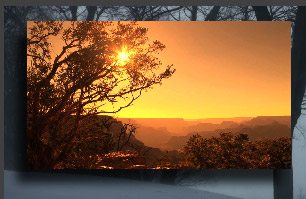
For added dimensionality, go to the Effect tab, and apply Video Effects > Perspective > Drop Shadow to the foreground clip. Adjust this filter in the Effect Controls tab to get the results you want.
Done.
Visit our website to see Final Cut Pro Training & more!

2,000 Video Training Titles
Edit smarter with Larry Jordan. Available in our store.
Access over 2,000 on-demand video editing courses. Become a member of our Video Training Library today!
Subscribe to Larry's FREE weekly newsletter and
save 10%
on your first purchase.
3 Responses to Premiere Pro: Motion Effects and Presets
Hello Larry.
As a long time Avid guy I want tho thank you for this tutorial. Finding where things are is my biggest challenge, but we shall carry on.
Do you have anything on how to move work spaces to a second screen? I’m used to having my time line, and monitors on one screen and my bins etc on the other.
Thanks much.
Eric
Eric:
Thanks for the kind words.
At the moment, I don’t have anything written about this. Let me do some homework and see what I can find out – then write it up.
Larry
[…] projects to the cloud | Importing Layered Photoshop Files | The Basics of Sending Exports to AME | Motion Effects Tips and Presets | Boost and Smooth Audio Levels | Warm Dialogue and Improve Diction | Interface Tips and Tricks […]