
![]() I was exploring Adobe’s website for Premiere and discovered Smart Rendering. Smart rendering is, essentially, media optimization before and during editing. It allows you to create better quality output by avoiding recompression where possible. This isn’t a new feature, it first showed up in Premiere CS6. But, if you are outputting MXF files, you’ll need to turn it on.
I was exploring Adobe’s website for Premiere and discovered Smart Rendering. Smart rendering is, essentially, media optimization before and during editing. It allows you to create better quality output by avoiding recompression where possible. This isn’t a new feature, it first showed up in Premiere CS6. But, if you are outputting MXF files, you’ll need to turn it on.
Smart rendering cuts down on the processing of exporting even more by doing a bit more work up front. Any smart rendering workflow you can add prior to exporting will speed up your exporting process even more than improving hardware and working with optimized media.
Kevin Monahan, from Adobe, summarized the steps of Smart Rendering:
Before Editing
You can also capture this footage natively to these codecs while shooting with certain cameras or recording systems (Atomos devices, etc.). It turns out that a lot of recent camera formats are available for smart rendering, including certain flavors of XDCAM.
Smart rendering works only if the source codec, size, frame rate, and bit rate match the export settings. Smart Rendering is supported for both MXF and QuickTime wrappers.
While you are editing
Before exporting
Kevin adds: “I should also point out that it is a much nicer editing experience when cutting with ProRes or the like, over Long GOP footage like H.264 or AVCHD. You drop fewer frames, and can view in a higher resolution with these intraframe codecs. You can even create proxies for them if you have an underpowered computer system and need better fluidity when editing.”
EXTRA CREDIT
Here’s a link that explains other ways to speed rendering and export.
Codecs in an MXF wrapper that support smart rendering
NOTE: To activate smart rendering for codecs in an MXF wrapper, check the “Enable smart rendering codec” option found under the Video settings tab of the preset.
Codecs in a QuickTime wrapper that support Smart Rendering:
NOTE: Smart rendering for QuickTime codecs is automatically enabled any time the source settings match the export settings.

2,000 Video Training Titles
Edit smarter with Larry Jordan. Available in our store.
Access over 2,000 on-demand video editing courses. Become a member of our Video Training Library today!
Subscribe to Larry's FREE weekly newsletter and
save 10%
on your first purchase.
7 Responses to Premiere Pro: Export Faster with Smart Render
This is part comment part question. My workflow for years has been this:
– import R3D files
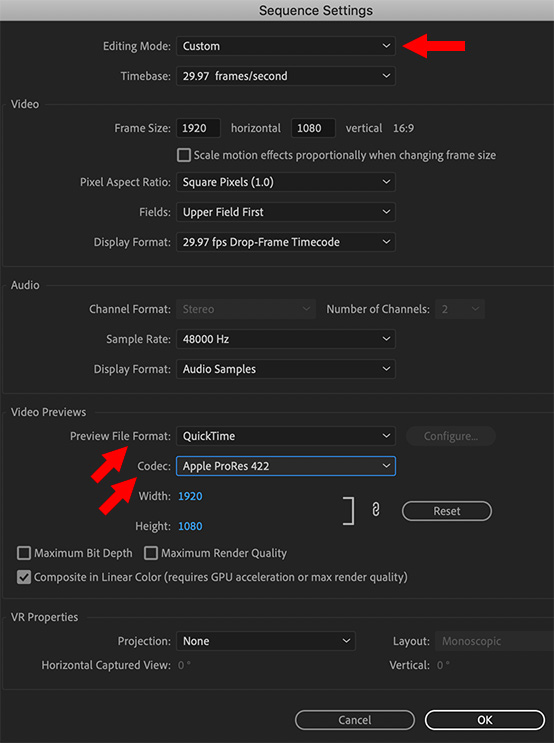
– go into sequence settings and switch “Editing Mode” to Custom
– switch frame size to 1920×1080
– switch preview files to QT ProRes 4444
– edit native R3D files regardless of size (4k, 5k, 6k etc)
– scale them down in the sequence to whatever percentage fits them to 1920×1080
– render areas of the sequence when necessary as I edit them
– output to same format as preview files (ProRes 4444) by clicking the “match sequence settings” button in the export dialog box as also making sure to check the “use previews” box
The export usually takes less than 2 min depending on length. (which never ceases to make me smile by the way)
This is mostly what is explained in this article EXCEPT for the transcoding part in the beginning to one of the codecs you listed.
So my question is, is transcoding only necessary for highly compressed formats like drone footage or other formats that shoot smaller files sizes due to compression? Because I feel like I’m getting the smart rendering benefit without the transcode step but as mentioned my footage is usually not a compressed format to begin with.
Christopher:
Great question, but I’m not sure of the right answer technically.
However, the fact that it works for you seems to me you are pointing in the right direction.
Larry
I had just assumed that if the preview files were set to the same codec as the output settings, Premiere would use the render files to expedite the export.
Haven’t tried random codecs though so not sure? I always just make a ProRes 4444 Master and make web/broadcast versions from there. I still subscribe to the old school workflow of a Hi Res Master. : )
Christopher:
This is not a safe assumption. Premiere allows you to set Preview files to a different codec than the project, and to output a different codec from the Preview files.
And I TOTALLY agree – export a high-quality master file and use that for all compression.
Larry
“Is transcoding only necessary for highly compressed formats like drone footage or other formats that shoot smaller files sizes due to compression? Because I feel like I’m getting the smart rendering benefit without the transcode step”
As with your R3D footage, transcoding ANY footage to your export requirements (in terms of codec, frame size, frame rate, color space, LUTs, etc.) up front saves you time on the back end when you need to render previews before exporting. You have the added benefit of editing with better editing codecs and, therefore, better performance. Hope that helps.
Hi Larry,
Not sure how to interpret this information for a process that involves multiple source formats? I transcode everything to ProRes Proxy and edit in that. I often output to ProRes LT for w.i.p. screenings. Ultimately, of course, I’ll output highest quality. What should my sequence settings be according to this article? Thank you!
Mark:
In your case, this article doesn’t apply. It applies to projects that contain only a single codec and frame size and no proxies.
Larry