
![]() Philippa asks: Larry, I would love an article that covers keyframe options in detail. For example, what’s the difference between Bezier, Auto Bezier, and Continuous Bezier? For that matter, what is Ease In and Ease Out? It would be much appreciated!
Philippa asks: Larry, I would love an article that covers keyframe options in detail. For example, what’s the difference between Bezier, Auto Bezier, and Continuous Bezier? For that matter, what is Ease In and Ease Out? It would be much appreciated!
Happy to help.
A QUICK DEFINITIONS
We use keyframes whenever we want something to change during playback. Keyframes can be created manually or automatically and keyframes are always set at the position of the playhead in the Timeline.
Because something is changing, we need to create a minimum of two keyframes: a setting for the start of the change and a setting for the end of the change. (This is often called the “keyframe transition.”)
Two typical examples of keyframe use are changing audio levels or changing the size and/or the position of a video clip on the screen. While two is the minimum number of keyframes to create a change, there is no upper limit – you could, if you wanted, put a keyframe on every frame in a video clip.
NOTE: In video, keyframes are placed at the start of a frame. You can’t put two keyframes for the same parameter in the same frame. In audio, keyframes are placed on the audio sample.
Here’s a link to Adobe’s Help page on adding, modifying and deleting keyframes.
VIDEO KEYFRAME OPTIONS
In Premiere, when we add a video keyframe, the options available to us vary depending upon whether the keyframe is for video or audio, as well as the effect being manipulated.
Not all keyframes have the same options, however, Position keyframes have lots.
NOTE: To enable keyframes in Effect Controls, click a gray “stop-watch” icon for that parameter. To delete all keyframes for a parameter, click its blue stop-watch icon.
(Click to see a larger image.)
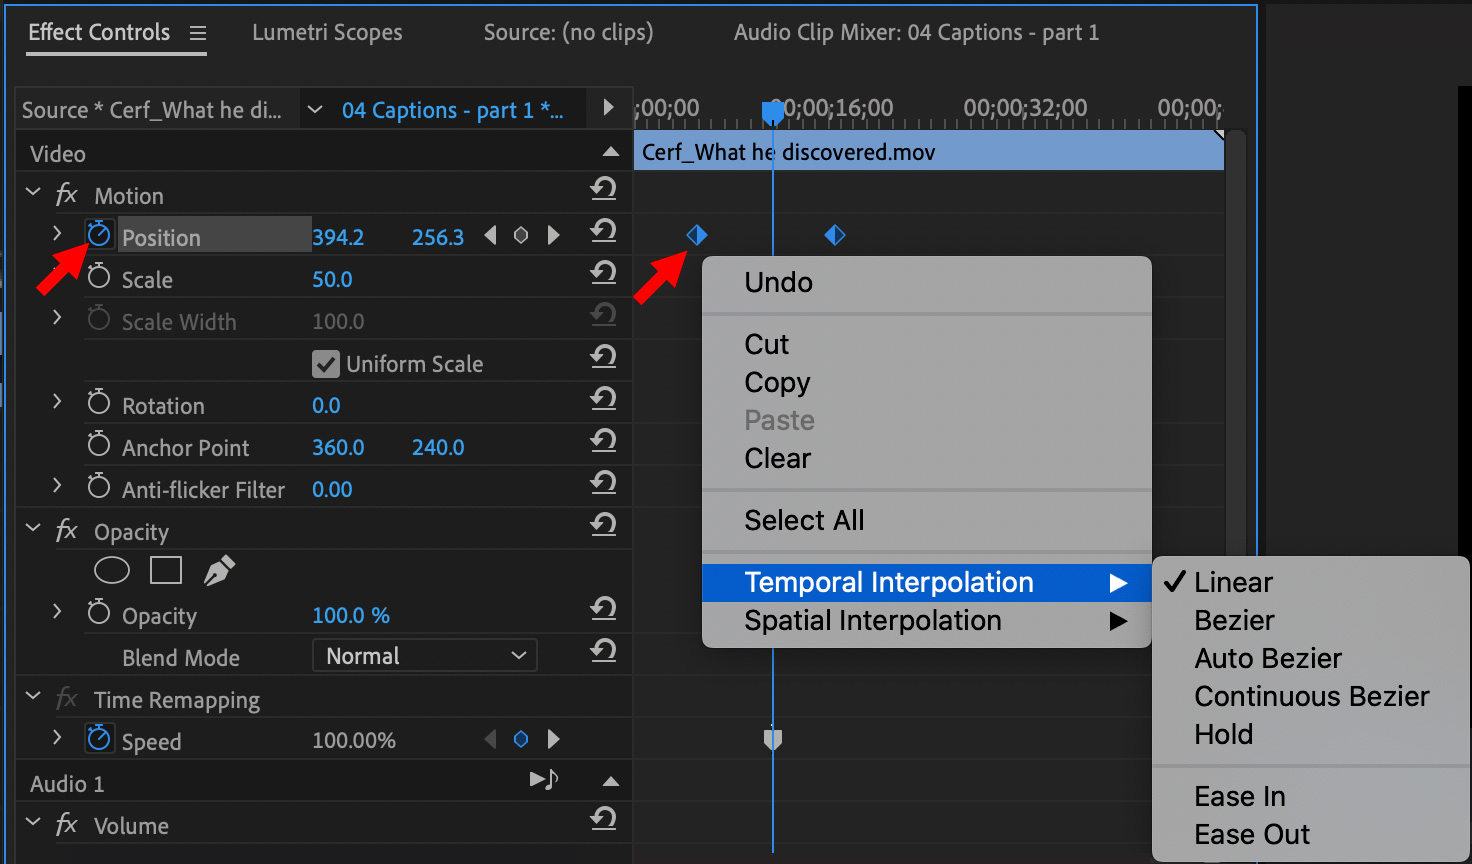
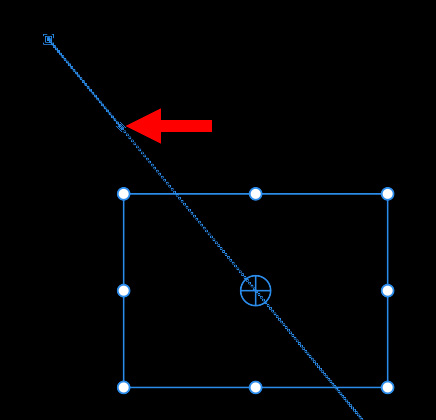
Here, I applied a Position keyframe (left red arrow) to a video clip that I want to move from one part of the screen to another. Control-click a keyframe (right red arrow) for the parameter you want to adjust in Effect Controls and these options appear.
Temporal Interpolation. This applies the selected interpolation method to changes in motion. You can use Temporal Interpolation, for example, to determine whether an object moves evenly or accelerates across a motion path. You can apply temporal interpolation of keyframes to only a few effects in Premiere Pro, mostly in Effect Controls > Motion.
In general, leave this set to Linear. The part of this menu we are most interested in is Ease In / Ease Out, which I’ll talk about in a few paragraphs.
(Click to see a larger image.)
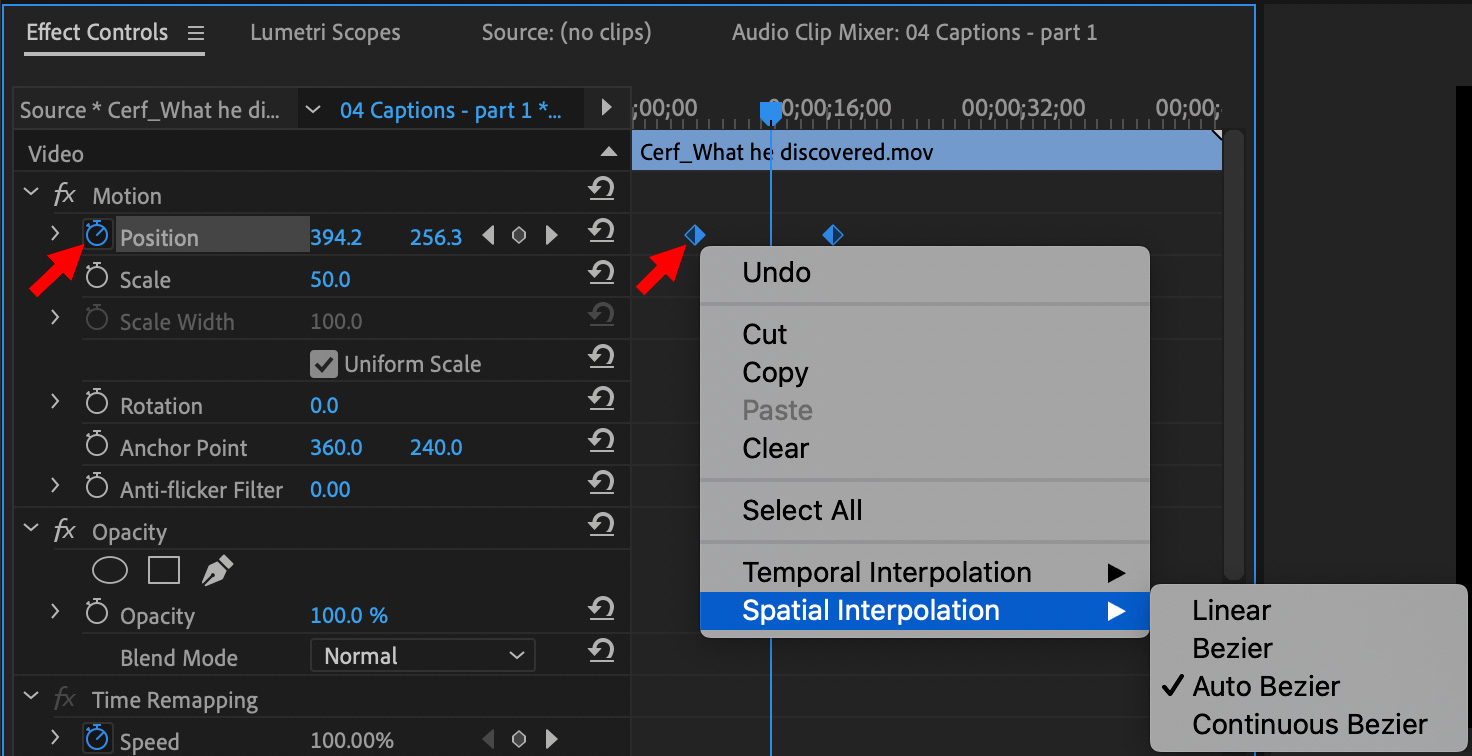
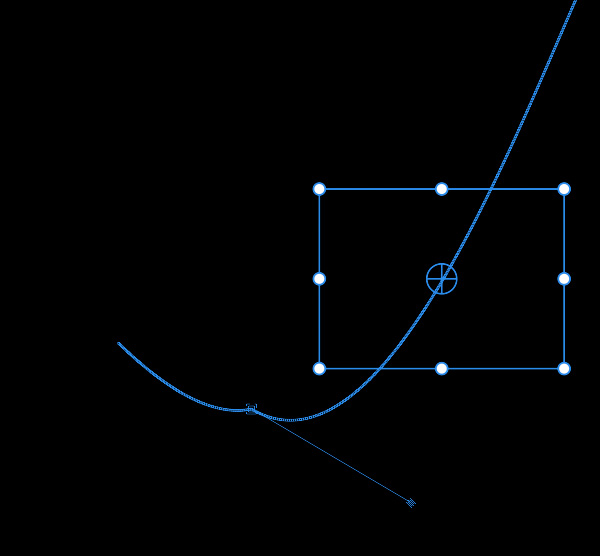
Spatial Interpolation. This applies the selected interpolation method to changes in the shape of the path created by the keyframe. You can use Spatial Interpolation, for example, to determine whether corners should be rounded or angular. You can apply spatial interpolation to the keyframes of many effects in Premiere Pro.
When you want to add custom curves to a motion path, change this to Continuous Bezier. If you need a motion path to turn a sharp corner, set this to Linear. Otherwise, just leave it at the default setting of Auto Bezier.
WHAT THE SETTINGS MEAN
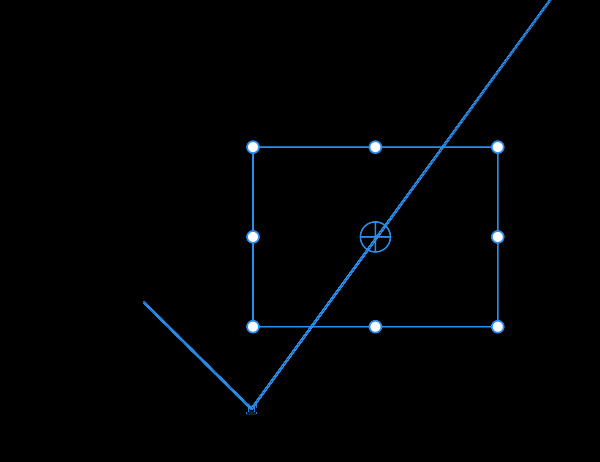
Linear. Creates a movement which does not change in speed from beginning to end. Starts and stops are abrupt. This is the default setting for all temporal effects. When applied to a Spatial Interpolation, it creates sharp corners.
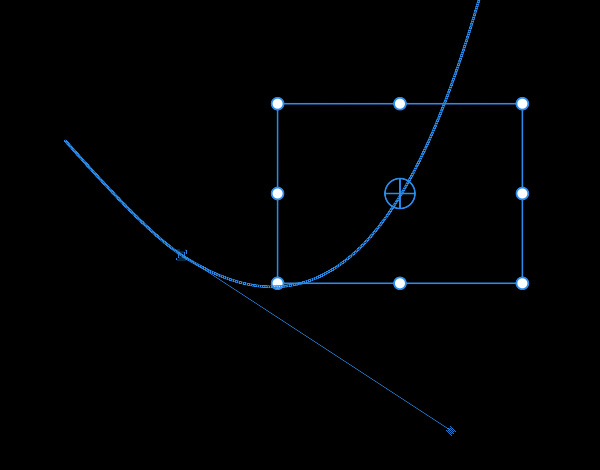
Bezier. Allows the shape or speed of the movement to change during the transition across the keyframe. Linear creates corners, Bezier creates curves.
Drag the blue dot (red arrow) to change the shape of the curve. To activate the blue dot for the left side of the curve, position the playhead before the keyframe in the timeline.
IMPORTANT NOTE: Assigning one of the Bezier settings does NOT add an Ease In / Ease Out behavior. They are assigned separately.
Within the Bezier setting, we have several options:
Auto-Bezier. This sets the shape of the curve automatically. (The Bezier screen shot, above, shows what an Auto-Bezier curve looks like.) This creates a smooth curve through the transition across the keyframe. This is the default option for Spatial Interpolation and, in most cases, it will look fine.
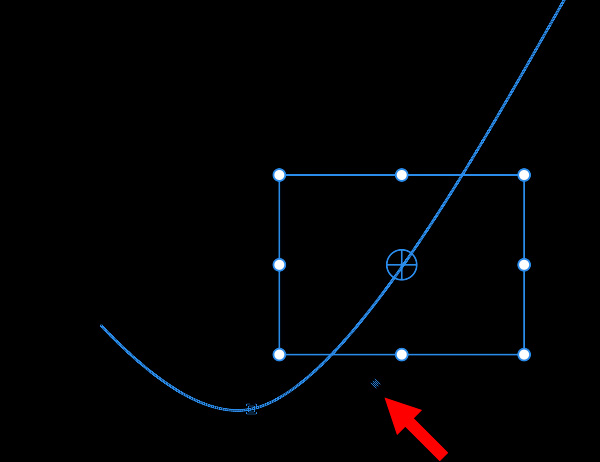
Bezier. This displays one or two small control handles. Drag the dot at the end of the line (red arrow) – it can be hard to grab – to change the shape of one side of the curve.
Continuous Bezier. This applies an Auto-Bezier curve to the transition across the keyframe to create smooth curve. However, we can drag the dot at the end of the line to change the shape and placement of the curve. It’s like an adjustable Auto-Bezier.
Hold. This disables the motion path. When the playhead get close to the keyframe, the selected clip jumps to that position. It’s like “tele-porting.” Poof – it’s somewhere else.
Remember, a keyframe has two sides: going in and coming out. To see control dots for the other side of a curve, move the playhead to the other side of the keyframe.
Regardless of whether you set the path to Linear or one of the various Bezier options, the keyframes object will move smoothly and evenly from the first keyframe to the last. To change the speed of movement, assuming the settings remain the same, move keyframes closer to go faster, or farther apart to go slower.
ACCELERATION vs. DECELERATION
When applying a Spatial Interpolation you are deciding between movement with sharp corners or smooth curves. But you are not changing the speed of the keyframed object. Ease In and Ease Out, however, do change the speed.
NOTE: Speed changes to an effect do not change the duration of the effect, simply the speed with which a keyframed object moves between keyframes.
“Ease In” and “Ease Out” are terms that confuse a lot of people. These determine the amount of acceleration or deceleration as an object nears or leaves a keyframe.
What makes this confusing is that we apply Ease OUT to the first keyframe, then Ease IN to the last keyframe. For example, apply an Ease Out setting to the first keyframe to have the selected object start moving slowly from the keyframe then speed up during the effect. Then, add an Ease In setting to the last keyframe to have the selected object slow down and stop when it reaches the last keyframe.
As long as you don’t add any Ease In / Out settings on any intervening keyframes, the selected object will start slowly, speed up until it reaches a constant speed for the majority of the keyframed effect, then slow down as it approaches the final keyframe, where it then stops.
Ease In/Out settings are hard to see. If you look closely at the red arrow (above) you see a little “knot” in the blue line (red arrow). This dot controls the speed of the Ease Out applied to this keyframe (“Out” refers to leaving a keyframe.) Drag the blue dot along the line to change the amount of acceleration. Don’t drag off the line, or you’ll add a curve to the motion path. (An Ease In setting has a similar “knot” just before the keyframe.)
NOTE: You don’t, generally, apply Ease In / Out settings to keyframes in the middle of a movement. You can, if you want to, but most of the time only change the start and finish.
AUDIO KEYFRAMES
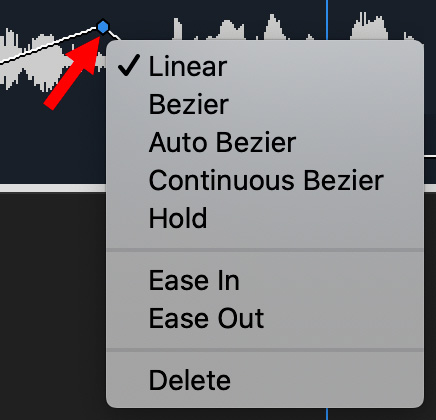
We have the same options when we Control-click an audio keyframe (red arrow). The default setting is Linear and most of the time that’s fine.
However, to add curves to our audio, select Continuous Bezier; this creates an adjustable smooth curve.
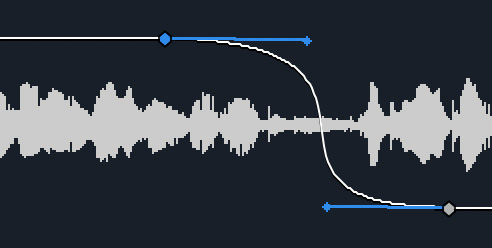
Drag a blue dot to change the shape of the curve to whatever sounds the best.
To reset a keyframe, Control-click the keyframe and select Linear.
SUMMARY
Keyframes create a change during playback. The options we can apply to a keyframe allow us to shape the speed and direction of an effect.
Most of the time, though, the defaults are fine. But, if you like to tweak, playing with Ease OUT and Ease IN are good places to start. It is easy to see the speed changes they create.
Remember, every keyframe can have different settings.

2,000 Video Training Titles
Edit smarter with Larry Jordan. Available in our store.
Access over 2,000 on-demand video editing courses. Become a member of our Video Training Library today!
Subscribe to Larry's FREE weekly newsletter and
save 10%
on your first purchase.
2 Responses to Premiere Pro: Discover the Hidden Controls in Keyframes
The defaults are not fine, not by far! I have been driven into a state of insanity by years of messed upp animations, forced as I am to manualy click and and change every single little keyframe as Premiere auto bezeiers my images wildly all over (and somtimes outside) of the screen. There should be a very simple way to turn on and off the default characterism of a keyframe, when you need the bezier you can easily add it to a linear working animation instead of trying to make a bezier animation, hopping randomly from starting point to just about anywhere between the fix points to end, to work. Just a very tiresamoe matter to change, and rembember to change, every single keyframe you make to linear. A lot of time consuming and completely unnecessary work, in vane and for nothing.
Stargazer:
You make a good point. And I’m sorry the defaults don’t work for you. I think your idea of a global setting for keyframes is a good one.
If you have the time, write up your request and email it to me – Larry [ at ] LarryJordan [dot] com. I’ll forward it to the development team at Adobe.
Larry