
![]() You’ve seen these options at the bottom of dialogs when you create or change sequence settings or export media.
You’ve seen these options at the bottom of dialogs when you create or change sequence settings or export media.
But, what do they mean? (And, in researching this, I found the answers surprisingly hard to find; in fact, Premiere’s Help files don’t include two of these.)
SEQUENCE SETTINGS

Maximum Bit Depth
If you shoot and edit 8-bit video – AVCHD, H.264, DV – leave this unchecked (off).
If you shoot 10-bit, or greater, video, turn this on (checked).
According to the Adobe Help files:
This “maximizes the color bit depth, up to 32 bits-per-channel (bpc), to include in video played back in sequences…. If your project contains high-bit-depth assets generated by programs such as Adobe Photoshop, or by high-definition camcorders, select Maximum Bit Depth. Premiere Pro then uses of all the color information in those assets when processing effects or generating preview files.”
Maximum Render Quality
If the images you are editing are the same size as the images you shot, turn this off. Or, if you are editing highly-compressed codecs, such as AVCHD or H.264, turn this off.
If you shoot images at one size, say 4K, but edit at another, say, HD, turn this on.
Again, from Adobe’s Help files:
This “maintains sharp detail when scaling from large formats to smaller formats, or from high-definition to standard-definition formats. Maximum Render Quality maximizes the quality of motion in rendered clips and sequences. Selecting this option often renders moving assets more sharply.
At maximum quality, rendering takes more time, and uses more RAM than at the default normal quality. Select this option only on systems with sufficient RAM. The Maximum Render Quality option is not recommended for systems with the minimum required RAM.
Maximum Render Quality often makes highly compressed image formats, or those containing compression artifacts, look worse because of sharpening.”
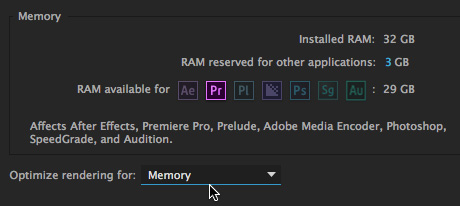
If you use Maximum Render Quality, you’ll need at least 16 GB of RAM. Then, in Preferences > Memory, dedicate all but 3 GB to Adobe applications and set Optimize Rendering for to Memory.
Composite in Linear Color
Adobe’s help files don’t cover this, at all. So, I found the answer on Creative Cow, written by Walter Soyka:
“Checking this box changes the mathematics used when blending images. It’s very common to [use] linear light in dedicated compositing workflows. Linear light will give you a very different look, usually with more natural-looking blends, but please note that some people find cross-dissolves in linear to be objectionably abrupt.
“See here for some background on linear light from Chris and Trish Meyers. Also, here’s my blog with more explanation and Premiere presets.
“Specifically to Premiere Pro: when using the GPU, Premiere always blends in linear light. You can use this checkbox to ensure that CPU-based renders will match GPU-based renders.”
EXPORT SETTINGS

You’ve seen these choices at the bottom of the screen every time you go to export a file from Adobe Premiere Pro. If you are like most editors, you check them, or don’t check them, and hope that you are making the right decision.
So, let me reduce some of this “stress of the unknown” and explain what these are and how to use them.
Use Maximum Render Quality
Maximum Render Quality is only used when you are scaling footage during export; or when you are deinterlacing footage. Additionally, this requires the Mercury Playback Engine for rendering during export.
Ideally, you should export the same frame size and frame rate as the sequence, in which case, this option can be turned off.
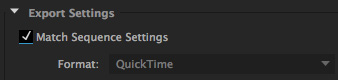
Also, keep Maximum Render Quality turned off when you export using Match Sequence settings at the top of the export window.
Use Previews
Previews are another word for render files. Checking this option allows you to use existing render files during export.
I’m of two minds about this. Checking this option results in faster exports, so if speed is your goal, check this option.
However, when this is not checked, Premiere will regenerate all new render files during export. I tend to prefer this because this way I know that all my changes are reflected in the export. However, enabling this option means that final output will take longer.
Import Into Project
This option takes your just-exported project and imports it into your project.
This option can save time when you are creating, say, a complex open for a series of shows. Rather than waste time rendering and exporting this repeating element for each show, you can check this box, export it once and have the exported file automatically imported back into your project. This process, called “baking,” means simplifies and speeds future editing.
If you are creating the master file for distribution, though, this box can be left unchecked.
Set Start Timecode
By default, all Premiere sequences start at timecode 00:00:00:00. While you can’t set a custom timecode when you create a new sequence, you can change it during export. This setting allows you to do just that.
If you are going to the Web, you can ignore timecode; the default setting is fine.
However, most shows that are laid back to tape start at timecode 01:00:00:00, to allow room for pre-show materials such as color bars and slates. Also, I’ve seen that many shows that originate in Europe start at timecode 10:00:00:00, as a way to differentiate EU shows from US shows.
NOTE: A timecode number uniquely identifies each frame of video and expresses time as a series of four number pairs: hours:minutes:seconds:frames.
Metadata
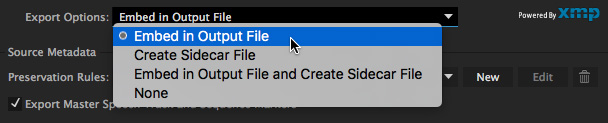
The Metadata export dialog is only relevant for XMP files.
This allows you to choose whether you want to include metadata in the exported file, attach it as a “sidecar” file – A sidecar file a file with the same name as your media file, but a different extension that is stored in the same folder – or not include any metadata at all.
If you aren’t working with XMP files, you can ignore this dialog. If you are using XMP, please consult with the team receiving your media how they want metadata treated; there’s no one answer that is perfect for all situations.
Time Interpolation
This setting only takes effect if you are changing the frame rate of the exported file when compared to the frame rate of your sequence.
As the Adobe Help files state:
“The Time Interpolation settings allow you to change the frame rate of the exported file by leveraging Optical Flow to interpolate the missing frames. For example, if you have a 30 fps footage that you want to export at 60 fps without repeating every frame, you can export the media with the Optical Flow option in the Time Interpolation drop-down box selected.
“In some footage, using Optical Flow for creating smoother motion may not produce the desired results. In such scenarios, you can use one the other time interpolation options–Frame Sampling or Frame Blending. Frame Sampling repeats or removes frames as needed to reach the desired speed. Frame Blending repeats frames, but it also blends between them as needed to help smooth the motion.”
If you aren’t changing the frame rate during your export, leave this setting at “Frame Sampling.”
SUMMARY
These settings can make a material difference in editing speed and image quality. It would be nice if Adobe made these answers easier to find in their Help files.

2,000 Video Training Titles
Edit smarter with Larry Jordan. Available in our store.
Access over 2,000 on-demand video editing courses. Become a member of our Video Training Library today!
Subscribe to Larry's FREE weekly newsletter and
save 10%
on your first purchase.
17 Responses to Premiere Pro CC: What the Heck Do These Image Export Options Mean?
Setting time code start correctly is critical if you will be adding closed captions via a sidecar timed text file. Final Cut defaulted to 01:00:00:00, so you had to remember to reset the sequence start to match (usually 00:00:00:00) when captioning was involved.
Stabilizing footage almost always results in upscaling. Should one set Maximum Render Quality to ON following the considerations you made?
In case of highly compressed footage there is certainly a tradeoff as for what is looking better. Shaky but soft vs smooth motion but sharpened.
Anyway thanks for the detailed explanation.
Klaus:
I hadn’t considered Maximum Render Quality in this context. But, you are correct. It makes sense to turn it on when you are stabilizing footage by zooming into the image.
Larry
Thanks! Helpful info all in one place.
Sidecar is where you park the caption files.
Hi, should I check ‘MRQ’ if I am using Red Giant’s Instant 4K upscale? I upscale the clip, then it matches the export, but, you said if seq and export match, no need for MRQ? But also say, if scaling, I should use MRQ? 🙂 Talk me down from this ledge. Thanks!
Leticia:
First, get down from the ledge. This is only video editing, for heaven’s sake. Second, I’ve never heard the term “MRQ.”
What I recommend is to contact the folks at Red Giant – they will explain what this is and how to use it.
Larry
You’ve never heard the term “MRQ” ?? Maximum Render Quality” Anyways, you stated to use MRQ when downscaling, I was interested to know if I should use it while upscaling as well.
Leticia:
Smile… I’ve heard of “Maximum Render Quality.” I’ve just never seen it abbreviated. Thanks for explaining.
You ask an intriguing question. I did some homework and wrote an article that answers your question more fully:
https://larryjordan.com/articles/adobe-premiere-pro-cc-when-to-use-maximum-render-quality/
Thanks,
Larry
I want to create a 50 frame progressive video from my 25 FPS interlaced footage. What time interpolation options should I choose if I want Premiere to create a frame out of every field? Thanks.
German:
Hmmm…. you won’t like the results. But, use Adobe Media Encoder to change the frame rate from 25 to 50. Fields should be set to None.
Larry
Heya, if I use ‘optical flow’ throughout my timeline, and then when exporting leave the option at ‘frame sampling’ – will it discard the optical flow used in the sequence?
Thank you 🙂
Mac:
No. It should use the rendered Optical Flow.
Larry
“By default, all Premiere sequences start at timecode 00:00:00:00. While you can’t set a custom timecode when you create a new sequence, you can change it during export.”
Apologies if I have misinterpreted this. You can actually set a sequence start timecode, either at the time you create the sequence or subsequently.
You go to the menu, next to the sequence name, at the top left of the Timeline panel. From the drop-down menu select Start Time. Here you can modify the sequence timecode. This is a much easier timecode customise option than those offered by Avid Media Composer, for one.
Paul:
Thanks for your comments. When I first wrote this review, back in 2016, entering timecode when creating a sequence was not possible. I’m very glad Adobe added that option between then and now.
Larry
On “Use Previews” I’m not so sure that Premiere always uses them on export. I applied the Neat Video Reduce Noise V5 filter to a few clips. I rendered the files in ProRes LT, however when exporting to H.264 with “Use Previews” checked, the export slowed down dramatically at clips with the Neat filter applied. It was as if the render was happening again. If I exported in the Preview format, ProRes LT, then there was no slow down. This leads me to believe, and the folks at Neat seem to agree that the Use Preview setting only works if your not transcoding from the Preview format. Any thoughts?
Lee:
A better way to think of this is Premiere will use Previews “if nothing changes.” You are transcoding ProRes LT into H.264. Re-rendering will occur.
Larry