
![]() It hasn’t drawn the attention of the new Morph Cut, or the new Lumetri Looks, but the recent addition of project consolidation and transcoding to Premiere Pro CC is a big deal. This is because it simplifies our ability to archive projects, or allows us to optimize existing projects for better playback.
It hasn’t drawn the attention of the new Morph Cut, or the new Lumetri Looks, but the recent addition of project consolidation and transcoding to Premiere Pro CC is a big deal. This is because it simplifies our ability to archive projects, or allows us to optimize existing projects for better playback.
Project consolidation is the easiest way to gather all our project assets into one location for archiving or long-term storage. These archives are stored in a folder that you select, in standard media and Premiere formats. No data compressing or file zipping is involved. (Though you can do that after consolidation, if you wish.)
Transcoding allows us to take all the different video formats that we expect to use, or are currently using in a project, and convert them all to the same format. This can speed playback, decrease export times and assure that all our clips meet the same technical specs.
Let me illustrate, using my latest project – Totally Spaced – as an example. This stunning romantic horror space western is gonna win awards in the future, so I want to preserve it. You know, just in case…
CONSOLIDATE A PROJECT

With my project file open in Premiere Pro CC, choose File > Project Manager. This opens the Project Manager window.
Here, we can do two things:
In both cases, sources files are not altered or moved.
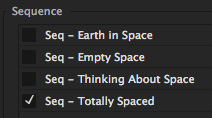
To start, select the sequences you want to archive. (Shift-click any checkbox to select all sequences.)
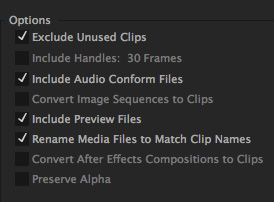
Next, determine which of these options you want to include:
Renaming is an organizational issue. It has zero effect on image quality.
NOTE: Consolidating copies entire clips. Even if Exclude Unused Clips is selected, if a portion of a clip is used in the project, the archive will contain the entire source clip. Copying the entire clip prevents image degradation which might be caused by copying a portion of a clip.
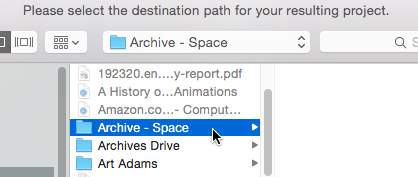
After setting the Options, click the Browse button to pick, or create, a new folder to store the archive in. In this example, I’m using the Archive – Space folder. Archive folders can be named anything and stored anywhere; assuming you have enough storage space on that location.
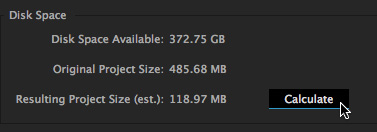
To see how much storage space you need, click the Calculate button. In my example, the archive will take about 118 MB of space. (Um, yeah, there are not a lot of clips in my project…)
Click the OK button to create the archive.
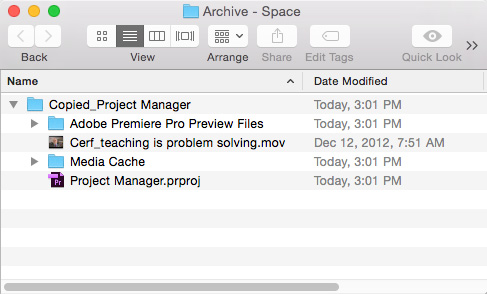
The archive was created in the selected folder, containing all used media files, a new Project file which is linked to the new media locations, plus all preview and cache files.
NOTE: Project Manager does not collect and copy After Effects compositions that are dynamically linked to an Adobe Premiere Pro project. Project Manager does save the Dynamic Link clip in the trimmed project as an offline clip, however.
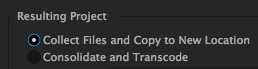
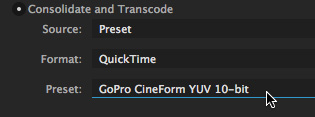
CONSOLIDATE AND TRANDSCODE
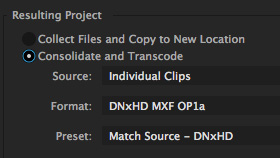
Both Collect Files and Consolidate and Transcode gather your clips from wherever they are and store them in a new location of your choosing. However, the Transcode option allows you to easily convert the files into a “mezzanine” codec which is often a better choice for editing than the camera native file.
NOTE: Transcode means to “convert.” You transcode clips to convert them into a different video or audio codec/format.
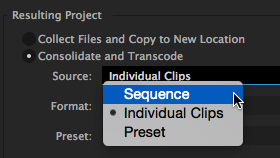
When Transcode is selected, you can specify which format you want the clips converted into.
Sequence is the best choice if your sequence settings exactly match your final deliverable.
Individual clips is the best choice to convert a variety of clips into a common codec, without altering other clip settings in each clip.
Preset is the best choice if you have a wide variety of clip formats and you want to convert them into a high-quality mezzanine format to preserve as much image quality and editing flexibility as possible.
There is no one “right” choice that works for all, but my general preference is to use the Presets option.
If you are struggling to figure out which Preset to select, here are my recommendations:
If you are on a Mac:
If you are on Windows:
The GoPro Cineform codecs are excellent and are designed for transcoding.
NOTE: Using the GoPro … at Maximum Bit Depth setting will create the largest files with potentially the highest image quality. However, unless you are using high-end cameras with professional film lenses, you probably won’t see a difference between the two Go-Pro settings.
TRANSCODE OPTIONS
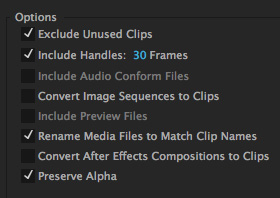
NOTE: The only preset that supports alpha channels is the GoPro CineForm With Alpha preset. All other presets flatten (remove) any alpha channel.
As with Consolidation, select a storage location and click OK.
NOTE: As with Consolidate, when transcoding, entire clips are transcoded, even if you are only using a portion of the clip in the selected sequence.
SUMMARY
The Project Manager is a powerful tool to gather all the different project elements into one place for final archiving. And the ability to quickly and easily transcode media into a single unified format from within Premiere is a huge benefit over having to use a separate utility for file conversion.
For both these cases, Project Manager is worth learning about.

2,000 Video Training Titles
Edit smarter with Larry Jordan. Available in our store.
Access over 2,000 on-demand video editing courses. Become a member of our Video Training Library today!
Subscribe to Larry's FREE weekly newsletter and
save 10%
on your first purchase.
44 Responses to Premiere Pro CC: Understand Project Manager
← Older Comments-
 William Julião says:
October 5, 2016 at 5:18 am
-
 Larry says:
October 5, 2016 at 6:42 am
-
 Tess says:
January 25, 2017 at 9:05 am
-
 Larry says:
January 25, 2017 at 8:58 pm
-
 Randall Martin says:
February 23, 2017 at 11:26 am
-
 Larry says:
February 23, 2017 at 2:36 pm
-
 Randall Martin says:
February 23, 2017 at 5:01 pm
-
 Larry says:
February 23, 2017 at 5:03 pm
-
 Kath says:
June 23, 2017 at 1:25 am
-
 Mark says:
July 13, 2018 at 11:10 am
-
 Naveed Ahmad says:
May 28, 2019 at 6:14 am
-
 Larry says:
May 28, 2019 at 7:55 am
-
 JDB says:
December 19, 2018 at 3:59 pm
-
 Larry says:
December 19, 2018 at 5:09 pm
-
 Rich Mqrchewka says:
February 4, 2019 at 10:23 pm
-
 Larry says:
February 5, 2019 at 10:22 am
-
 Tim Tewell says:
August 8, 2019 at 7:13 am
-
 Larry says:
August 8, 2019 at 10:57 am
-
 Brett Hansen says:
August 12, 2019 at 4:33 pm
-
 Larry says:
August 12, 2019 at 8:44 pm
-
 brett hansen says:
August 13, 2019 at 9:05 am
-
 Larry says:
August 13, 2019 at 9:21 am
-
 brett hansen says:
August 13, 2019 at 10:52 am
← Older CommentsThe Premiere CC collect function definitely doesn’t work. It copies the media to a new location, if the files have the same name it generates a copy with an underline,for example, 00004.MTS, 00004_1.MTS, however, this new renamed copy does not match the file that should be, that is, 00004_1.MTS is equal to 00004.MTS. Any help??
William:
I don’t have an immediate answer – I suggest you contact Adobe Support. If this feature really is broken, Support will notify the product team to get this fixed.
Larry
Thanks this was helpful!
But for the transcode function it seems like if the original setting is a Apple ProRes codec/Quicktime format, it can’t perform the transcode function. I saw that you noted that “When the source format cannot be matched, the clip is only copied and not transcoded” – do you know why this is or a way around this?
Tess:
You are correct. Transcoding is only necessary for video formats (codecs) that are not optimized for editing. ProRes, AVC-Intra, Cineform and others are already optimized so no transcoding is necessary.
Larry
I would like a list of the locations of the raw files in my premiere project. Is there software for this? it seems like it ought to be a part of Project Manger, but doesn’t seem to be.
Randall:
Easy to do.
After your clips are imported, go to the Project panel.
Right-click any of the column headers – for example “Media Start” or “Media End” – and click Metadata Display.
In the list that appears, twirl down “Premiere Pro Project Data”.
Check the box for File Path, then click OK.
Now, every file in the Project panel will display the path to the source file. (You may need to widen the column by dragging a dividing line between column headers to see the entire text.)
Larry
Larry,
Great!!! Been looking for that for a long time. Being very disorganized, this gets pretty close to what need.
As Columbo says: “One more thing.”
Is it possible to save the list to something like Excel, word, or just print it?
Thanks very much!
I don’t know of any way to print it – other than screen grabs – or export it. But doesn’t mean it can’t be done.
See what a Googles search tells you. Adobe is pretty flexible with its metadata.
Larry
Hi Larry, thank you for the description! I am searching the internet to find a solution for a problem with the project manager that I have. It does not collect files just from the sequence that I select but it collects the whole project, which is huge. Do you know anything about an issue like that? Thank you very much!
Checking the “Exclude Unused Clips” button should limit it to just the clips used in your sequence(s)
I’m having the same issue, but even with “exclude” checked, it copies everything. Any idea why?
Naveed:
Nope, no clue. Time to call Adobe Support.
Larry
Is there any way to only export parts of the clips in the sequence? I don’t understand why they even give an option of handles since the entire video clip is transcoded and consolidated. I am prepping a sequence for color correction.
JDB:
If you are prepping files for color grading, try exporting an XML file – no media involved and DaVinci Resolve can easily read it.
Larry
I am prepping for telecine for resolve but need to transfer video via ftp for someone else is correcting.
I too would only like to give 1 second of handles and not the whole take. Is that possible? Also, is there a way that it is taking the original shoot ftg (arri) and giving that as a source? Or is what the timeline is set to?
Rich:
The only way to limit handles is to copy all your media, which raises the possibility of artifacts and errors lost due to making a copy.
As to using the source footage, this depends upon how you created your copies, whether file names and timecode match and where the files are stored. The answer is “potentially yes, depending…” Your colorist will have good advice on the best way to do this, as well as the best way to set the timeline.
There’s no one process that works for everyone.
Larry
Thank you for spreading the knowledge. You are a warrior for sure.
I would like to contact someone in your comments section to see if he figured out a solution for collecting with handles without transcoding. We have RED footage with long slo-mo takes and would prefer to NOT transcode. It’s such a simple tweak I am not sure why adobe would NOT include that feature.
Maybe send him my email / web info and he can txt me from my # on my website if he is interested in talking it out.
THANKS again for your time and attention.
Tim:
Send me an email directly and I’ll forward it to my contacts at Adobe and see what we can learn.
Larry
Hi Larry,
After collecting all the necessary files and copying them to a new location, is there a way of locating and deleting all of the old asset files linked to the orginal project?
(Assuming the assets are spread all about your computer and not neatly placed in an assets folder as they probably should be).
Brett:
Yes, but not easily. Premiere does the safe thing and COPIES media to a new location.
To locate the source, right-click (or Control-click) on each clip and choose Reveal in Finder.
Larry
Thanks Larry, allow me to elaborate on my issue that I am trying to resolve…
I have a large documentary piece completed and I am looking for a simple way to archive it in its own fully self contained folder. In genera, the project along with all of its assets are organized within a large master folder, but over time some assets are linked to the project from outside of the main folder in various places (locally, on network space and on external hard drives).
Aside from right clicking each clip and revealing each file in Finder from Premiere, because that would take a very long time. Is there a way to force Premiere to only look for media assets to link to within a specific folder i.e. the Main Project folder? This would result in a number of media files that are unlinked within the project, but that way I can determine which media assets are linked to files located outside of the Main Folder and subsequently move them into it.
Or is there a different method that you might suggest?
Thanks again Larry
Brett:
Hmm… What just occurred to me is, AFTER you consolidate all your media into a new folder and drive, RENAME the old master folder.
This will unlink all clips inside it. Only those clips that are OUTSIDE the master folder will still be linked in your project. This will make it much easier to find the outliers without having to review all your content.
Larry
LARRY I LOVE THIS SUGGESTION!!
But Alas, it appears that Premiere has become far too smart for such a simple (yet genius) trick.
I changed the name of the master folder and then (just to be extra tricky) I created a folder inside of that where I placed the contents of the project. Then opened the project and despite it taking extra long to load up, It opens flawlessly without any unlinked media. Premiere you are too good.
Do you have any other suggestions by chance, Larry?