 There is a non-obvious dialog that I want to show you in Adobe Premiere that makes setting audio levels fast and easy. And, along the way, I’ll explain a technique you can use to avoid distortion and still have great sounding audio.
DEFINITIONS
The first and most important rule about audio levels is:
Audio levels must not exceed 0 dB during export for any reason. Doing so causes distortion and bad audio, which can’t be easily fixed – if at all.
NOTE: Many times, during editing, audio levels may exceed 0 dB because you aren’t always paying close attention to audio. Damage to your audio does not occur until export.
In this article, I’m going to use two terms a lot:
NOTE: We use gain, volume, level and loudness almost interchangeably; though there is a subtle difference in meaning between them. For this article, I’m using gain.
Yeah, I know, that second definition is a doozy. But it does a lot and its worth learning about.
SETTING GAIN
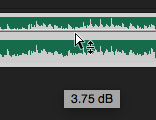
As most of us know, the easiest way to set gain is to drag the audio “rubber band” inside an audio clip up or down. (To make it easier to see the rubber band, I added the cursor arrow in the screen shot above.)
This works fine – EXCEPT, remember that rule above that states that audio levels can’t go above 0 dB? Well, how do you know that you haven’t increased the audio gain so much that it creates distortion?
NOTE: You can also adjust levels using Effect Controls. As long as you don’t add keyframes, the result is the same as if you were dragging the audio rubber band. And keyframes are outside what I want to cover in this article.
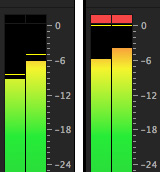
Right. We watch the audio meters. As long as the bouncing meters stay below 0 dB we are safe. However, if the red clip light above each audio channel lights, that means that the audio is too loud and will create distortion during export.
This system works fine – except that we need to play the entire audio clip to be sure that levels are safe – there’s no easy way to jump to a timeline location where the audio mix is too loud.
In other words, this works but it takes time to verify that levels are OK.
SETTING GAIN – FASTER
There’s a faster – though much less obvious – way to set gain: use the Gain Dialog.
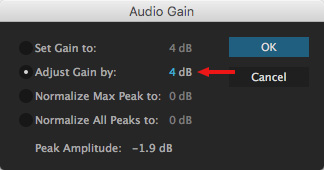
Select the clip, or clips, for which you want to adjust the audio gain and type G. This opens the Audio Gain dialog.
There are four choices here:
These two settings are, essentially, faster ways to drag the audio rubber band up or down. In both cases, they set the audio level for the entire clip by the same amount. And, in both cases, they don’t pay any attention to whether the setting you just dialed in might cause distortion.
These are very helpful, especially in making global adjustments to a group of clips. But, at their core, they are simply faster ways of doing what you were doing manually.
THE POWER OF NORMALIZATION
The huge benefit to normalization is that it takes into account the loudest portion of each clip BEFORE it sets audio levels. This means that, using normalization, it is impossible to raise the gain of the selected clip(s) so much that they distort.
NOTE: While normalization prevents against distortion in a single clip, it does not prevent distortion caused by a mix that’s too loud.
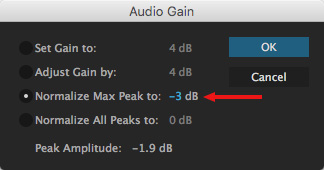
For me, “Normalize All Peaks to.” is the truly powerful setting. Select all clips, type G, set a normalization level and click OK. Poof. In an instant, all the selected clips are close to the same level.
I have two rules that I generally follow when I’m normalizing levels for a video project:
My final mixes tend to create peaks that hover between -3 and -6 dB. This generates loudness levels around -20 dB.
Normalization is a really fast way to set levels quickly and know that they are not going to distort.
LIMITATION
Normalization has one big limitation – it can’t tell the difference in a peak caused by someone talking excitedly and a cough. So, if you have a soft-spoken individual who coughs, normalization is going to adjust levels based on the cough, not on the overall levels of the person talking.
NOTE: This is a BIG benefit of using a Limiter filter, which I write about here.
SUMMARY
When speed is everything, and distortion is not an option, normalization can wrangle all your selected audio clips and even out their audio levels in a heartbeat. Limiter and Multiband Compressor filters will do a better job of evening out audio levels within a clip, but nothing is faster at setting safe levels across clips than normalization.
2,000 Video Training Titles
Edit smarter with Larry Jordan. Available in our store.
Access over 2,000 on-demand video editing courses. Become a member of our Video Training Library today!
Subscribe to Larry's FREE weekly newsletter and
save 10%
on your first purchase.
17 Responses to Premiere Pro CC: Gain vs. Normalization
Hi Larry
I have Pr set to FCP7 Keyboard with some custom clicks. the – G – does nothing in my settings. I see no pulldown menu for using the Gain Dialog.
Please fill us in on what keystroke or menu it hides in.
Thanks
Jim Fink
Jim:
Clip > Audio Options > Gain — or, open Keyboard Shortcuts, search for “Gain” and create your own shortcut.
Larry
If you’re replicating FCP shortcuts in Premiere, (there’s plenty to add!) Command-Option-L brings up the Opacity/Gain Levels dialog, depending upon which track is selected. By comparison, the Premiere dialog which comes up is richer, as shown above.
Nice tutorial, Larry!
Hi, where is Normalize to 0LU (-23LUFS)
This is so important for broadcast.
Thank you.
Timmy:
When you start thinking about Loudness, the Multiband Compressor is a better choice than Normalization. And, don’t forget to use the Loudness Radar to measure loudness levels accurately.
Larry
for -23LUFS it is better to go to AUDITION and throw in the limiter that you can set to -23LUFS separately, if you wanna stay in premiere pro and not use audition, throw in the limiter and set it to -11dB (usually it’s around -10dB but I get away with -11dB everytime
Joseph:
Hmm… the audio engine and audio effects are essentially the same between Premiere and Audition (at least in recent versions). Your settings should be the same.
Larry
I think normalising all peaks to max peak is really not a good idea in almost all instances. Most shooters will be recording some room and folly sounds inadvertently with the dialogue. Normalising in any way other than manually, carefully, taking many, many hours would cause no end of inappropriate background noises to burst through unwanted.
Like many things in life, only patience, hard work, an ear for detail is going to produce an acceptable set of audio tracks for a good movie. All indie films struggle with sound. Camera and picture is easy, but sound… well that is an issue which would occupy a complete training course. mol
Mol:
I agree, in theory. The more time you have, the better your audio. But for people on extreme deadlines: news, same-day wedding videographers and others where the luxury of time does not exist, normalization can speed audio processing without causing distortion.
There’s no single, perfect technique for all situations, but normalization can help.
Larry
Hi,Larry :
Thanks for your explanation. I have another question. If I want to adjust the volume of some specific fragments of clips(like soft sound which could not be heard) and those fragments do not be split out, how should I do?
I have too many clips to split all of fragment whose sound is too soft to be heard so I want know whether I could adjust volume by fragment not by clips.
Thanks you so much.
Richard:
This is what audio keyframes were invented for.
Larry
Hi,
There doesn’t seem to be any way to clear normalisation in a project back to the clip’s original level. If you have hundreds of clips normalised while you edit, and plan to send it off to the sound mixer, he or she will not want your normalisation. You will be stuck replacing all clips from the source bin which can take a very long time. Do not normalise if you intend to do a sound mix later.
Ken
[…] https://larryjordan.com/articles/premiere-pro-cc-set-gain-vs-normalization/ […]
[…] Jordan has written an article that explains more in-depth what this dialogue does. Thank for sharing, […]
Hi, Larry. First, sorry for my English, I’m from Russia.
I have a question. When I put my video into Premiere Pro timeline, the sound in it gets more quiet than in original file, when I play it in operation system.
Then I record my voice, adjust it to -12 dB (because the dictor’s voice that I muffle to make it quieter) is about that gain in Premiere.
But, when I extract the new video, the volume is get higher again and my voice is getting higher too.
I looked for system’s volume in system mixer, it’s ok. I don’t know what to do, because I can’t to adjust volume.
Ruslan:
Smile. I was an abject failure in Russian at college. Your English is FAR superior to my Russian…!
This sounds like you are moving a mono clip into a stereo track or sequence. This would cause a 3 dB dip in volume. Also, the settings for audio volume in the operating system may be louder than the audio levels in Premiere Pro.
Here’s a good way to check. Generate bars and tone in Premiere – https://helpx.adobe.com/premiere-pro/using/creating-special-clips-synthetics.html –
Make sure levels are at 0 dB, or some other recognizable level.
Export the file. Listen to it in the operating system, does it sound the same?
Then, reimport the file and measure the levels in Premiere.
This allows you to make sure – using reference tones – that the levels you are hearing in both Premiere and the operating system match, and that Premiere is able to export and import media without changing the level.
Larry
This was a fantastic read! Your passion for the subject matter really shows and makes the content all the more compelling.