
![]()
[Nov. 27, 2016, updated throughout with information geared for the web.]
NOTE: The Loudness Radar is also available in Adobe Audition. Its interface, operation and settings are identical.
Ed Golya, the Emmy-award-winning audio mixer for the Digital Production Buzz, and I would often get into a discussion on how “loud” the Buzz should be. Based on my background I look at the waveforms. Based on Ed’s experience, he listens. This difference provides an interesting basis to our discussions.
BACKGROUND
The basic rule – that audio levels should not exceed 0 dB during export – continues to hold true. But there are new rules on loudness in both the EU and the US that now come into play.
NOTE: In the US, loudness levels are set by the CALM Act (Commercial Advertising Loudness Mitigation Act). “In its final form, it restrains itself to ‘incorporating by reference and making mandatory… the ‘Recommended Practice: Techniques for Establishing and Maintaining Audio Loudness for Digital Television’ (A/85), and any successor thereto…” This Recommended Practice, known as ATSC A/85, was generated by industry practitioners entirely independent of the government, actually prior to the law’s creation.
“So we’ve been ordered by the government to obey our own internally developed recommended practices for the management of loudness in television broadcast and distribution. (Dave Moulton – TV Technology )
The basic goal of these rules is that the average loudness of commercials, programs and interstitials should sound about the same. Unlike peaks, which measures the instant-by-instant maximum audio level, loudness measures the average level over time, measured in LKFS. (Average levels are about 20 dB lower than peaks.)
Definition: LKFS. Loudness, K-weighted, relative to nominal full-scale. LKFS is an amplitude level, based on dBFS and measured as LUFS (Loudness Unit, Full-Scale). 1 LUFS is, essentially, the same as 1 dB.
While it is easy to get lost in the technical details, for this article I want to show you how to measure loudness and, more importantly, how to use those measurements to improve the quality of your sound while staying within legal limits.
NOTE: If you are mixing programs exclusively for the web, this meter is even more helpful, but the settings are different. I’ll discuss web settings throughout.
THE LOUDNESS RADAR
In both Adobe Premiere Pro CC and Adobe Audition is a special filter – called the Loudness Radar. The Loudness Radar is a tool that allows us to measure average audio levels over time and, if applied to the master track, to see the audio levels for our entire project at a glance.

While the Loudness Radar can be applied to any clip or track, I recommend you apply it to the Master track; because, after all, you want to measure the loudness of your entire mix. To do this, select Window > Audio Track Mixer.
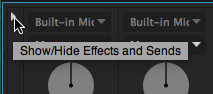
To reveal the FX section of the mixer, click the small, white, right-pointing triangle in the top left corner of the mixer.
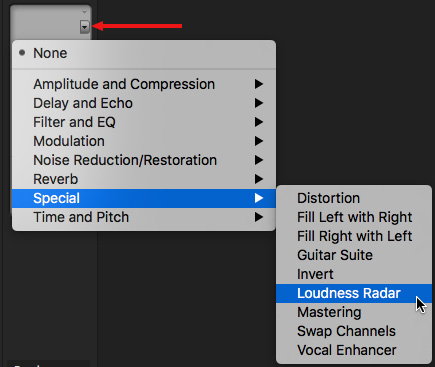
This displays both FX and Send sections above every track. In the top portion of the Master track (all the way to the right) click one of the small triangle to reveal effects filters that can be applied to a track. Select Special > Loudness Radar.
NOTE: To remove a filter, click the small arrow, again, and choose None.
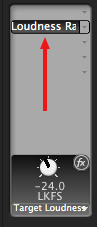
This adds the filter to the Master track.
NOTE: There are five effects slots, or positions, in each track. Make sure that the Loudness Radar is below any other filters, to allow you to properly measure the results of their effects. In this example, I’ve applied it to the second slot. If you are only applying this one effect, you can use any of the five slots.
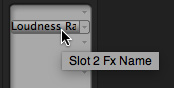
To view the Radar, double-click the text “Loudness Radar” in the effects slot.
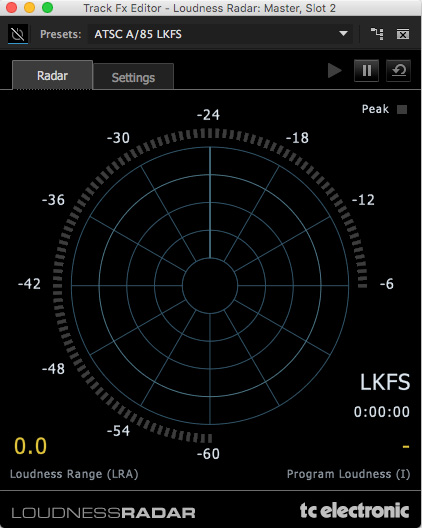
This displays the Radar itself. Yup. Its big. Feel free to move this wherever you have room – including a second monitor.
NOTE: To display the Loudness Radar in Audition, select a track – I generally use the Master Track because I want to monitor my entire mix. Then, in the Effects Rack, choose Special > Loudness Radar.
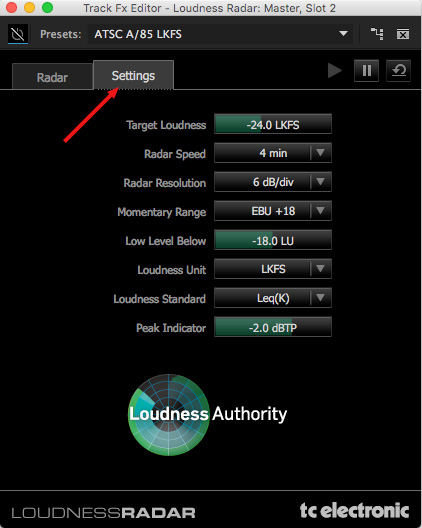
Click the Settings tab at the top to see the settings for the Radar. If you are measuring this for broadcast, the default settings are fine.
For the web, change Target Loudness to -16 LKFS. The rest of the settings are fine as is.
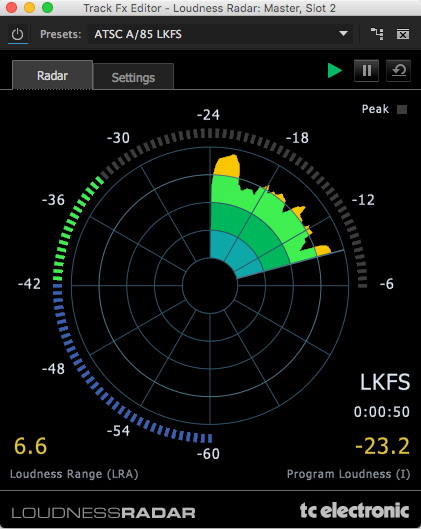
Using the Radar is easy – just play your project:
GOALS
The Act says broadcast and cable projects should be -24 LKFS. When I’m mixing for the web, I want my levels around -16 LKFS. (Yeah, the web is louder, mainly because computer speakers are so lousy.)
But there is more we use this for. Notice how levels vary in the four rings? The beginning is too loud, then it gets too soft. Our goal is to have our audio float at the edge of the second ring, just before it turns yellow.
The Radar allows us to see how even, or consistent, our audio is throughout the program. This is the only tool that allows us to see all the audio in our mix in a glance, allowing us to determine where it might be too loud, or too soft.
NOTE: Yes, many times we want differences in loudness during our program. (This is called “dynamic range.”) But, even more importantly, we want the mix under our control so that we know exactly where the loud and soft passages are and that they are within the right boundaries.
This allows us to go back to our mix and know exactly where we need to tweak to get our audio levels and our mix to sound as good as it can.
EXTRA CREDIT
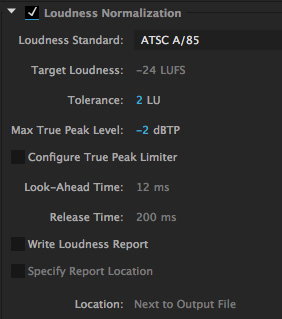
The latest version of Adobe Premiere allows us to normalize our audio to match the Calm Act settings. This means that we can use the Radar to spot problems and either fix them manually, or allow Premiere to fix them for us during export.
NOTE: Loudness Normalization is worth an entire article in itself. Be sure to read the Help files before using this feature so that you understand what the settings are doing.
SUMMARY
Unlike the audio meters, which provide only transitory data on our audio mix, the Loudness Radar helps us spot problem sections instantly, as well as offering advice on where we need to bring excessive levels under control.

2,000 Video Training Titles
Edit smarter with Larry Jordan. Available in our store.
Access over 2,000 on-demand video editing courses. Become a member of our Video Training Library today!
Subscribe to Larry's FREE weekly newsletter and
save 10%
on your first purchase.
15 Responses to Premiere Pro CC: Loudness Radar and Average Audio Levels [u]
Excellent post! Much needed and easy to understand. I’ve struggled with this topic a lot. Relying on the VU meters just doesn’t cut it.
Interesting. It sounds like this is solely about
Thanks for your article, Larry.
Sounds like broadcast legalities. Not necessary for the web, but “your audio will sound better?” I wonder how? Is this mostly about evening out volume levels? Like the way to get pop music to sound better on a car radio? Or a television set . . . I still can’t figure out the difference between levels, power, and loudness. Would “loudness” affect the experience of a program in a theater setting?
Best wishes,
Robert
Robert:
Levels are a setting, loudness is a result. Power only relates to the physical capacity of a speaker. Yeah, its confusing.
Your audio sounds “better” because perceived loudness is greater, variations between audio levels are evened out, thus making the audio easier to hear.
Larry
Thanks, very helpful.
[…] https://larryjordan.com/articles/premiere-pro-cc-loudness-radar-and-average-audio-levels/ […]
Hi,
have you ever had any issue with the “loudness range” and the “Program loudness” or any numbers not showing up when you open the radar and play the sound?
Kurt:
Nope. Time to call support.
Larry
Larry, thanks for this informative article. I noticed a possible bug that I wonder if you’ve encountered. Description: I take a dialogue clip and put it in its own sequence. I Auto-Match the clip in Essential Sound to the default of -23 LUFS and play it back. The Loudness Radar says my sequence is an average of -24 LUFS. Close enough. But now I go back to the Essential Sound panel and try the “Balanced Male Voice” preset on the same clip, which adds a bunch of enhancement effects, but is still supposed to Auto-Match to -23. Now, when I play back the sequence, the Loudness Radar gives an average of -18 LUFS. I’d love to use that Balanced Male Voice preset, but the increased loudness is a problem. Any solutions? Thank you!
Mike:
I don’t have a solid answer, but what I would do would be to turn OFF the Auto-Match to reset the clip to normal. Then, apply the Balanced Mail Voice, then apply the Auto-Match.
Try that and let me know if it worked. Otherwise, you may need to contact Adobe Support.
Larry
Hi, thanks for this informative article! I need a little help to pick down the loudness range from LU to 8. How do I find this settings in premiere? pls thk <3 sorry my english
Ayumi:
Loudness measures the average volume of a clip. So, to adjust the Loudness, raise or lower clip or track audio levels.
Larry
Does the Loudness Radar tool apply any changes to normalise audio or is it simply measuring it?
Cheers
Dylan:
It simply measures the audio. It makes no changes to it.
Larry
How is 0db measured in reference to dbfs or dbm? I don’t believe Adobe has any real structure to the perceived 0db, as most non-audio workstations do. An arbitrary number is anything but scientific. Seems more attention is paid towards accurate lux levels that decibels.
Rusty:
As I understand it, the audio meters in Premiere measure peak audio levels using dBFS (decibels full-scale). This is called an “absolute measurement.” A digital audio file stores it’s audio levels in “steps” – 8-bit audio has 256 “steps” (2 to the 8th power), while 16-bit audio has 65,536 steps (2 to the 16th power).
A fully saturated audio level – where all the steps are full – is defined as 0 dB. The reason digital audio can not go over 0 dB is there are no additional steps to hold the excess audio. Instead, audio levels over 0 dB are discarded and distortion results.
The reason this is tricky is that when we make adjustments to the audio level of a clip, we are making a “relative” audio adjustment; relative to the level at which it was recorded. Raising the audio level of a clip increases the level compared to how it was recorded, while lowering the audio level decreases it compared to the original recording.
However, all relative changes to each clip are measured on the absolute scale of the audio meters. A very soft clip can be raised a lot without causing distortion. A clip that is recorded near 0 db – such as most music – can be raised only a little bit, if at all.
This audio structure is followed by ProTool, Audition, Premiere, Final Cut – audio meters measure the absolute audio level using dBFS, while clip level changes are all relative to the original recording level.
Larry
P.S. The audio meters display peak levels. The Loudness Radar displays average audio levels using the LKFS scale. In my mixes, I watch both.