
![]() [This material was first presented in my webinar: “Green-Screen: From Production to Post.” Download it here.]
[This material was first presented in my webinar: “Green-Screen: From Production to Post.” Download it here.]
Green-screen key, also called a chroma-key, is the process of removing a background color from the image so that you can place an actor in front of another background.
NOTE: The reason this process is necessary is that no camera shoots an image with depth. Because we can’t tell our software to: “remove everything that is more than ten feet away from the talent,” we use chroma-key instead.
Premiere Pro provides several different ways to create this key. In this tutorial, I’ll show you the preferred method: the Ultra key. The big benefits to Ultra Key is that it is fast, flexible and looks great.
GETTING STARTED
The best thing you can do to improve the quality of your keys is to improve how you light and shoot them. Here are seven basic production rules:
NOTE: The chroma-key effect uses the color of the source clip and ignores any color correction you add to the image. This is why some of the foreground shots in this article are a bit green, I haven’t done final color correction to them.
THE ULTRA KEY
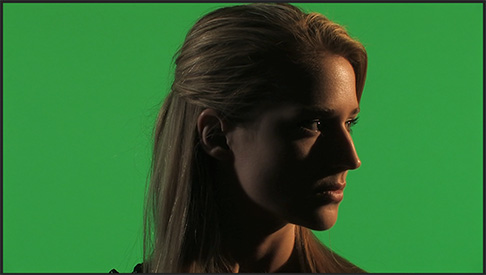
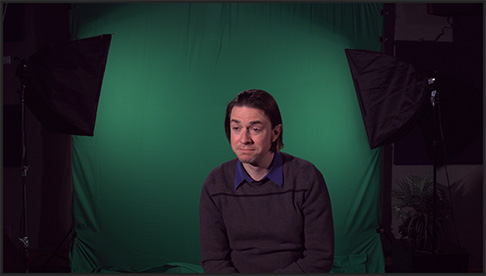
This is Lisa. We want to remove the green background and replace it with something more interesting. Note how dramatically she is lit, while the background is very even and flat. This is intentional.
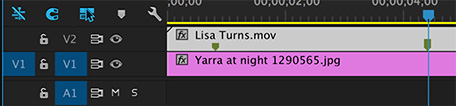
In the Timeline, put the background clip on V1 and the foreground (green-screen) clip on V2.( In this example, I’m not using audio, but the process is the same whether you have audio or not.) Select the V2 (green-screen) clip.
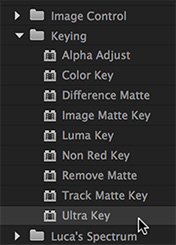
In the Effects panel, double-click Video Effects > Keying > Ultra Key to apply it to the selected clip. (You can also drag the effect on top of the V2 clip.) This applies the keying effect to the selected clip, or clips.

In the Effect Controls tab, click the twirl-down arrow next to Ultra key.
Click the eyedropper next to Key Color. This allows you to sample the background color of the image (i.e. the green background) so that the Ultra key knows what color to remove. (The default color selection is a dark gray.)
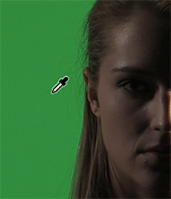
Then, click near the face of the subject; but not so close that you run the risk of getting either skin or hair as part of the color sample.
KEY TRICK: Press the Command key when you click the eyedropper, which allows the eyedropper to select a 5×5 pixel square, rather than the default 1 pixel under the eyedropper. This makes for more accurate samples. Notice, when you press the Command key, the eyedropper gets “fatter.”
There are two schools of thought about where to select the background color. One side says to select something in the mid-range of the background, not too dark or light. My point of view is to select the color nearest the face. If the face keys well, people won’t even notice other problems. If the face doesn’t key well, nothing else in the key will matter. Every key is a bit different and you are welcome to form your own opinion.
Instantly, we have a pretty darn good looking key. But, before moving on, let’s check the matte to be sure it really IS OK.
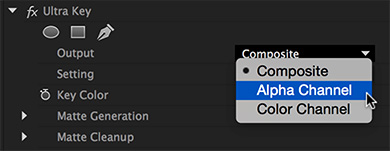
Change the Output menu from Composite (the final result) to Alpha Channel. This displays the key in shades of gray. Your goal is to get the foreground solid white (opaque), while the background is solid black (transparent). Any shades of gray indicates translucency which, in general, you want to avoid.

This image was shot and lit pretty well, notice there is a clear delineation between foreground (white) and background (black.)
Switch the Output to Composite and you could stop here. But, let’s make two other tweaks.
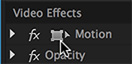
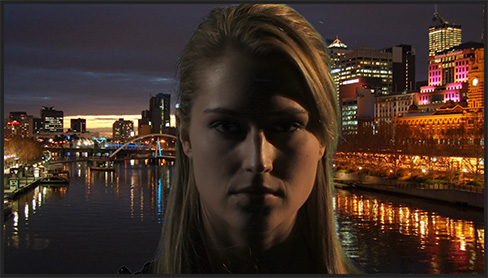
Click the Motion icon, to enable dragging the image in the Program Monitor, and drag the image off-center to frame it better against the background.

Then, add a Video Effects > Blur > Gaussian Blur to the background and adjust the blur to make it look like the shot has depth of field.
Now, we are done.
TWEAKING THE KEY
However, not all keys are that easy to pull. Let’s try something more difficult.
Here’s a key with an uneven background, wrinkles in the fabric, and “garbage” in the frame. In other words, a typical production shot.
I’m a big fan of having a process to follow when creating effects. This is especially true of green-screen work. So, here’s mine. To begin, follow the steps above, select the color and then switch to Alpha Channel mode.
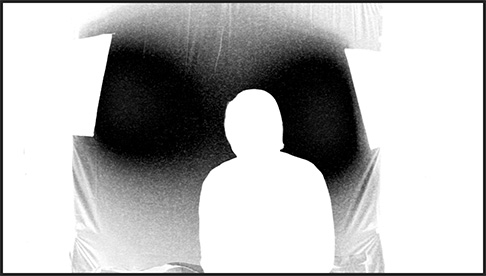
Hmmm… notice all the white “dust” in the background? The green background is more gray that black. Worse, even the garbage is white. Not good. Here’s how to fix it. We are going to take this in three steps:
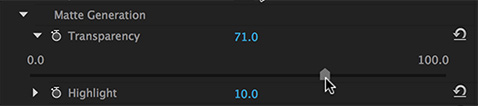
In the Effect Control panel, twirl down Matte Generation, then adjust Transparency until the foreground you want to keep is solid white. This slider controls the foreground separation. The best way to adjust this is to slide it until you find the point where the foreground becomes transparent, then move the slider a little bit until the foreground is back to solid white.
Check carefully for subtle shadows, which will allow the background to bleed through.

Next, twirl down Pedestal and do the same thing, except now you are adjusting the background to be solid black. Switch the Output back to Composite and take a look at the finished results.
Your goal, even with bad keys, is to get the background immediately behind the talent to be solid black, even if other areas of the frame are not. We’ll get rid of them next.
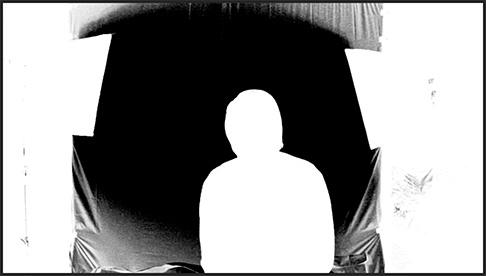
These two controls should allow you to nail the key, though, in this case, the poor lighting is making our life difficult.
TWEAKING THE EDGES
If you need to adjust the edges to remove excessive spill, or halos, twirl down Matte Cleanup.
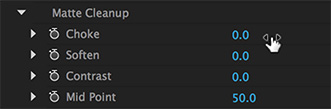
Here, start by GENTLY adjusting Choke. This crops in the edges of the image and a little goes a long way.
Then, add a bit of blur to the edges with Soften. Again, small amounts are always the best option.
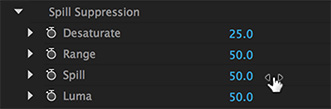
To remove green around the edges, twirl down Spill Suppression and tweak Desaturate. Remember, the easiest way to avoid excessive spill is to separate your actors from the background.
NOTE: There are also color correction settings with this filter, but we have far more control over color using the Lumetri Color Panel; which is what I would normally use.
ADD GARBAGE MATTE
Garbage mattes are used to get rid of stuff in the frame that you can’t key out.
Make sure the green screen clip is still selected, then twirl down Opacity in Effect Controls.
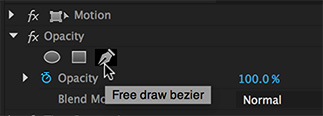
Select one of the three masking tools; I tend to use the Pen tool.
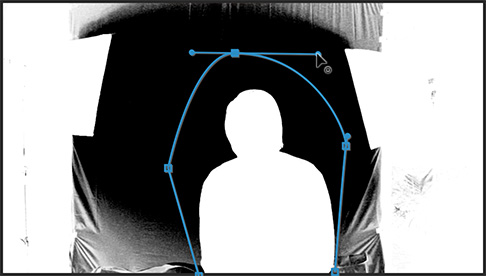
Then, click to draw a border around the objects you want to keep. To add a curve, click-hold-and-drag. Click the starting point to close the circle.
To adjust a curve, click one of the square control points with the Pen tool.
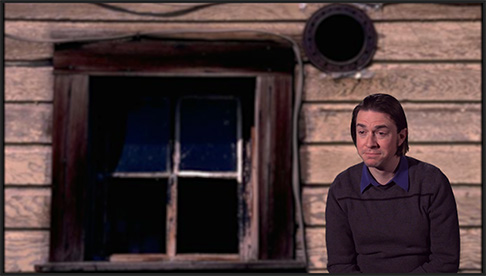
When the circle is closed, you’ll instantly see the finished key. And, yup, I moved the foreground image to the right and added a Gaussian Blur to the background. Before I totally finished, I’d do a bit of color correction to his face.
Cool.
SUMMARY
When you need a great key in a hurry, your best friend in Premiere Pro is the Ultra key.

2,000 Video Training Titles
Edit smarter with Larry Jordan. Available in our store.
Access over 2,000 on-demand video editing courses. Become a member of our Video Training Library today!
Subscribe to Larry's FREE weekly newsletter and
save 10%
on your first purchase.
14 Responses to Premiere Pro CC: Create a Green-Screen Key
Great tutorial. Thanks! Would love to see you do a video using this example ( :
JC:
I have:
https://larryjordan.com/powerup-webinar-190-green-screen-from-production-to-post/
Larry
Great article, Larry. Thanks!
I’ve had some occasional keying problems that led me to After Effects – which solves most challenges. I remember seeing some plug-ins for after effect that provided even more “natural” (adding ambience to the foreground from the background, for example). Do have any recommendations on those?
Also, rimless glasses can often be an issue – especially as the subject moves his head. Any advice?
Thanks.
Your old friend (and assistant to the producer) from WCVB days,
-David
David:
(It is GOOD to hear from you again!)
You are correct – After Effects is designed for creating stunning effects, including keys. And, sometimes, even the best software needs help, which is why After Effects has a wide variety of masks to hide trouble-some spots.
However, as for recommending specific keying software for A.E., I will leave that to other readers.
Larry
So well presented! Actually Tops!
[…] I then had to find out how to use it through this website. – how to use green screen […]
Great post guys.
Here are a couple of my tips:
1. Light the background color as evenly as possible. I found the brighter green works best.
2. Use the best possible camera you have. The results with my Canon T3i are quite good.
3.Add a little contrast to your video. I get a little more “pop” from my
chromakey video by adding some contrast to it. It’s almost as good as
the filter I use in FCPX.
4. Crop the edges of your video if you’re
not extending your hands or arms. And if you do extend your hands, keep
your fingers closed to minimize any green bleed over.
You can also check http://greenscreenlab.com
Why won’t it let me drag the pen from the Ultra Key ‘Key Color’ over to the video as easy it it shows in the tutorials. I keep trying to click on the pen and it enables but as soon as I cross from the effect control panel into the video panel on the right hand side the pen icon disables and an error sounds and I have to go off screen to reengage again. I’m guessing it’s something very simple I am missing,
Anyone?
John:
Make sure you’ve applied the UltraKey effect to the clip with the green background in the timeline, and selected that clip, before dragging the pen.
Larry
I like to this tips and this is so helpful but how can I get that software. I want to use my own work .
Santosh:
Adobe Premiere Pro CC is available here:
https://www.adobe.com/products/premiere.html
Larry
This is super helpful and remarkably broken down. Thanks a bunch.
Super clear and helpful tutorial.
thank you