
![]() With the release of the 2014 edition of Premiere Pro CC, Adobe added the ability to motion track any effect inside Premiere. This is especially useful when you want to hide the identity of something – say, a face, logo, or license plate.
With the release of the 2014 edition of Premiere Pro CC, Adobe added the ability to motion track any effect inside Premiere. This is especially useful when you want to hide the identity of something – say, a face, logo, or license plate.
UPDATE: Adobe added new features to this effect with the Oct. 2014 update to Premiere Pro CC. Read about them here.
While After Effects provides more sophisticated tracking, many times using something simple works just fine. Which is where this new feature in Premiere comes in. Best of all, this new motion tracking feature is really easy to use.
NOTE: The motion tracking in Premiere is designed to track an effect applied to a clip. After Effects is the preferred choice if you want to track multiple clips at the same time; for example, to have a text clip move in relation to video in a separate clip.
GETTING STARTED
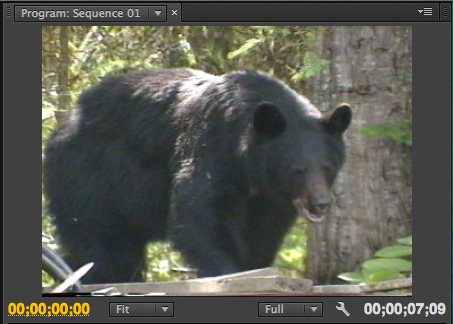
Because my video collection of suspicious individuals walking the streets of LA is extremely limited, I decided to mask the identity of something much more dangerous: a black bear.
NOTE: While it may seem, to the uninitiated, that all black bears look alike, nothing could be further from the truth. This bear, Fred, was unfortunately caught in the wrong place at the wrong time. He’s very embarrassed about the whole escapade and doesn’t want his mother to find out. Hence, he’s requested we hide his identity.

I loaded the clip into the Timeline.
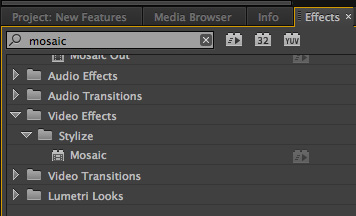
Then, in the Effects panel, I searched for the Mosaic effect.
NOTE: While tracking can be applied to ANY effect, except the Warp Stabilizer and the effects contained in the Effect Controls panel, it makes the most sense to use this for effects which change the look of a portion of a clip: blurs, mosaics, posterization, that sort of thing. We can’t use this effect to track one object in relation to another.
Drag the effect and drop it on top of the clip in the Timeline. (Or, if the clip is selected, double-click the effect to apply it.
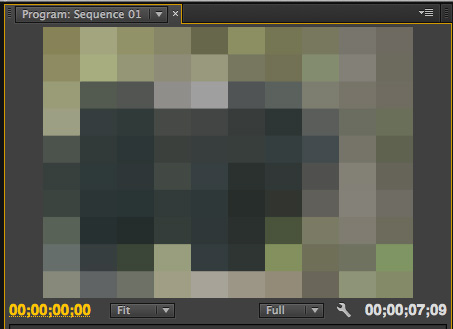
The entire image is now covered with a mosaic pattern.
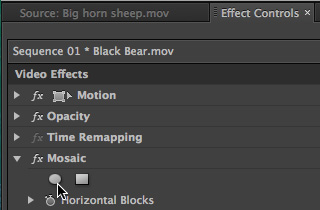
In the Effect Controls panel, immediately under the name of the effect, two new controls appear. These allow us to apply a mask shaped like an ellipse, or a four-sided rectangle. To apply the mask, click the shape that most closely resembles the shape you want to use. In our case, the ellipse most closely resembles the shape of the bear’s face.
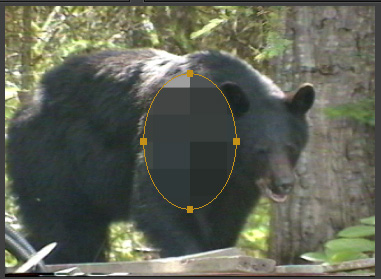
Instantly, in the center of the frame in the Program monitor, a golden ellipse appears. Grab one of the four control dots to change the shape. Click and drag near the center of the image to change its position.
NOTE: While we can’t add new control dots to the ellipse, we can add more sides to the rectangle. Hold the Command key while clicking the gold line to add more control points, then drag the control point as necessary.
Here, I’ve repositioned and resized the ellipse.
NOTE: As I was writing this tutorial, I discovered that the effect settings became corrupted when I switched from ellipse to rectangle and back. Since there is no reset the mask, the easiest thing to do when that happens is to delete the mask and reapply it. See the Extra Credit section below for instructions.
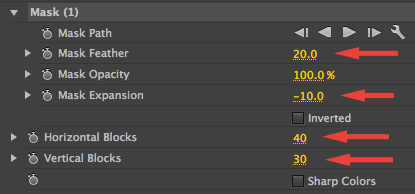
I also tweaked the effect settings, mainly because I could:
All of these settings are based on personal preference. You can also invert the mask to select everything outside the gold shape by checking the Inverted checkbox.
TRACKING
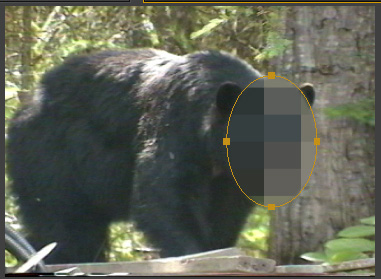
Premiere has allowed us to apply masks before. The REAL news is that now we can quickly and easily motion track it. What I’m especially impressed with is that we don’t need to set tracking points. Premiere simply looks at what’s under the gold shape and follows it as it moves.

Click the Wrench icon (part of the Mask Path) to select what we want to track:
While I wish we could select only position and scale, which would compensate for a person walking toward the camera, many times Position alone will be enough. In this example, I’m tracking Position only.
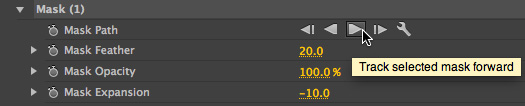
To begin the track, click the right-pointing arrow.
Here’s another cool thing: We don’t need to start the track at the beginning of the clip. In my example, the playhead is located at the start of the clip. But, it doesn’t have to be. However, if you are in the middle of a clip, because it is easier to find what you want to track, click the right-pointing arrow to track from where you are to the end. Then, reset the playhead back to the same spot, and click the left-pointing arrow to track from the playhead position to the beginning.
This often yields more accurate results than tracking from the beginning, especially if the image at the start or end of the clip is hard to see.
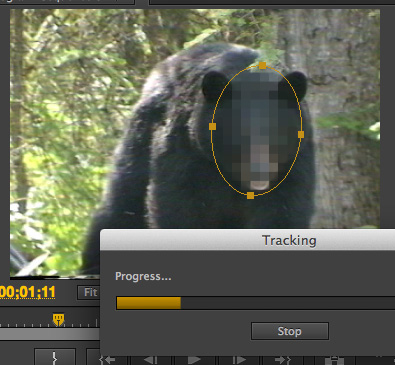
Tracking takes longer than the length of the clip; but the actual speed will vary based upon the speed of your computer and the complexity of the track. This eight-second clip took about 2.5x real-time to track.
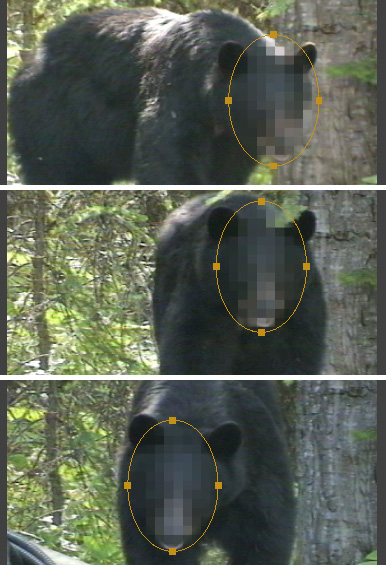
Then, just to give you an example, here are three frames from the motion of our malevolent bear. I haven’t tweaked the track at all, this was generated automatically by Premiere.
NOTE: If you don’t see the gold outline on your monitor, be sure to select the word “Mask” in the Effect Controls panel.
SUMMARY
And that’s it. Fast and easy motion tracking for any effect that’s applied to a clip inside Premiere Pro CC (2014).
Very, very cool.
EXTRA CREDIT
To remove a mask, highlight the word Mask in Effect Controls and delete it.
Add a new mask by clicking the ellipse or rectangle mask icons immediately under the name of the effect.
To add more than one mask to a clip, click the ellipse or rectangle icons to create as many masks as you need.

2,000 Video Training Titles
Edit smarter with Larry Jordan. Available in our store.
Access over 2,000 on-demand video editing courses. Become a member of our Video Training Library today!
Subscribe to Larry's FREE weekly newsletter and
save 10%
on your first purchase.
21 Responses to Premiere Pro CC 2014: Track & Mask
← Older Comments-
 John says:
September 14, 2016 at 10:56 am
-
 Larry says:
September 14, 2016 at 12:25 pm
← Older CommentsI tried to use Mask Tracking to follow a football player from game film. It won’t track properly. The player is a small portion of the frame. Is there a way to increase sensitivity to better follow small objects? Would better quality video, 4k vs 1080i, allow PP more easily follow?
If everything is moving and the tracked item is small, you will probably need to track them manually.
Higher resolution will help, though.
Larry