
![]() NOTE: I recently recorded a short video that illustrates how to use the Video Limiter. You can see it here.
NOTE: I recently recorded a short video that illustrates how to use the Video Limiter. You can see it here.
The Video Limiter effect inside Adobe Premiere Pro CC allows you to constrain white or black gray-scale levels to specific limits that you set within the effect.
NOTE: Final Cut Pro editors will recognize the Video Limiter as equivalent to the Broadcast Safe filter in Final Cut Pro.
The reason this effect is necessary is that most digital cameras record video levels that are excessive for broadcast, cable, or DVD distribution. The Video Limiter effect allows you to clamp your levels so they stay within spec.
SOME BACKGROUND
Gray-scale levels are measured on the Waveform Monitor. (Here’s a video that explains the different gray-scale ranges.)

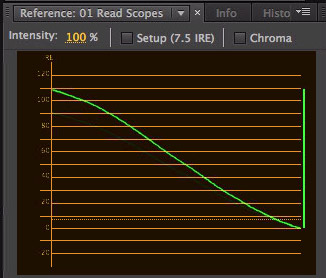
Here, for instance, is a gradient with 100% white on the left, and 0% white (or 100% black) on the right.
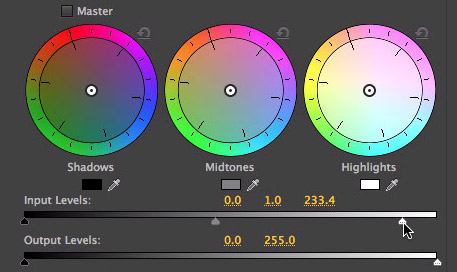
If we apply the Three-Way Color Corrector effect to this clip and adjust the Input White Level…
… the gradient gray-scale line shifts in its totality, so that the maximum white levels rise from 100% to 110%. In other words, we are changing the entire angle of the line; which alters all the gray-scale settings in the clip.
This is an important point: adjusting the Input and Output level sliders affects then entire range of gray-scale values proportionately, such that all gray-scale relationships remain the same. (Don’t worry too much about this definition, you’ll see the difference immediately when I apply the Video Limiter effect.)
NOTE: White levels around 110% are typical of the brightest portions of an image shot by most digital cameras today.
In general, you will get the best results by adjusting levels using the Input Level and Output Level sliders. Adjusting these sliders retains all the gray-scale texture in your clip.
However, there are many instances where retaining texture is not important. Say, for example, in a candle-lit scene, you don’t need to see texture in the flame, you just want to imply that this is night in 14th century England. You want to see the candles, but don’t need to see all the shades of light and dark within the flame.
NOTE: An example of where you DO want to see texture in the flame is if you are doing a commercial for a candle shop. Here, the beautiful flame of the candle is the star of your ad. Seeing all the shades of gray-scale and color in the flame is essential.
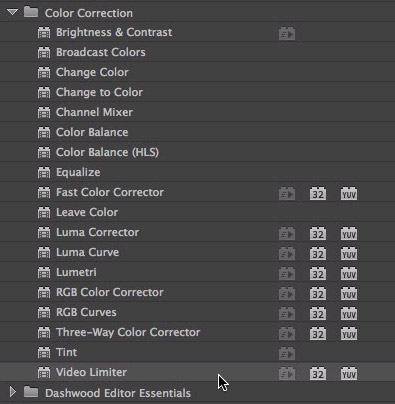
The Video Limiter effect is located in Effects > Color Correction > Video Limiter.
The easiest way to apply this effect to a single clip is to drag-and-drop it on the clip.
NOTE: Later in this article, I’ll show you a better way to apply this effect to a group of clips.
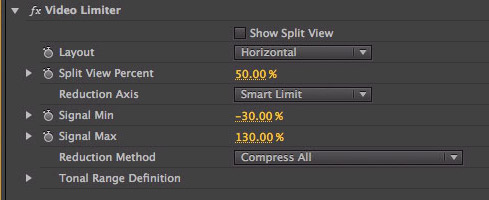
These are the default settings of the Video Limiter effect. The problem is that they are set too broadly; these settings won’t protect you against illegal levels.
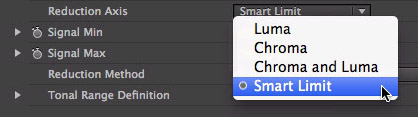
Adjusting the Reduction Axis allows you to clamp Luma (gray-scale), Chroma (color), or both. My recommendation is to use the Smart Limit setting, which is the default.
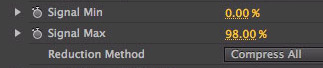
Now we need to adjust the effect. My recommendations, for protecting gray-scale levels, are:
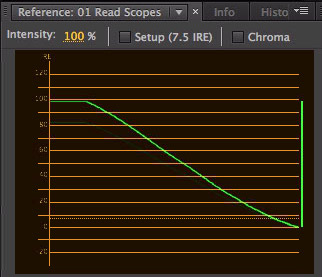
Notice what’s happened to the gray-scale line. The angle of the line did not change. Instead, all highlights in excess of the 98% limit set in the Video Limiter have been clamped so that NOTHING exceeds 98%. This effect only changes the brightest portions of an image, nothing else.
This effect guarantees to keep your levels safe, but it can mess with the texture of your highlights.
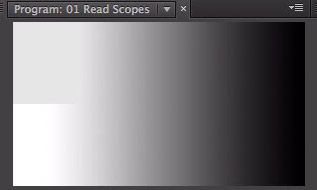
Here’s a split screen showing the clamped highlights above and the full-range of highlights on the bottom. Notice that in the top left corner, all the highlights have become the same shade of gray.
Imagine you were shooting a bride in her dress. Clamping the highlights would remove all the fine highlight detail in the lace and fabric. This would be bad because it would destroy the look and texture in the dress and make all the highlights look like mush.
If, on the other hand, you were shooting a chase scene at night, clamping the whites would simply mean the street lights would be white spots, without texture. In this case, losing the highlight detail is not a problem.
Use the Three-Way Color Corrector filter to adjust highlights to retain texture. Use the Video Limiter filter to clamp highlights quickly, but at the loss of texture. Which one you choose can vary on a clip by clip, or scene by scene, basis.
LIMITING A GROUP OF CLIPS
There is one very important rule about using the Video Limiter: it must ALWAYS be the last effect applied to a clip. This means that any other adjustments or color corrections need to be done before you apply this effect.
For single clips, this isn’t, generally, a problem. However, for groups of clips, or an entire program, its a pain in the posterior.
A much better way to apply the video limiter is to:
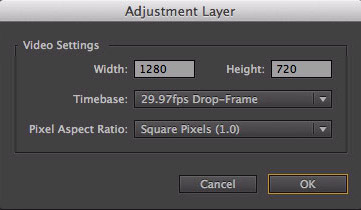
In the Adjustment Layer dialog, accept the defaults. (You want the adjustment layer to have the same image size as your Project.)


A TYPICAL EXAMPLE
The way we normally work with the Video Limiter is to adjust all gray-scale values using the Three-Way Color Corrector effect on the clip-by-clip basis.
Then, add an adjustment layer and apply the Video Limiter, so that if any weird levels were not caught by the Three-Way Color Corrector effect, they would be clamped by the Limiter. This approach generally yields the highest image quality, with the least amount of futzing with settings.
SUMMARY
When you are posting video exclusively to the web, video levels are not an issue. The web is very forgiving and you don’t need to worry about the Video Limiter at all.
However, when you are creating video for professional distribution, properly controlling video levels is crucial. For these projects, the Video Limiter can prevent a whole lot of trouble.
Visit our website to see Final Cut Pro Training & more!

2,000 Video Training Titles
Edit smarter with Larry Jordan. Available in our store.
Access over 2,000 on-demand video editing courses. Become a member of our Video Training Library today!
Subscribe to Larry's FREE weekly newsletter and
save 10%
on your first purchase.
4 Responses to Premiere Pro CC: Video Limiter
Hi Larry,
Thanks for your article. I am finding that when I use the video limiter (set to your recommended settings) that my white background images are made to have a yellowish tint. When I turn off the video limiter the white background goes back to a more true white. Do you know why this would be?
This is a project I am working on for TV. Any insight into the yellow-ish bloom I am getting would be much appreciated!
-Eric
Eric:
I’ve never know the Video Limiter to change the color of any portion of a clip.
I suggest contacting Adobe Support to see if they can sort this out.
Larry
This use to happen to me in legacy FCP. It’s an artifact of a source or grade with luma way out of bounds. You can test this by dropping a 3-way onto a clip that has some darks areas plus large fully super-white bright areas in it. Then drop the video limiter on it, placed underneath the 3-way.
Now pull the “Input Levels” highlights slowly down from 255 all the down way to about 10 — grabbing the rightmost marker of the horizontal control bar sitting just below the three color wheels, and slide the tiny white marker to the left. Keep going and watch what happens. The farther you go, the more cyan and yellow blocks appear.
The higher the chroma levels in the grade, and the more conservative the limiter settings, the lower the threshold where artifacting begins at as high as a 235 whites boundary. Standard 422 YUV video is a complexly entwined set of goo. This luma/color artifact is some weird bleeding from yellow and cyan angles adjacent the green at the “color center”, which does double duty as the luma (all of the dark to light and image details information) from which all other colors are derived (by adding or subtracting red and blue signals, their fully “subtracted” forms being the negatives cyan and yellow). Anyway, the more you push towards the bottom boundary of 0 you’ll even start to see the other axis of red and blue snaking along details defined by luma. It’s all very weird.
ANYWAY, you DO want to use a limiter especially in these cases where you are seeing the weird yellow, because that super pushed white is waaay beyond what is broadcastable and can even cause similar color artifacts (or even audio buzzing on analog signals) during a broadcast or legalized projection. But Q/C will bounce the show back to you before they let that happen.
So put on that limiter (last in line) and with the color correction tools lower or curve out the intensity of the brightest brights until the yellow disappears. OR, if you have them, use the Lumetri controls in place of the 3-way. Still do put on the video limiter as the last filter, but Lumetri handles color completely differently, effectively soft-limiting amplitudes to some extent whereby the color artifacting just doesn’t happen. (Lumetri and its ilk are a more modern, more algorithmically “evolved” signal handling, a good way to go.)
There ya go 🙂
I have the same issue. I’ve got a project where I’ve warmed the highlights so the red and green channels are hotter than the blue channel on the RGB waveform monitor. When I apply the Video Limiter, it pulls the red and green channels down and raises the blue channel so the sky is a cooler blue than I want. I find that the highlight “Shoulder” effect in Magic Bullet Looks works better for me for limiting than the Video Limiter effect in Premiere. It still causes a color shift but it’s more subtle and you can control the roll off or “shoulder”. I also don’t go below 99% since the shift is more dramatic the more you clamp it.