

[Updated June 4 with links to new presets.]
Shortly after it’s release, I took a “First Look at Adobe Prelude.” You can read that article here.

Recently, Adobe updated Prelude CS6 to version 1.0.1. Coming less than a month after the initial release of Prelude, you would expect the new version to only add bug fixes. But it actually added several new features, as well.
NEW TRANSCODING OPTIONS
Due to the way many tapeless formats are compressed, when you want to ingest a portion of a clip using Prelude, you need to transcode, or convert, it from the format in which it was shot into something different. This transcoding process is handled for Prelude by Adobe Media Encoder (AME).
The problem is that almost all of the default transcoding settings in AME are optimized for final distribution – say, to the web – rather than for editing. This meant that transcoding ran the very real risk that your image and audio quality would decrease during transcoding, which is not what you want for your master clips.
With this release, Prelude now provides new transcoding options that are optimized for editing.
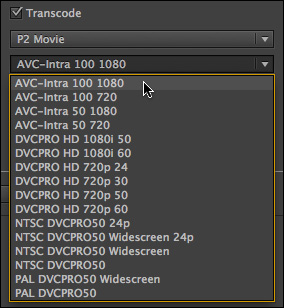
While the ideal option for Mac users is to transcode into ProRes, this isn’t a viable option for Windows users. Since Prelude is cross-platform, Adobe provides two other options: MXF OP1a and P2 Movie. Of the two, I prefer P2 Movie > AVC Intra 100. This Panasonic codec is 10-bit, uses I-frame compression, and creates file sizes somewhat smaller than ProRes 422. For most editors, it should provide excellent quality.
For Mac users wanting the best quality, I recommend creating a custom preset in Adobe Media Encoder using ProRes. For editors needing to support files in a cross-platform environment, I recommend AVC-Intra 100. (The 100 version has a higher bit rate, and generally higher quality than the 50 version.)
UPDATE – June 4, 2012
I just received two links from Adobe providing updates to the new transcode presets.
The presets are in the Add-Ons section at the middle of the screen. These also require the latest version of Adobe Media Encoder (6.0.1 or later).
INGEST MULTIPLE FILES INTO ONE
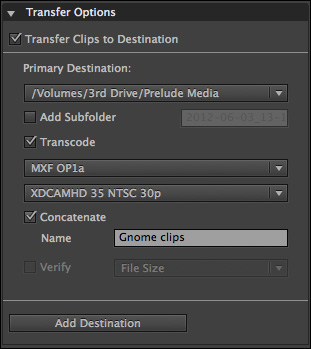
The new version provides the ability to select multiple clips for ingest, then build them into a single file for editing. For example, say you took a lot of B-roll shots of the exterior of a location. You may not want all those shots as separate files. Instead, to make organization simpler, you want to build them all into a single file and give it a new name, say: “Exterior B-roll.” Now you can.
Now, you can. In the Ingest window, select all the clips you want to combine into a single file.
Then, in the Transfer Options panel on the right, turn on:
All three options need to be checked for this option to work. Then, as before, Prelude off-loads the heavy-lifting of transcoding to AME which runs in the background and creates the new clip.
NOTE: In order to use this option, you must have both Adobe Media Encoder CS6 and Premiere Pro CS6 installed on your system, as this process uses software that is included with both. If both programs are not installed, the Concatenate option will be grayed out.
RELINK MISSING MEDIA
The initial release of Prelude did not have the ability to relink missing, moved, or renamed media. Now, it does.
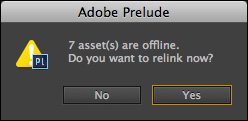
When you first open an existing project, Prelude checks to be sure it can find all the media in it. If it can’t, it pops up a dialog asking if you want to relink them. (You can also manually request to relink a clip by selecting the clip, or clips, to relink, then choosing: File > Relink clips.)
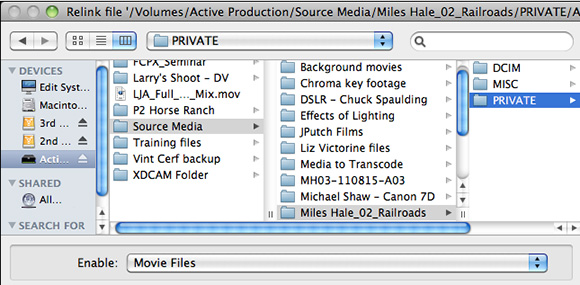
If you choose to relink, Prelude displays a dialog – showing the name of the missing clip at the top – asking you to find the files. There is no automatic search with this option, so you will need to locate the missing files manually.
Once you find the missing files – remember you are looking to find the file listed at the top of the window – click Open to relink to it. If other missing files are stored in the same location, Prelude will automatically link to them as well.
NOTE: By the way, there are times when you might not want to relink – for instance, you opened the project to check a marker or file name on a different computer. You know the links are broken, but since you are just reviewing a file, you don’t want to reset the links. Click “No” in the reset links dialog and your files and links remain untouched.
At this point, while we can relink master clips, we can not relink subclips or unlinked clips in a rough cut. That should be fixed in a future update.
PARTIAL MARKERS
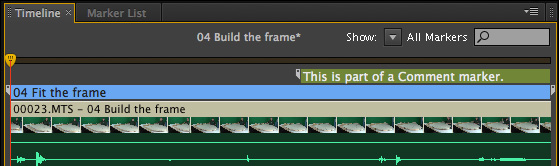
In the initial release of Prelude, if a marker was not fully contained in a subclip, for example a Comment marker, it would not be displayed in the clip. Now, after the update, if a marker is partially contained in a subclip, the part of the marker that exists within the subclip will be displayed in the subclip. This is a great way to have comments show up in both the subclip and clips that are exported to Premiere Pro CS6.
NOTE: While Prelude only supports sending files to Premiere Pro CS6 or Final Cut Pro 7, transcoded clips can be opened by any editing software that supports the transcoded format that you chose.
A REQUEST FOR ADOBE
Prelude is a great tool for enabling producers and editors review and ingest software without needing to use extremely powerful computers – Prelude is only 32-bit so it runs on older gear very nicely – or expensive editing system.
What Adobe needs to do is sell Prelude separately to enable producers to purchase multiple copies of Prelude without needing to purchase the entire Production Premium suite. The existing license for Prelude allows it to be installed on two different computers, though only one computer at a time can run the application.
GIVE IT A TRY
If you haven’t tried using Prelude, download the trial version from Adobe and see what you think.
NOTE: I’ve created video training for Prelude CS6. You can learn more about my training here. Within the next couple of weeks, I’ll create an update based on the new features. That video update will be provided free to all existing Prelude training customers.

2,000 Video Training Titles
Edit smarter with Larry Jordan. Available in our store.
Access over 2,000 on-demand video editing courses. Become a member of our Video Training Library today!
Subscribe to Larry's FREE weekly newsletter and
save 10%
on your first purchase.
28 Responses to Adobe Prelude CS6: New Features
← Older Comments-
 Riikka says:
June 30, 2014 at 4:01 am
-
 LarryJ says:
June 30, 2014 at 7:14 pm
-
 Harley Davis says:
September 4, 2014 at 11:56 am
← Older CommentsDear Larry,
Thank you for your great lessons on how to learn Adobe Prelude which I currently subscribed in order to re-define my work flow.
I would be really thankful if you could provide an answer for me if destroying my Prelude project after importing it to Premiere Pro will have any effect for the same files (clips and sub clips)in Premiere pro?
I wouldn’t consider otherwise, but this becomes an issue when I am transferring my project from one hard drive to another. Premiere Pro lets me re-link, but the newest version of Adobe Prelude only lets me re-link only full clips with it resulting me loosing all the sub clips in Prelude. The option for re-linking sub clips does not seem to be there? However I can re-link the same sub clips (if imported from Prelude) in Adobe Premiere Pro. But will it harm my Premiere Pro project if after this is done I just get rid of my Prelude project with missing links?
Thank you for your answer.
Rikka:
Hmmm… Trashing a Prelude project AFTER importing it into Premiere should not hurt the Premiere project, because the data is stored in an entirely different file after import.
However, do a quick test. Create a simple – 2 or 3 shot – Prelude project. Import it into Premiere. Delete the Prelude project. If the Premiere project is still OK, then you are safe in deleting major Prelude projects.
Larry
Without rendering the sub clips, you won’t have a file to relink (accept for the original file you made the sub clip markers from). My advice to you, sir, is to place the sub clips on timelines and render, render, render. This will actually build the sub clips as their own file, allowing you to relink them from their preview render.
Subclip markers are not a file, they are a simple marker in a file, but if they have no linkup when you save and move, they will do one of two things:
A. Disappear because they haven’t been rendered (it’s assumed they are unimportant information)
B. Link only to the primary original file, and become sub clips that are just copies of the original clip in it’s entirety (no longer the sub clip but a dupe of the original).
When you move from one system to another, RENDER your previews.
Consequently, if you try to use AME and they haven’t been attached to a timeline or rendered to a preview in some way, you’ll get copies of the full clip, or sub clips without sound (the sound clipping hasn’t been rendered!).
When in doubt, or when sending out, RENDER.