
[ Please see my disclosure statement on product reviews. ]
ARTICLE UPDATE
This article has generated a lot of readers and discussion. In the week since this article was first published, I had the opportunity to continue researching the differences reported here on Apple’s website, as well as talk with Patrick Palmer, the Senior Product Manager at Adobe, who is responsible for Adobe Media Encoder. In my continued research, I realized that there were a number of significant mistakes and false assumptions I made in the first version, so I updated this article and retested both programs.
Last week, I compared the speed of video compression on an iMac vs. the new Mac Pro. (Read the article here.)
This week, I decided to continue this comparison by comparing the speed of Apple Compressor to Adobe Media Encoder (AME) on the new Mac Pro. And I discovered that testing video compression software is MUCH more complicated than I first thought.
UPDATE SUMMARY
It is incorrect to simply compare the speed of video compression without also comparing image quality. All other settings being equal, lower bit-rate settings will compress faster than higher-bit rate settings. If file sizes are radically different for the “same” setting, which they were in my original tests, it means that the bit rate settings are also significantly different. Similar bit rate settings should yield similar file sizes, though not, necessarily, similar image quality.
The H.264 codec, like all standardized codecs, describes what the finished compressed file should look like. However, different developers will take different paths to get to that result and those different paths can result in different compression times with, potentially, different image quality. (Think of this as climbing a mountain, there are many paths to the top, but only one peak once you get there.)
In this retest, we look both at speed and image quality for MPEG-4 compression. I chose MPEG-4 because both applications support it extensively, and it is the preferred video codec for all Apple devices.
EXECUTIVE SUMMARY

 There are significant variations between Apple Compressor 4.1 and Adobe Media Encoder 7.2, in both speed and quality. While it would be true to say that AME is generally faster, it is not true to say that it is consistently faster.
NOTE: This article is based on tests run on the new Mac Pro. I would expect similar results on iMacs or MacBook Pros, though the compression speeds will be different.
Even more surprisingly, when using default settings in each application, the compressed file sizes can vary by hundreds of megabytes. This indicates that simply using the default settings may not be sufficient to get the best results. For some codecs, such as QuickTime, getting the settings to match between the two programs is difficult. For others, like MPEG-4, settings are easier to match.
For some tasks, Compressor is a better choice. For others, AME is a better choice.
UPDATE – A NOTE ON GRAPHICS CARDS AND SYSTEM RESOURCES
In the original article, I wrote: “And neither application takes advantage of all the power that the Mac Pro has to offer.” Except that isn’t completely true. In fact, its downright murky.
Adobe Media Encoder (AME) does take advantage of both graphics cards in the new Mac Pro, provided the Mercury Playback Engine is enabled. Apple Compressor does use the GPUs when exporting from Final Cut Pro X, but not when compressing within Compressor. Compressor does access hardware acceleration on Macs that support it, such as iMacs and MacBook Pros, but not on the Mac Pro. AME does not access hardware acceleration at all.
Some codecs are single-threaded, which means even if you tried to use all the resources on a Mac Pro, the codec itself would throttle performance. Some codecs, such as ProRes, fully support multi-threading. For multi-threaded codecs, the operating system handles parceling out compression tasks to the CPU, rather than the application. Simply watching CPU load in Activity Monitor does not provide a full picture.
There are three basic steps in compression:
In AME, all rendering functions use the Mercury Playback Engine, which is a very fast rendering engine that is GPU-accelerated in most Macs, but not the MacBook Air. In the Air, the Mercury Playback Engine uses the CPU.
Like I said, “murky.”
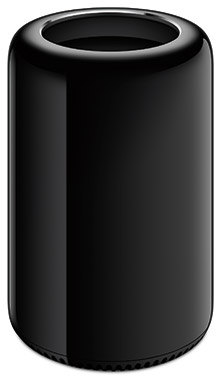 THE NEW MAC PRO
I’ve been using a Mac Pro for a month for testing and writing articles. (You can read my first review of it here.)
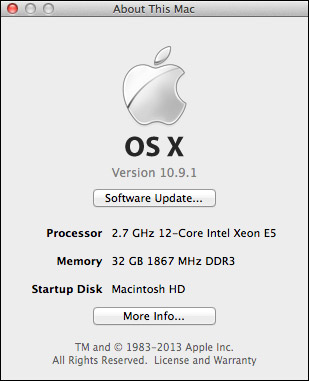
The Mac Pro I used for testing has:
NOTE: There was debate in last week’s article about whether the processor speed of the iMac offset the extra cores and GPUs in the Mac Pro. This week, I ran all the tests on the same computer, which would make the system performance the same for both applications.
ABOUT THE SOFTWARE

I’m running the latest version of Adobe Media Encoder with all its default installation settings.

The biggest thing to note is that Adobe Media encoder is a 64-bit application, which allows it to take full advantage of all the RAM contained in the Mac Pro. (Look in the “Kind” column.)
I’m also running the latest version of Apple Compressor, also set to its default settings.
NOTE: I ran these tests with Compressor in single-instance mode. Running Compressor in multi-instance mode can speed compression of some codecs, such as H.264, though not others, such as ProRes. However, I discovered that running Compressor in multi-instance mode can sometimes conflict when also running Final Cut Pro X. So, to emulate my real-world conditions where I run both programs at the same time, I tested in single-instance mode only.
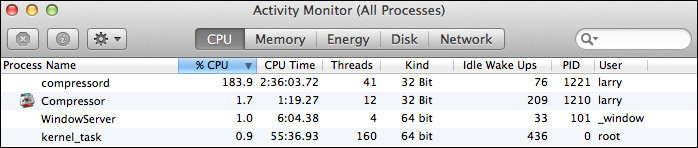
The biggest point here is that Compressor is still a 32-bit application. Which means that it can only access 4 GB of RAM. As you will see, that may, or may not, have an impact on its speed. (Again, you can monitor this for yourself using Utilities > Activity Monitor > CPU tab and look in the “Kind” column.)
As an interesting aside, Compressor doesn’t actually compress video. Instead, a background application called “compressord” does all the heavy lifting. This is why we can quit Compressor, once compression starts, without affecting the compression itself.
UPDATE
While it is true that AME is 64-bit, vs. 32-bit for Compressor, when it comes to video compression this is less of a factor than might at first appear. Most codecs only require 1-2 GB of RAM for compression. A BIG benefit to remaining a 32-bit application is that Compressor is able to support legacy 32-bit codecs, such as DVCPROHD and older camera-native codecs.
Another note about Activity Monitor is that it has no way of displaying how busy the GPUs are for any task.
ABOUT THE TESTS
In my original tests, I used the same four video files I used in last week’s tests:
My principal goal was to test the speed of the two applications. I was not trying to achieve the highest quality, nor the smallest files. To meet this goal, I tried to keep settings identical between the programs. However, over this last week, I discovered my results were flawed because the settings did not match closely enough.
For the second set of tests, I used:
UPDATE
As I mentioned at the beginning, measuring speed without also looking at quality is not particularly meaningful. This week, I created new tests specifically to look at whether I could better match the settings to compare results, as well as examine image quality.
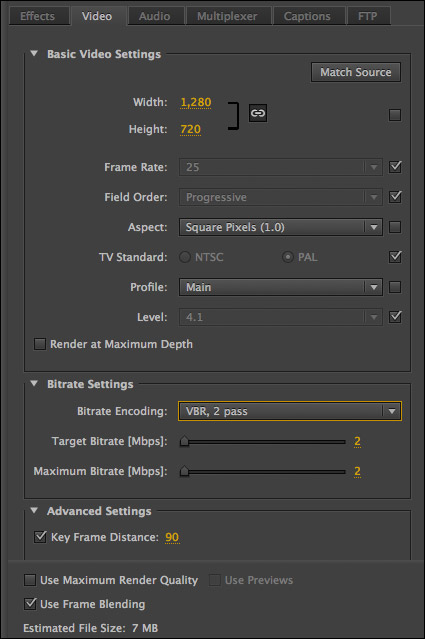
For example, here are the settings I used for the MPEG-4 movie in Adobe Media Encoder.
NOTE: Up until the 7.1 release, Adobe Media Encoder was missing too many features to make a comparison with Compressor even feasible. For the first time, in my opinion, AME and Compressor can now be reasonably compared to each other.
In my first report, I ran 24 tests on each application, using my four different media files. For the custom QuickTime and MPEG-4 tests, all bit rates were set to 2,000 bps.
In this updated report, I ran 14 tests on each application across the two test files. I used variations on their default YouTube settings and a custom MPEG-4 setting with a bit rate of 2,000 kbps.
NOTE: Neither application supports the H.265 codec and I did not attempt to run the X.264 open source version of H.264.
LET’S CHECK THE MONITOR
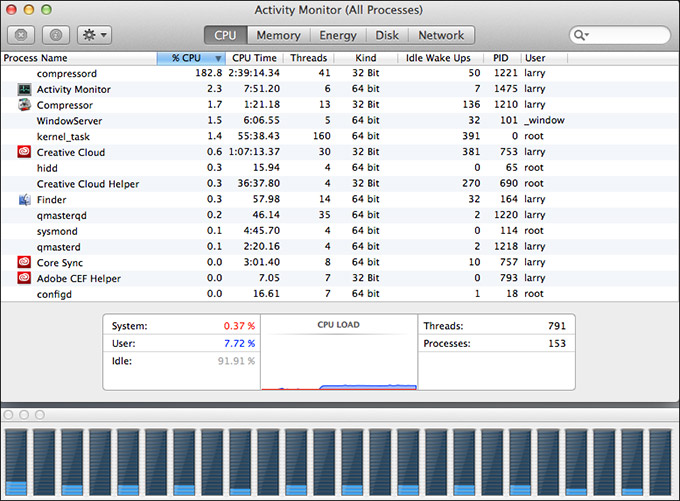
This screen shows Compressor (actually “compressord”) chomping its way through a movie. Notice that it is only using 182% of all the CPUs. (The maximum is 100% times the number of virtual cores, or 2400%.) Notice, also, how none of the processors are working very hard; the average CPU usage is 7.72%.
UPDATE
While this is a true statement, we are missing any measure of how hard the GPUs are working. In fact, Activity Monitor provides no GPU tracking at all. All this means is that the CPUs may be mostly idle because the GPUs are working extra hard. There’s no way for us to easily know. CPU load will vary by codec. For example, ProRes encoding uses CPUs and GPUs much more extensively.
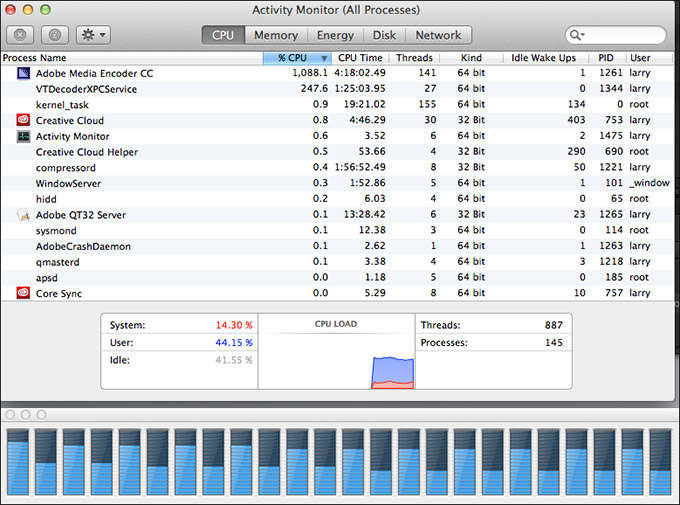
This screen shows Adobe Media Encoder munching its way through a file using almost 1100% of total CPU power. Notice how it uses system resources much more intensively and the processors are much busier; though even here the average CPU usage is only 44.15%.
Take-away? Don’t judge speed solely by Activity Monitor.
THE INITIAL RESULTS
This table is a subset of my initial results – I removed the portions that were most incorrect. However, even here, notice the huge variations in file sizes. This is a clear indicator, though I didn’t realize it at the time, that we were comparing kumquats to rudabegas. I was using default settings, but the default settings did not match.
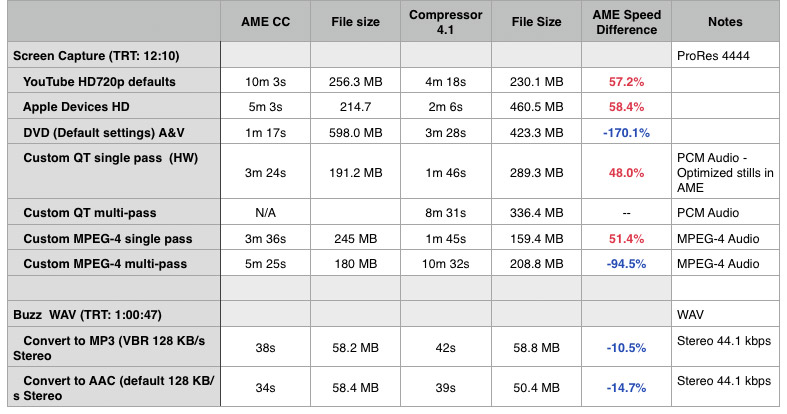
(Click the image to display a larger view of this spreadsheet.)
In my research and conversations, it became obvious that I made two significant mistakes in my original methodology. First, was that I did not check for image quality as well as speed. Second, the large file size variations indicate major differences in data rate; which affects both compression speed and image quality.
So, I went back and retested, focusing just on MPEG-4.
UPDATE: THE RETEST
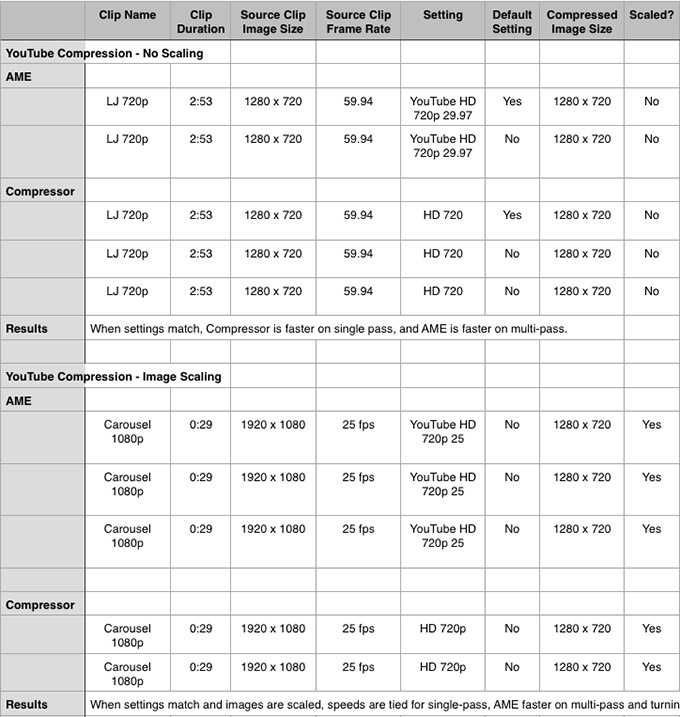
(Click the image to display a complete view of this spreadsheet as a PDF.)
The most obvious finding in the new results is that the default settings used by AME and Compressor use different bit rates, MPEG-4 profiles, and methods of matching frame rates. When those are adjusted to match – as closely as possible – the compressed file sizes and data rates are almost identical.
When compressing files without scaling the image size, Compressor has an edge in single-pass encoding, though the Mac Pro does not use hardware acceleration, while AME has the edge in multi-pass encoding.
When compressing files that require image scaling, both applications are about the same speed in single-pass encoding, while AME retains its lead in multi-pass encoding. Again, file sizes were within 500 KB of each other.
Image quality for both software was excellent with data rates of 5 mbps or greater. These would be typical compression settings for YouTube. However, when the data rate dropped to 2 mbps, which is more typical for posting to a local website, AME had better image quality, with Compressor exhibiting artifacting and lack of detail around edges. More on this in a minute.
In general, AME was faster compressing MPEG-4 video, but the speed differences and file sizes were MUCH closer between the two applications.
UPDATE: EXPLAINING AME’S “MAXIMUM RENDER QUALITY” SETTING
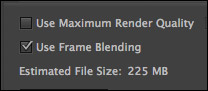
There’s a checkbox at the bottom of the AME’s settings pane that is off by default, called “Use Maximum Render Quality.” When I was talking with Patrick Palmer, I asked him about this.
When you are scaling an image (meaning you are changing its size from bigger to smaller), turning this on accesses a higher-quality scaling algorithm that will improve the image quality of the reduced image. However, it will also increase compression time. If you are not changing the size of an image, you can leave this off.
Initially, based on Patrick’s comments, I was tempted to leave this off, because it would slow compression down too much. However, in my testing, I saw virtually no difference in compression speed when this was turned on. Nor, for that matter, did I see much difference in image quality. If you are reducing an image by 50%, leave this off. Otherwise, it probably won’t hurt to turn it on.
As a side-note, if you are enlarging an image, Patrick recommends using After Effects, rather than AME. After Effects just improved all its scaling algorithms and enlarging an image in After Effects will look better than enlarging an image in AME.
UPDATE: COMPARING IMAGES
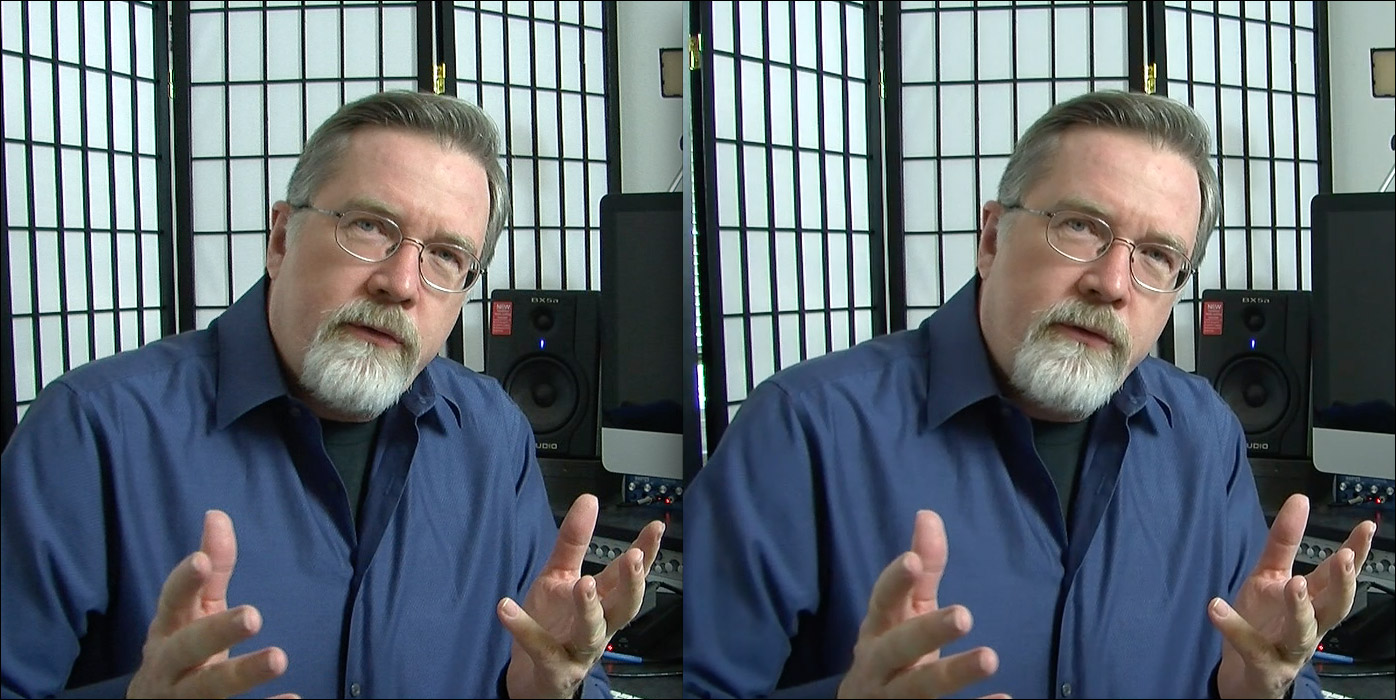
In the retest, I also wanted to compare image quality. While image quality at the higher bit rates was excellent in both software, there were noticeable differences. Here are three examples.

(Click to see a larger image.)
Here is a comparison of the original file on the left, and the Adobe Media Encoder file compressed for YouTube at 10 mbps on the right. Notice the a lack of color with a color shift toward red in the compressed image.
(Click to see a larger image.)
Here is a comparison of the original file on the left, and the Compressor file compressed for YouTube at 10 mbps on the right. There seems to be a slight decrease in saturation, but the color seems quite accurate.

(Click to see a larger image.)
However, when the data rates dropped from 10 mbps to 2 mbps, there was a decided difference in image quality. The AME compressed file is on the left, the Compressor file is on the right. The settings were as close to identical as I could make them – 2 mbps, multi-pass, MPEG-4 Main profile. Keep in mind that this frame is in the middle of her spinning rapidly in the shot.
The AME image is better. Compare the pink piping in her top – visible in the AME version, blurred in Compressor. Look at the edge of her lips and nostrils. Sharp in AME, but with artifacts in Compressor.
Every compression setting will yield different results. It is not correct to say that AME is consistently better, but it is better in this specific instance. What I do want to emphasize is that spending time tweaking your compression settings can improve your results.
UPDATE: THOUGHTS ON ADOBE MEDIA ENCODER
Though AME was generally faster, AME was less flexible in many of its settings. For example, based on my first tests:
UPDATE: WHAT I LEARNED
The biggest lesson, for me, is that just because a setting is a default setting, does not mean it has the same properties as a similar default setting on other software. I forgot what I teach in my own training: The principle determiner of file size is bit rate. If file sizes are significantly different, then the bit rates don’t match. Which means that the settings don’t match, which probably also affects image quality. In my initial tests, I wasn’t paying enough attention to the individual specific settings.
There are multiple ways to compress a clip, yet still end up with a compliant file. Different methods of compression, like different paths up a mountain, will yield different results yet still take you to the same place. However, simply considering speed without also considering image quality and file size is inadequate.
When I took the time to match settings, the resulting file sizes are very similar. When bit rates suitable for YouTube are used, the image quality of both applications is excellent. As bit rates decrease, image quality starts to suffer. Which is an excellent reason to test your settings whenever you are compressing a new movie.
Neither of these applications yields exactly the same speeds or compressed file size. What this means is that if you are having problems getting a file to the size you need, or compression is taking too long, or you don’t like the look of the compressed file, try another compression application.
There is no obvious reason why Adobe is so slow at compressing screen capture movies. If screen caps are your life (think training), Compressor is probably better choice.
If MPEG-4 is your prime focus, AME may be the better choice. If QuickTime movies are your primary focus, Compressor wins. AME is the best choice for Flash. Compressor for HTTP Live Streaming.
For me, the biggest take-away is the complexity of something as simple as video compression. Legacy codecs force software to keep one foot in the past, while hardware changes force them to keep another foot in the future. We are still in the very earliest days of optimizing compression for the Mac Pro and today’s hardware. As I learned, video compression is both a test of the hardware and the programming artistry of the engineers writing the software.
While both Adobe and Apple each have something to brag about, both applications are also an evolving work in progress.

2,000 Video Training Titles
Edit smarter with Larry Jordan. Available in our store.
Access over 2,000 on-demand video editing courses. Become a member of our Video Training Library today!
Subscribe to Larry's FREE weekly newsletter and
save 10%
on your first purchase.

37 Responses to New Mac Pro: Adobe Media Encoder vs. Compressor [Updated]
← Older Comments Newer Comments →-
 Al B. says:
January 13, 2014 at 12:23 pm
-
 William Hohauser says:
January 14, 2014 at 9:26 am
-
 Al B. says:
January 14, 2014 at 10:11 am
-
 William Hohauser says:
January 14, 2014 at 10:47 am
-
 Jim B says:
January 15, 2014 at 2:16 pm
-
 Ryan Holmes says:
January 15, 2014 at 2:40 pm
-
 greytail says:
January 20, 2014 at 8:16 am
-
 Larry Jordan says:
January 20, 2014 at 9:15 am
-
 Philip Hodgetts says:
January 20, 2014 at 11:11 am
-
 David Arbor says:
January 20, 2014 at 11:18 am
← Older Comments Newer Comments →Great info David. I didn’t even think to set my previews to Prores. I’ll have to try that. And thanks for that info Larry. I hadn’t even though about the issue of de-compressing the footage and then sending it back out in the same format. I guess that I had forgotten that Vimeo and Youtube could accept AVCHD for example, because it already *is* H.264 MPEG-4. Likely for a lot of my work it won’t look any better really. But I’ll have to try it out. As usual my *assumptions* were wrong.
Yes, it is indeed called “CompressorTranscoder” and it is 32bit. I just made a set of h264 files in varying sizes of the same file using the stock Compressor Video Sharing settings with the single-pass adjustment except for one transcode and this is what happened on my 2009 8-core MacPro:
HD1080p – 1000% CPU usage – CPU graph hovered over 80 to 85% on the 16 bars
HD540P – 750 to 800% CPU usage – CPU graph hovered between 70 and 75% on the 16 bars
Small (left this in multi-pass) – 500% CPU usage – CPU graph hovered around 500% on 8 alternating bars and around 5% on the rest.
I do not have multiple instances set up as they stall Compressor completely, I have been in communication with Apple about this as it’s been a running issue with Compressor and the old Qmaster on my MacPro for awhile. I probably need to do a clean system install but work prevents me from a drastic measure like that.
Interesting. What version of the OS are you using? It would seem an older version as it appears from both Larry and your results that the new version on the new MP is running in some way that the process is not capable of taking the whole CPU while on yours it is. I don’t know enough of how the Mac OS handles threads to understand why the newest OS doesn’t use all available memory to do a conversion task like this. Bottom line is that you’d think it would allow for much faster operations than Larry is getting and that if they ever rewrite it into 64 bit, it’s likely to really be much faster.
Once my new MacPro arrives, I’ll be able to give it a test. Some time in February unfortunately. Right now I am running 10.9 updated completely.
There seem to be things going on that maybe an experienced programmer could clarify for us. I just made some DCP files of the same project for digital projection and watched the program in Activity Monitor as it used the CPUs. Just like Compressor (but unlike FCPX), the DCP program launches a separate rendering program behind the scenes but this one is 64bit and there is a separate renderer launched for each CPU so there ends up being 16 identical renderers running at once on my computer. The percentages for each DCP renderer go up to 100 percent, none of the over 100% readings we get with other programs, while filling the bars in the CPU graph. Oddly the special DCP player made by the same company, which is also 64bit, plays back the finished files but it goes to 1000% inside the program while running while using all the CPUs to around 80%.
While FCPX gets into the video card for it’s horsepower, it is possible that Compressor and it’s rendering codecs are more CPU based. Why? Good question.
Great information Larry. For the past year or so, I’ve been using Sorenson Squeeze for almost all my encoding. It has always seemed faster to me than Compressor and AME but I have never really compared them. It’s just my “gut feel”, but I would like to see how they actually compare to each other. I really like the Squeeze interface and it’s loaded with options you can apply during the encoding process. Maybe you can put this on your ‘to do’ list for a future date.
Larry – nice write up. I’m glad to see people kicking the tires of the new Mac Pro (or is it kicking the can in this case?)!
As for AME, when making a DVD if you select the audio tab you can chose several different audio formats – Dolby Digital (which is ac3), MPEG, or PCM. In your test case, you’d want to select Dolby Digital. AME also provides the ability to mux the file together or not (see Multiplexer tab). If you mux the file it’ll combine the ac3 and m2v file together. If you chose not to mux it will leave them as two independent files.
I would like more clarity on your first point: “AME does not allow selecting single-pass or multi-pass encoding for QuickTime movies.” Since Quicktime is just a wrapper the codec used will often determine what options you get presented with (i.e. ProRes, DNxHD, DV, etc.). Same goes for the audio bitrate adjustment…that varies from format to format. If you make MPEG-2 or MPEG-4 files then you’ll always have the option. But formats like Quicktime, DNxHD MXF OP1a, P2, etc. have standard bitrates for audio.
Thanks for doing these tests for the larger video community. It’s much appreciated!
I’d be interested what you all think of Squeeze 9. What has happened to Sorenson? It seems to have gone down hill. The latest encodes for Vimeo and YouTube result in jittery footage using the program’s default settings for Vimeo and YouTube. I find that AME gives the best results for Vimeo with slightly smaller files. AME is also the best if you want to make DVDs or Blu Ray with Encore.
Greytall:
Here’s a review I wrote recently about Squeeze: http://www.larryjordan.biz/review-sorenson-squeeze-9-pro/
Larry
I’m not sure who I am to contradict a product manager about their own product, but I found that Adobe Media Encoder absolutely uses two GPUs for some encodes – specifically h.264 in my testing. With two GPUs enabled (default) using the Mercury Engine (OpenCL) on a Mac Pro, h.264 encode of a 1’22 timeline (RED RAW, 1-4 streams in places) took 4’11”
After forcing Premiere Pro/AME into single GPU mode that encode was 13’38” seconds. Very clear evidence that the second GPU is used where Adobe have the opportunity to write optimized code.
My results comparing export encode times in Premiere Pro CC and Final Cut Pro X 10.1 are at http://www.philiphodgetts.com/?p=14491
Philip
Phillip, you mentioned a timeline rather than a single file. Does that mean you’re queueing a sequence from Premiere to AME? If so, when you do that, or when you import a Pproj. natively into AME, it will use PProHeadless to do all the work, hence, how you’re seeing two GPUs working. What I suspect Patrick is saying is that AME native only uses one GPU. When encoding through Premiere/PProHeadless, you get all the advantages of exporting from Premiere. Every GPU accelerated effect is processed on the GPU, as opposed to the limited number of GPU accelerated processes in AME like the new filters, scaling, de-interlacing, and a few others.