 [UPDATES: Nov. 2, 2020. Adobe removed XML import from After Effects in the 17.0.5 update. The new recommendation is to import an XML file into Premiere Pro, then save the project. Next, either open the PPRo Project in After Effects or Dynamic Link it to After Effects. Jan. 10, 2021, with a new export screen shot from FCP.]
Most of the time, when you start a project in Final Cut Pro, you’ll want to finish the edit in Final Cut. However, there may be reasons that you need to move a project from FCP to Premiere in the middle of an edit; for example, you need to change editors and the new editor is more comfortable in Premiere.
You CAN move projects between apps and this article explains how.
But…!
FCP and Premiere use two different versions of XML (similar to English and French). So, in order for one app to read the XML of the other, it needs to be translated. This requires a utility called: “XtoCC.”
This translation process isn’t really difficult. A more fundamental problem is that the underlying software architecture between FCP and Premiere are very, very different and not everything in your edit will successfully transfer. You need to understand these differences in order to determine if and when is the best time to move projects between software.
This process applies to any Final Cut Pro X project that you want to send to:
NOTE: Here’s an article that explains how to move projects from Adobe Premiere Pro CC to Apple Final Cut Pro X.
EXECUTIVE SUMMARY
The best time to transfer projects is during the rough-cut process, before you start adding transitions, titles, color grading or effects.
Moving rough-cuts between software will almost always be successful. However, for projects you are moving between applications, media must be store OUTSIDE the Library.
In order to transfer between FCP and other applications, you’ll need a utility called: “XtoCC.” Developed by Intelligent Assistance, it is available here in the Mac App Store. The reason this utility is necessary is that FCP and Premiere speak two different versions of XML; this utility converts between them.
WHAT TRANSFERS SUCCESSFULLY
WHAT TRANSFERS MOSTLY
WHAT DOESN’T TRANSFER
Because the effects engines between FCP and other applications are so different, anything that involves an effect won’t transfer. This is why I recommend translating projects in the rough-cut stage, before effects are applied. Here’s a more detailed list:
NOTE: Premiere can import XML containing multiple sequences, nested sequences, event clips etc. Basically anything that’s in a Library or Event. But After Effects and Audition only accept XML with a single sequence and no nested sequences (which means no Compound Clips in your Project).
HOW IT WORKS
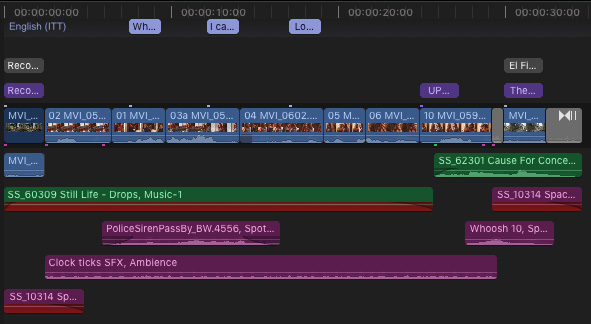
Here’s a typical projects in FCP; though short, this can easily illustrate the transfer process. It contains video and audio clips, transitions, titles and captions.
To move this project from FCP, you need to create an XML (eXtensible Markup Language) file. This contains pointers to all clips, but not the actual media, as well as settings for just about everything in the project file.
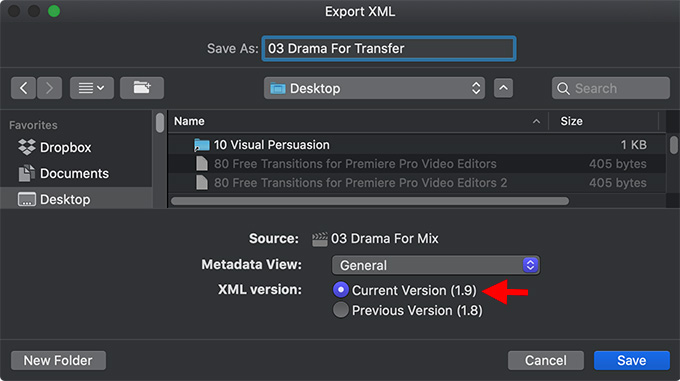
Select the project, then choose File > Export XML. In the resulting dialog, give the XML file a name and storage location. Then, click OK.
NOTE: Be sure to always pick the latest version of XML (Version 1.9 in this screen shot).
In just a few seconds, an XML file is created. XML is a language similar to HTML that you see on many web pages, that explains how the project was created, but doesn’t contain any media. It just contains all the different settings applied to each clip.
NOTE: For long-term archiving, I strongly recommend you save an XML version of every project you want to save. For example, we can convert FCP 7 XML projects easily today, but can’t convert a single FCP 7 project. XML is a long-term archiving format.

NOTE: XML files are just text files. You can open them with TextEdit and see what’s inside; for example the screen shot above is from my project. The good news is that you don’t need to understand how to read an XML file in order to use it.
At this point, you can quit FCP. You no longer need it.
CONVERSION
Here’s where the magic happens. Drag the XML file on top of the XtoCC application – either in the Applications folder or the Dock. This opens the application and starts the XML conversion process. (Sigh… you can also simply open the app, then select the XML file from the File Picker window, but that is a whole lot less fun.)
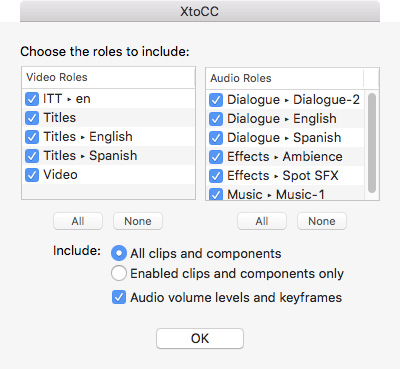
After a few seconds, the translation process is complete. XtoCC then asks which roles you want to transfer. At this point, you have a lot of choices:
In this case, I want to move everything, so I’ll leave all boxes checked and click OK.
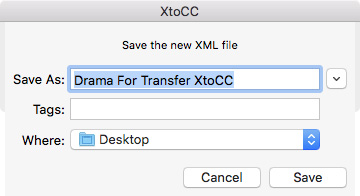
XtoCC displays a dialog asking what I want to name the converted file and where I want to store it.
NOTE: When working with XML files, I generally leave them on the desktop to make them easy to find. I’ll move them into a more permanent location after all the translation is done. This is a personal habit, you can store these wherever you want.
At this point, you can close XtoCC. You are done with it.
IMPORT INTO PREMIERE
The final step is both fast and easy. Open Premiere.
From the Welcome screen choose File > Open and open the XML file directly. You don’t need to create a new project or open an existing one.
Premiere reads the XML file, imports all the media and builds a new sequence in the Premiere timeline based on the original FCP project.
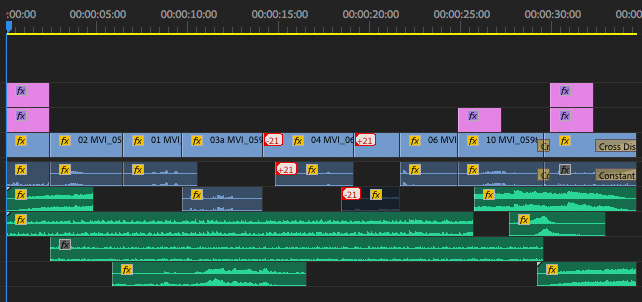
Ta-DAH! There’s your transferred project, ready to edit.
EXTRA CREDIT
2,000 Video Training Titles
Edit smarter with Larry Jordan. Available in our store.
Access over 2,000 on-demand video editing courses. Become a member of our Video Training Library today!
Subscribe to Larry's FREE weekly newsletter and
save 10%
on your first purchase.
13 Responses to Transfer Projects Between Final Cut Pro and Adobe Premiere Pro CC [u]
Hi Larry. Happy Football Sunday.
I finally got the point where I needed to convert about 500 (no joke) FCP 7 projects to Premier CC projects. But it won’t work. Most of the time it seems to be importing, but then no sequences or video or anything for that matter shows up in the new Premier Project. I went online to see that many people experience this. I guess it’s a CC glitch. But I’m stuck. Do you know how to fix this, OR, which version of Premier would work with exported FCP 7 XML files? I could try to find an older version somehow and spend a month converting all my projects.
Thanx in advance! ~ Andrew
Andrew:
This is supposed to work: Export an XML file from FCP 7, then using File > Import in Premiere to bring the file in. No conversion is necessary.
I’ve sent a note to my contacts at Adobe to see if I can learn more. I’ll let you know what I find out.
Larry
Hello Larry,
I’m working in FCPX 10.4.8, XtoCC 1.2.14, Premiere Pro 2020.
I have a project that has two camera angles, and two audio dialog tracks recorded on an external recorder. I’ve imported both camera angle clips and both audio clips and created a synced multicam clip. (highlight all, right click, new multicam clip). I moved this multi-cam clip to the timeline, selected the external recorder audio track and made a few cuts between Cam A and Cam B.
I’m wanting to migrate this over to Premiere Pro 2020. According to the HelpX Adobe article and video at https://helpx.adobe.com/premiere-pro/how-to/migrate-from-final-cut-pro.html there’s a way to import this project into Premiere Pro and the different camera angles appear synced on the sequence timeline in Premiere.
I’ve copied the verbiage from their website below. Specifically the last bullet point of the angles being synced on separate tracks.
-Migration Results
*Bin Hierarchy is preserved when migrating collected clips and events from FCPX to Premiere Pro.
*Many effects migrate from FCPX to Premiere Pro, including dissolves and wipes, motion effects, titles, speed variations, audio keyframes and levels.
*Alpha Channels from FCP footage migrate.
*Multicam footage, if not flattened in FCPX, becomes a Multicam Sequence in Premiere Pro if it contains 4 or fewer camera angles.
*If a FCPX Multiclip was flattened in the FCPX Timeline, camera angles will appear as individual clips on separate tracks, synched in the newly created Premiere Pro Sequence.
French:
There’s a problem here. I just ran a test and Premiere 2020 does not natively import FCP X XML files. You’ll need to convert the FCP X XML using X2CC from the Mac App Store.
At which point you can import the project.
Also, while FCP 7 flattened multicam projects, FCP X does not. My guess is that whoever wrote this did a copy/paste from old FCP 7 instructions.
Larry
Thanks for replying Larry! i’ve made a screen capture video of exactly what i’m doing. I have XtoCC so I’m able to open the FCPX project in Premiere, but I’m not able to get the MultiCam Clip function as an option on the migrated timeline. Here’s a video showing what I’m doing. Maybe this isn’t possible, but the Adobe Support that made the help video on the subject says she did it.
https://vimeo.com/406253861/ab358b0afd
French:
I just skimmed your video. The BEST advice is to contact the team at Intelligent Assistance (www.intelligentassistance.com) and ask how X2CC handles multicam clips. They may even have a tutorial posted on their website that answers this.
The problems you are having are most likely in how X2CC converts the XML between FCP X and Premiere.
Larry
Thank you kindly!
I have moved my files from FinalCut to Premiere Pro using XtoCC but the images are all stretched in Premiere. Everyone tells me I have to change my sequence settings but this doesnt seem to make a difference. I think the footage was shot in 1440×1080 and that is causing the problem but cant seem to fix it. Any ideas?
Madeline:
You have the wrong pixel aspect ratio.
The big difference between HDV and “normal” media is the aspect ratio of each pixel. Just today, I got an email from a reader asking why their footage looked “stretched.” Here’s what you need to know.
Back in the old days, as we were making the transition from standard definition video to HD, cameras and storage devices were neither big enough nor fast enough to capture and record a full HD video stream.
To solve this problem, Sony and Panasonic created HD formats with non-square pixels. This meant that they could record fewer pixels, then stretch them horizontally in the final display so that fewer pixels would fill more space.
For example, while HDV records 720p footage using square pixels, instead of recording an image at 1920 x 1080, it records it using 1440 x 1080, then stretches each pixel’s width to fill the space of 1920 pixels, using only 1440 of them.
The problem this causes in editing is that, today, NLEs expect HD pixels to be square. When you work with older footage, if your image looks squished, check your pixel aspect ratio – or your project settings – to make sure you are compensating for these earlier rectangular pixels.
HDV for a 1920 image uses a 1.3 : 1 aspect ratio. You’ll find this as a preset in Premiere.
Larry
The workflow that i do :
make all rough cut and sound edit in fcpx
export the whole timeline as mov-APPLE PRORES 422 HQ
open mov in primiere
overdo transitions wwith adjustment layer
do all the effects
export
.
I only use this because i find it harder to navigate and find the best scene in individual clips in primiere . fcpx with touch pad and macos inbuilt video viewer makes my workflow much faster in cutting
.
all the dirty work is done in primiere
Lilaquath:
A very interesting workflow. Thanks for sharing.
Larry
Hello,
I’m transferring from final cut into Premiere, but notice that the audio is really spaced out and stretching out down to almost 50 tracks. Part of it is that the camera audio is included with the boom audio (in final cut the camera audio is mostly detached and deleted to make room for the boom audio). Any suggestions for transferring where the audio renders much neater? Thanks.
Mary:
Which version of Final Cut are you using? And do all those tracks appear in Final Cut?
Larry