
![]() [ Learn more about creating paths and animation in Motion 5 in this video tutorial. ]
[ Learn more about creating paths and animation in Motion 5 in this video tutorial. ]
After posting last week’s video on creating animating text on a path in Motion 5, I got a number of emails asking how to create an animated line tracing across a map, suitable for travel videos.
So, if you will overlook the fact that I can’t design my way out of a paper bag (even with a map), here’s the process.
NOTE: By the way, this technique works the same in Motion 4, using the same tools – the only difference is the interface.
GET ORGANIZED
I created a new Motion 5 project that matched the settings of the video where I want to use this animation.
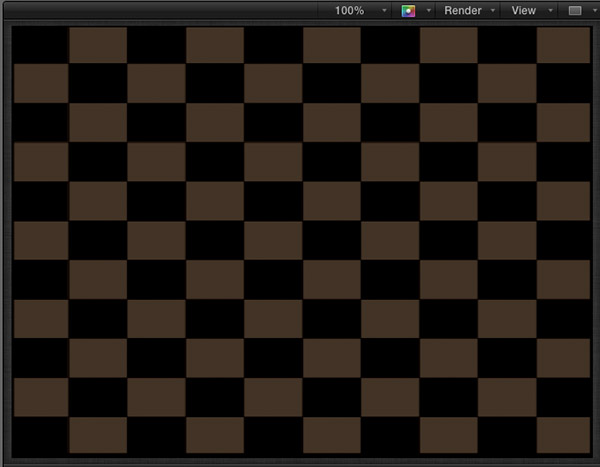
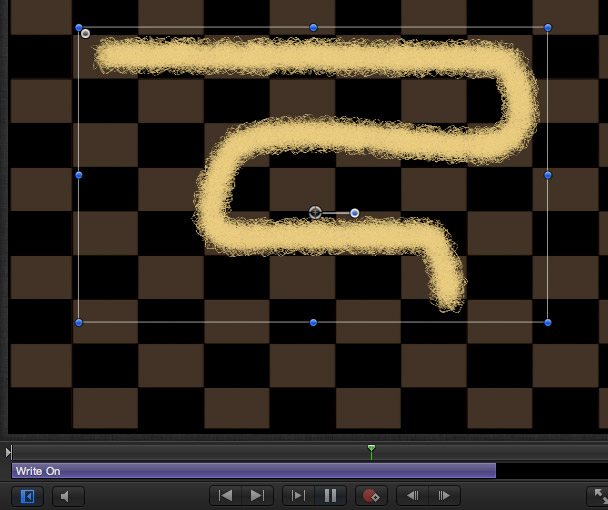
SIDE NOTE: The astute among you will no doubt notice this is not, actually, a map. It is, in fact, a checkerboard. That’s because I couldn’t figure out where to find a public domain map. So, I’m using the next best thing. Imagine there are roads drawn all over this.
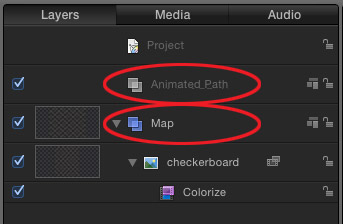
In the Layers panel, I created two folders (you can call these folders whatever you want):
CREATING THE PATH
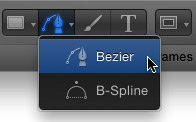
First, select the Animated Path folder. This determines where the shape you are about to draw will be stored. Then, select the Bezier pen tool (keyboard shortcut B) from the toolbar at the bottom.
NOTE: Seeing as I ALWAYS forget to do this, be sure your playhead is positioned where you want the animated line to start drawing. It does not need to be at the start of the mini-Timeline, just be sure that the playhead is located where you want it.
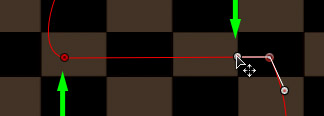
Click the pen tool on the map where you want your path to start.
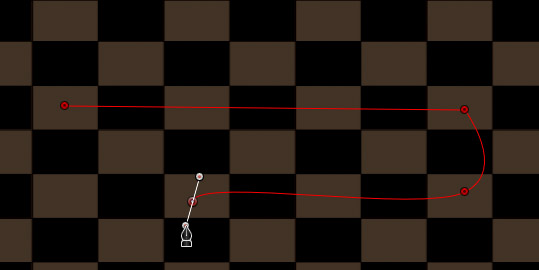
Then, click at each point along the map where you want to make a turn. If you need a curve, click and drag to create the curve. Your goal here is to get the curve close, you will tweak the shape of the curve after you get the entire path drawn.
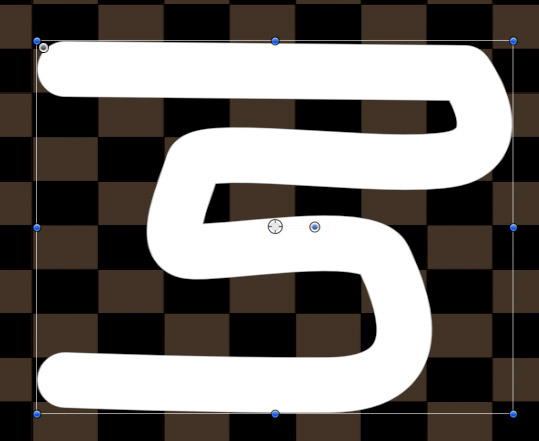
When you have finished the path press the RETURN key, or double-click the mouse. This creates an open shape and automatically traces the path with the default outline – a thick white shape.
Don’t panic. we will improve the look of this shortly. (This shape is the reason no one will hire me to design the open to Monday Night Football…)
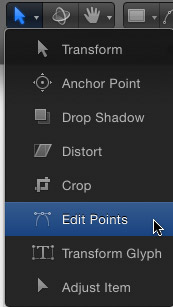
To adjust the path, first be sure the Bezier layer containing the shape is still selected, then select the Edit Points tool.

So that you can see the path more easily, display the HUD (F7) and uncheck the Outline option.
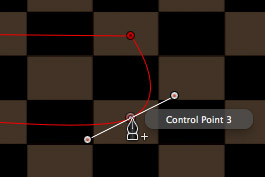
To adjust a curve on the path, click a Bezier control point with the Edit Points tool to select itl. Drag one of the dots at the end of the white line to adjust the shape of the curve. Move the dot closer or farther to the control point to change the shape of the curve. Move the dot in an angle around the control point to change the softness of the curve.
Play with this, it is easier to see than to explain.
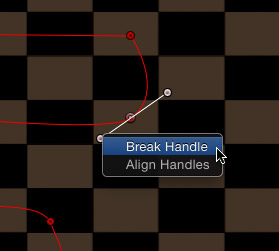
NOTE: Right-click a white dot at the end of the line. Break Handles allows you to move one dot separately from the other dot. Align Handles creates a straight line between the two handles. Link Handles allows the two sides to operate in tandem, this re-connects them after they were broken.
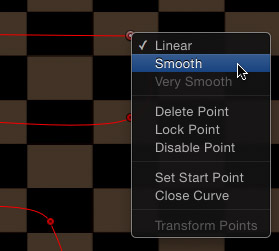
If you need to convert a corner to a curve, right-click a control point to convert it from Linear to Smooth. To convert a curve to a corner, change it from Smooth to Linear. The Delete Point allows you to delete an unnecessary control point. Lock Point prevents the point from moving or changing.
For instance, here I converted a curve to a corner by breaking the handles, then adjusting the two closest handles on each control point to point to each other. This creates both a corner and a straight line between them.
When you are happy with the shape of the line, it is time to dress it up.
COVERING THE PATH
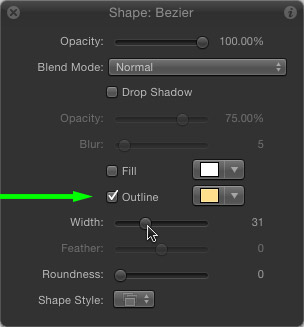
In order to create an animated path, open the HUD and turn on Outline. Adjust the width to something reasonably fat. You can adjust this at any time to get the look you want, after you pick a pattern you like.
At this point, if you like clean lines, give the outline a color and you are done.
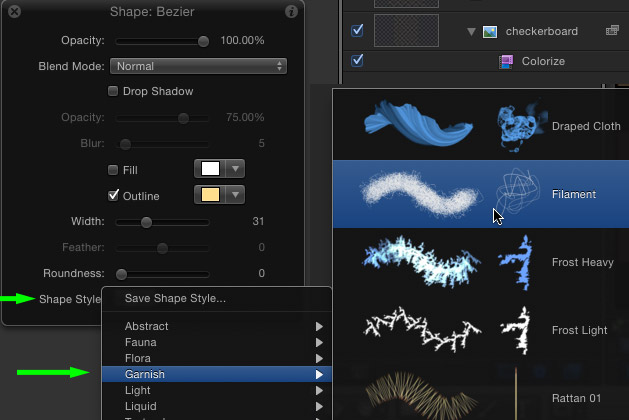
However, if you want something different, or with texture, click the Styles menu at the bottom. There are almost a hundred different styles to choose from. In this example, I chose Garnish > Filament and colored it a medium yellow.
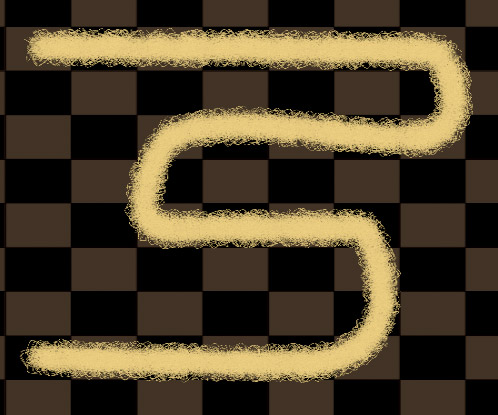
Here’s how it looks so far.
ANIMATING THE PATH
Now we need to apply some animation to make the line move. That requires the Write On behavior.
Again, be sure the playhead is where you want the animation to start – generally, this is the same point where you started drawing the path – and be sure the Bezier layer is still selected.
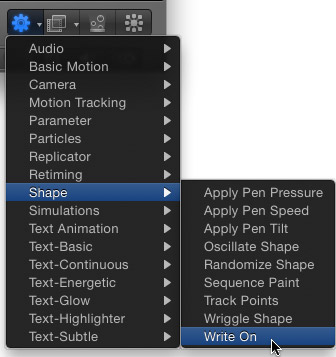
From the Behaviors menu, select Shape > Write On.
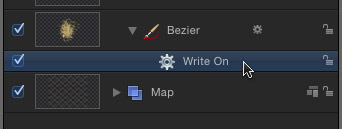
Notice that the Write On effect appears under the Bezier layer.

And, when you select the Write On behavior, a purple line appears in the mini-Timeline. This line indicates where the effect starts and stops. To change the speed or timing of the effect, change the duration or location of this purple bar. The shorter the purple line, the faster the effect plays.
In this screen shot, the effect starts immediately, but ends before the end of the project. This allows the line to draw fully, then pause before the end of the project so I have time to transition from the effect to another shot when editing this back in Final Cut Pro.
Press Play and watch the line draw as it follows your path to its final destination.
Very cool!
– – –
EXTRA CREDIT
If you want the line to stop and start, create multiple paths, each with its own Write On behavior and adjust the timing in the mini-Timeline so that the line stops and starts as you need.
To add symbols like circles for each city reached, add these as separate elements, timed to correspond with the arrival of the line.
EXTRA EXTRA CREDIT
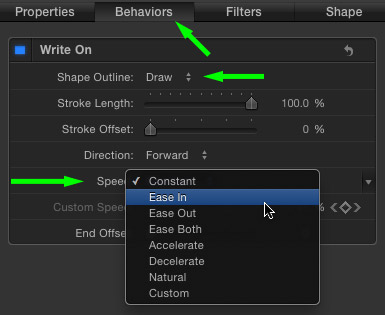
The Inspector provides a lot of speed and drawing options for this behavior, including the ability to draw the line and erase it at the same time.
The Speed behaviors support Ease In/Out and acceleration.
For more information, read the Motion Help files, or just play with them and see what happens.

2,000 Video Training Titles
Edit smarter with Larry Jordan. Available in our store.
Access over 2,000 on-demand video editing courses. Become a member of our Video Training Library today!
Subscribe to Larry's FREE weekly newsletter and
save 10%
on your first purchase.

5 Responses to Motion 5: Animating a Map Track
Larry,
Thanks for the tutorial – especially the part about multiple paths for doing a “start & stop” animation. It’s one of solutions that’s so obvious we often overlook it (or at least I do). BTW – you can get free maps at USGS.GOV and NATIONALATLAS.GOV. While you are at USGS, check the Earth As Art (EROS) section.
As much as I loath most things Texas, for those of you who may not be aware, the University of Texas has a fabulous map collection. I am not sure how to quickly determine which maps are in the public domain, but I would guess there is a way.
http://www.lib.utexas.edu/maps/
Incidentally, I found another way to accomplish this trick, one which seems to have fewer steps. Basically you draw the stroke, and then you create keyframe in the inspect and adjust the setting for “Last Point Offset” accordingly. It works if you are simply “showing progress.”
Thanks for another great tutorial, Larry!
Motion 5 has changed since this was written. The new format does not seem much different, but the suggested procedure does not always work – the Bezier points sometimes refuse to turn into anything when the Return key is pressed at the end of the line and they remain as Bezier points. When the Write-on is added, the Bezier points disappear from the map. The Bezier trace appears in the icon in the Layers panel, and will progress as the cursor is moved, but does not write on the map. So something extra needs to be done, but what I wonder?
OK, very simple. It is important that the Layer panel is arranged so that the Bezier path layer is above the map layer i.e towards the top of the screen, otherwise the Bezier will be behind the map and you won’t see it. It seems that if you import the map, then create the Bezier path, it will naturally come second, be towards the bottom, and be invisible behind the map. You can of course drag and drop to re-order them.
I need some help here I’m A Gamer And Video Editor And I play call of duty and edited call of duty video’s and one thing I can’t finger out is lets say I get a kill in the game the and the other person drops how do I add effect that would highlight them when I aim at them in the game is there anyway I can creat this effect in any color please let me know thanks