
![]() Motion tracking allows you to link the movement of one image to a second image below it. In this example, I’ll show you how to motion track some text so it moves in sync with an image.
Motion tracking allows you to link the movement of one image to a second image below it. In this example, I’ll show you how to motion track some text so it moves in sync with an image.
Here’s how this works.
Open Motion 5 (though this procedure works essentially the same in Motion 4) and create a new Motion project. In our example, we are working with NTSC DV media – however, this process works for all image sizes and video formats.

The hardest part about motion tracking is finding a point somewhere within the image that’s moving that you can use for the track. If you only need to track the horizontal or vertical position, you only need one position. If you need to track rotation and zoom, you need two.
For example, in the images above, I was hoping to track the snowboarder, but these three shots didn’t work.
In all three cases, I could not find a reliable location to use for tracking.
A tracking location should be:

Here’s an example of a good tracking location: the bowl of the number “5” – high contrast, in the frame the whole time, small with clear edges, and attached to the moving object. However, it is also attached to an image that I don’t have the rights to use. Sigh…
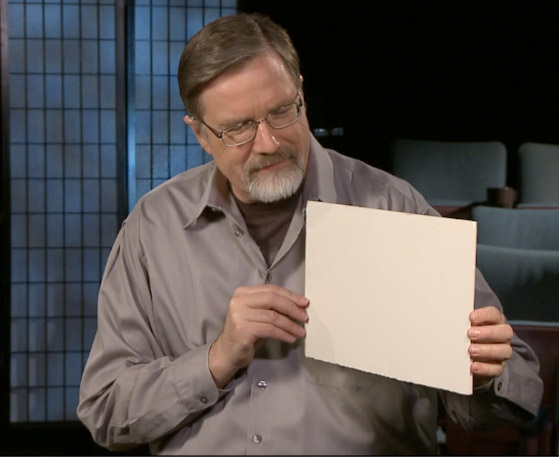
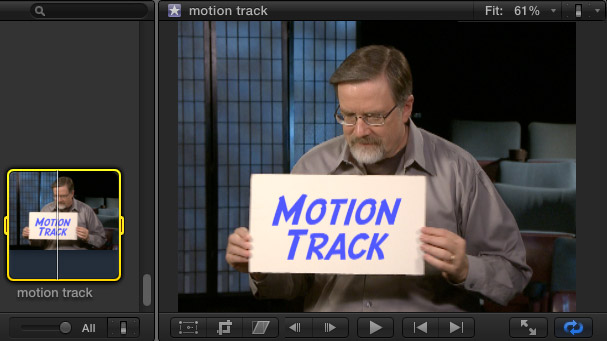
Hmm… what to do, what to do. Ah! I found another example – me, holding a white card. In this case, I can track a corner of the card, because it is small, sharp-edged, and clearly delineated from the background.
Now that we’ve found a clip we can use, the procedure itself is very simple. Watch this.
Add both the background clip and the clip you want to track into your Motion project.
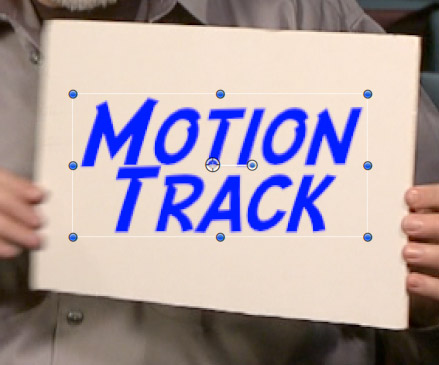
Finally, position the clip you want to track – in my example, the text clip – so it is exactly where you want it to start. In my case, I’m putting it in the middle of the white card. Then, position the playhead at the start of the clip you want to track (the upper clip).
(As you’ll see, this is not an ideal background clip to track – but it gives me a chance to illustrate a problem with motion tracking that you will need to consider in your own effects work.)
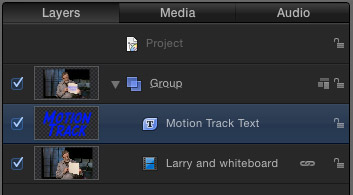
In the Layers panel, select the clip you want to track. In my case, it’s the layer “Motion Track Text”. The background clip needs to be on a lower layer than the foreground clip, unless you are working in 3D space.
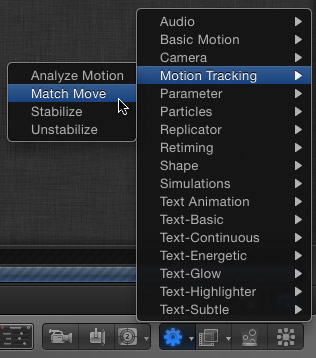
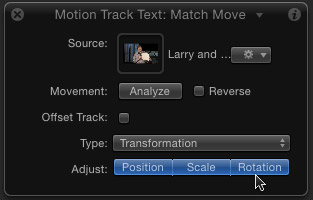
Apply Behaviors > Motion Tracking > Match Move to the text layer.
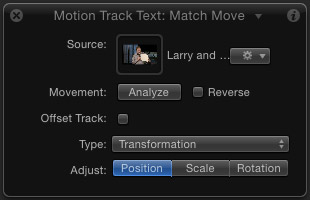
If the HUD isn’t showing, press F7 to display it. If the foreground clip was selected, the HUD should automatically display the background clip in the small graphics well at the top. If not, drag the background clip from the Layers panel into the small graphics well at the top of the HUD. This tells Motion which clip it needs to analyze for movement.
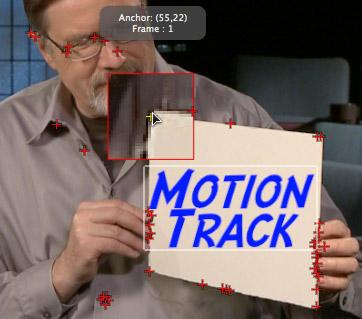
As soon as you apply this behavior, Motion displays a small red X in a circle in the middle of your image. This is called a “tracking dot.” Drag the tracking dot on top of a clearly defined point on your background image; the tracking location we described earlier. In my example, I’m using the upper left corner of the white card.
As a tip, if you hold the Option key down while dragging, Motion will display a variety of other locations that it thinks would make good tracking locations. (These recommended locations are illustrated by red crosses.) I’ve discovered finding the right tracking location is often a matter of trial and error.)
NOTE: If you only need to analyze the horizontal or vertical position of an object, you only need to set one tracking dot. If you need to track rotation and/or zoom, you’ll need to set two. Click Scale and/or Rotation at the bottom of the HUD to display the second tracking dot. To get the best results, position this dot as far from the first dot as possible.
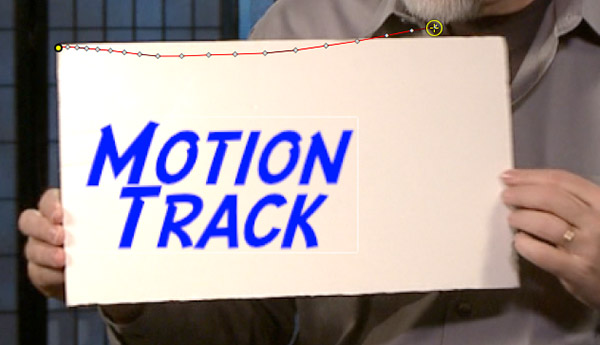
Once your tracking dot(s) are set, click the Analyze button on the HUD. Motion analyzes the movement of your clip and builds a motion track path – frame by frame – for the entire clip. (You can see the completed motion track illustrated by the red line in the screen shot above.)
The good news is that – assuming you have a clearly-defined location point to track – this process is fast and easy.

And the bad news is not really Motion’s fault. Notice in this example that the perspective of the white card changes between the starting and ending position. Motion has no knowledge of perspective.
If you need to track something that changes X/Y position, rotation, or scale, this is a great tool. If you need to track something that changes perspective, you’ll need a different tool – such as Mocha from Imagineer Systems.
Still, the ability to attach one object to another and have them change positions in sync is extremely useful – especially in commercials. The hardest part of the entire process is finding the right tracking location to place a tracking dot.
GETTING THIS INTO FINAL CUT PRO X
Unlike Final Cut Pro 7, you can’t simply save a Motion project as a Motion project, then import it into Final Cut Pro X. FCP X doesn’t know how to import Motion projects. (Also, FCP 7 can’t import Motion 5 projects. The export described below works for both FCP 7 and FCP X.)
Instead, you need to export it as a movie. Select Share > Export Movie.
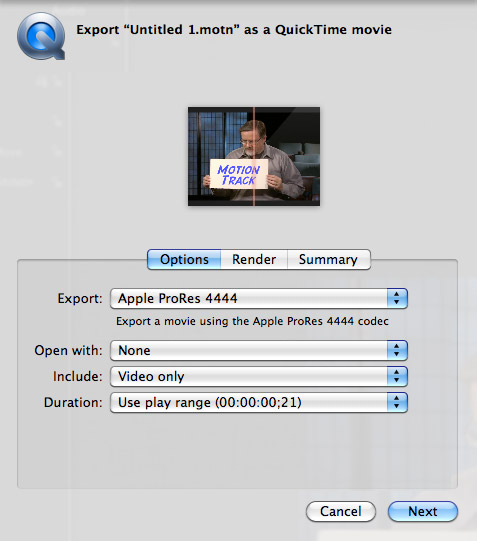
The default settings will be fine in most cases. In this dialog, exporting as Apple ProRes 4444 allows the exported movie to retain any transparency information you created as part of your Motion project.
Click Next, give the file a name and location, and click Save.
Open Final Cut Pro X and select File > Import Files. Navigate to the Motion project and import it.
Done.
Once you find the right tracking location, motion tracking is fast and easy. And definitely worth experimenting with in your own work.

2,000 Video Training Titles
Edit smarter with Larry Jordan. Available in our store.
Access over 2,000 on-demand video editing courses. Become a member of our Video Training Library today!
Subscribe to Larry's FREE weekly newsletter and
save 10%
on your first purchase.
4 Responses to Motion 5: Motion Tracking
Thanks for tutorial. It wasn’t that hard at the end.
[…] […]
Unlike Final Cut Pro 7, you can’t simply save a Motion project as a Motion project, then import it into Final Cut Pro X. FCP X doesn’t know how to import Motion projects. (Also, FCP 7 can’t import Motion 5 projects. The export described below works for both FCP 7 and FCP X.)
Larry, I feel bad that Apple put you in this position with their continued flogging of ‘iMovie Pro’.
My, my goodness…and people wonder why pros are so disappointed with Apple. Don’t tell me ‘I can’t”…tell me “I can, only better!!”
But so far, I’m not hearing it!!! Y’all can play with your ‘work-arounds’, I got work to do with FCS thank you.
Larry,
What are your thoughts on this tool from CoreMelt in regards to motion tracking within Final Cut Pro X?
http://coremelt.com/products/slicex-powered-by-mocha.html
–
Christian