
![]() A common motion graphic effect is to move an object — text or graphic — along a path within the frame. While we can do this in Final Cut Pro X using the Transform options in the Inspector, we have a whole lot more options when we use behaviors in Motion 5.
A common motion graphic effect is to move an object — text or graphic — along a path within the frame. While we can do this in Final Cut Pro X using the Transform options in the Inspector, we have a whole lot more options when we use behaviors in Motion 5.
This technique can be used to move anything within the frame. Let me show you how this works.
THE SETUP
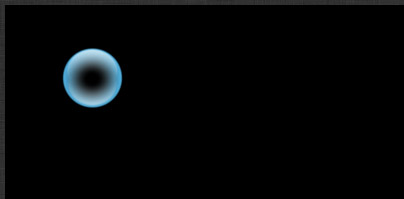
Here is our star: a small blue circle that I placed on the Motion canvas.
NOTE: While I’m using the AquaBall, which you can find in Motion Library > Content > Particle Images, this will work with any visual element; graphics or text.
If all we wanted to do was get this to move, we could apply the Throw behavior [ Behaviors > Basic Motion > Throw ]. This is fast and easy and uses the HUD to adjust the effect. But the Throw behavior doesn’t provide a lot of control over the end position or what happens in the middle of the move.
In this case I want to precisely control the location where the object starts and stops, as well as when the effect itself starts and stops.
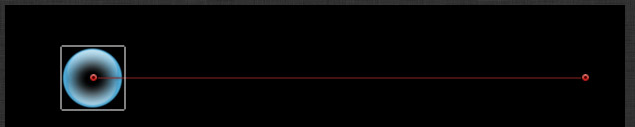
For that level of control, we need to apply Behaviors > Basic Motion > Motion Path. Notice that, once the effect is applied, a thin red line extends right from the center of the blue ball toward the edge of the image; with a red dot at each end of the line.
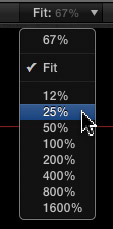
NOTE: If you can’t see the end of the red line, you need to zoom out on the image. Click the Fit button at the top of the Canvas and choose a smaller size for the Viewer. (For this demo, I’m using 50%.) You are NOT changing the image in any way, you are simply changing the size the Viewer displays the image.
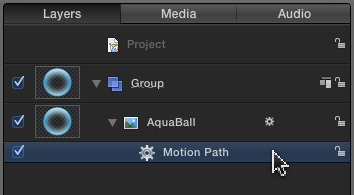
If the Layers panel is not displayed, press F5 to display it. Notice that the Motion Path effect was applied to the AquaBall. Click the Motion Path effect to select it. Now you are ready to animate the effect.
SIMPLE ANIMATION

Notice the purple bar in the Mini-Timeline, below the Canvas. This bar represents the timing of the effect. The start of the purple bar represents when the effect starts, the end of the purple bar represents when the effect ends. And the duration of the purple bar represents the duration of the effect.
Here, for example, the effect runs the entire duration of the project. Except… I want the effect to start a bit later and end earlier.

To change the timing of any effect, drag an edge of the purple bar (remember, you need to first select the effect you want to modify in the Layers panel) and place it where you want. For instance, here, I want the movement to start one second in from the beginning and end one second from the end. (The yellow Tool Tip shows you how much you are moving the selected edge.)
NOTE: All effects are timed the same way, by selecting the effect in the Layers tab and adjusting the timing of the purple bar.
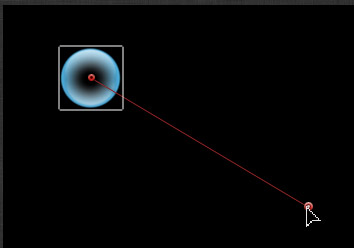
Now that I have the timing set, I can set the starting and ending positions of the move. Here, for instance, I want the ball to start in the top left corner, represented by the first red dot, then move down right, to the position represented by the second red dot. Drag the red dot at the end to position where the ball’s movement is to stop.
NOTE: There really isn’t a special order here. You can adjust position first or the timing first. Changing the duration of the effect will change the speed of the movement, but not the starting or ending positions.
Press the spacebar and admire your work.
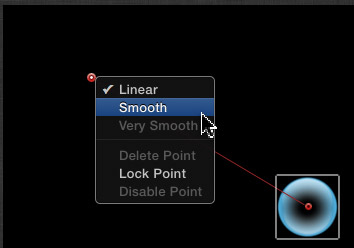
Except… the move is very linear. It has a “stiff” feeling. So, right click one of the end dots and change it from “Linear” to “Smooth.” This adds an ease-in (to the start) or ease-out (to the end), which provides a gentle acceleration or deceleration to the movement.
EXTRA CREDIT
But, wait! Yes, there’s more.
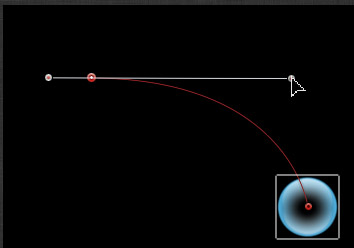
See those thin white lines attached to the red dot? Those are called “Bezier control points.” Grab a white dot at the end of the line (called the “handle”) and drag it. As you drag, the straight red line turns into a curve. The shape of the curve is determined by where you drag the dot.
This is a good time to get creative and drag the handle EVERYWHERE and watch what happens.
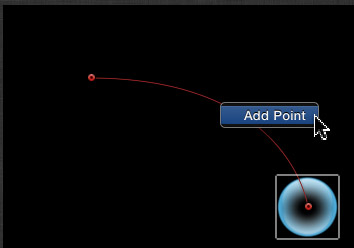
Next, right-click along the red line and select “Add point.”
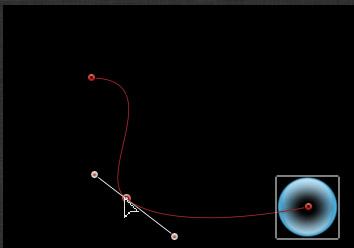
This adds an interim Bezier control point and handles. Drag the point itself to move it. Drag the handles to change the shape of the curve.
NOTE: Adding a Bezier control point does not change the duration of the effect, nor its start or end positions. What you are doing is changing the path of the movement between the start and the end.
The only limit to the number of Bezier controls points you can add is the number of frames between the start and end of the effect; because each frame can have only one Bezier control point applied to it. These red dots are also called “motion path keyframes.”
SUMMARY
When I first saw the Motion Path behavior, I wasn’t very impressed because I didn’t know how to modify it. Now, it is one of my favorite Behaviors because it gives us such precise control over all the elements of the effect.

2,000 Video Training Titles
Edit smarter with Larry Jordan. Available in our store.
Access over 2,000 on-demand video editing courses. Become a member of our Video Training Library today!
Subscribe to Larry's FREE weekly newsletter and
save 10%
on your first purchase.
2 Responses to Motion 5: Move an Object On a Path
In motion 5, I’m trying to modify a motion path by adding control points. It’s OK when I start to set the motion path and add control points with option-click, but at a certain point the dots vanish and I cannot figure any way to resume adding control points. I can modify them numerically in the behaviors menu but cannot add more.
Thanks,
Tad McArdle
Tad:
Interesting, and unexpected. I don’t have an answer – suggest you contact Apple support.
Larry