
![]() Final Cut Pro X ships with a lot of titles, both full-screen and lower-third. However, in most cases, they are over-designed, inconsistently designed, or not applicable for more serious work. (For example, FCP X has three lower-third titles – left, center and right – and none of them match.)
Final Cut Pro X ships with a lot of titles, both full-screen and lower-third. However, in most cases, they are over-designed, inconsistently designed, or not applicable for more serious work. (For example, FCP X has three lower-third titles – left, center and right – and none of them match.)
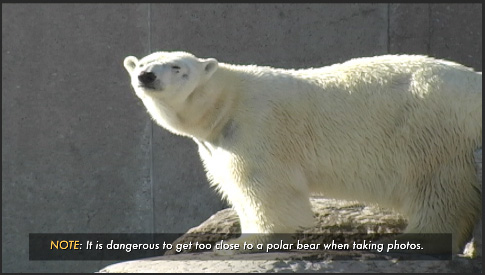
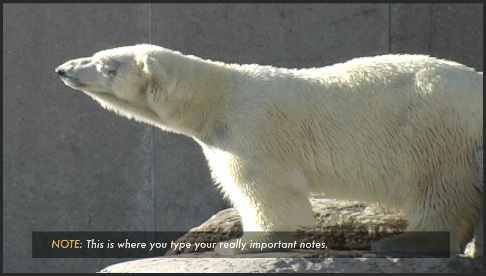
In my webinars, I often add lower-third titles to reinforce key points, keyboard shortcuts or correct misstatements. (As an example, see the title above.)
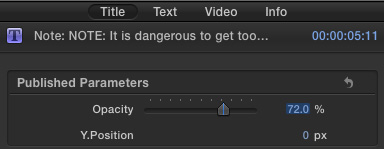
This title is a custom Motion title that allows me to vary the opacity of the black rectangle behind the text, plus change the vertical position of the title so I can move it wherever it needs to be in the screen.
As well, I still have complete control over the font, font size and position – left, center or right – though, in general, I leave these as the title was designed.
Here’s how I designed this.
MOVE TO MOTION
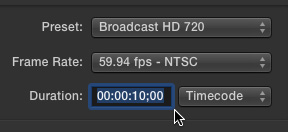
Start Motion. In the top right corner, set the Preset to match your typical FCP X project settings. Here, I’m creating a title for a 720p project – which is what I use for all my training.
The key setting here is Duration. My titles run between 8 – 10 seconds, so I want to be sure that what I create is long enough. (The default duration is five seconds.) It is hard to change the duration in Motion once a project has been created.
NOTE: It drives me NUTS! when titles are only up for 1-2 seconds in a video. Just because you can read them in the edit bay when you are paused on a still frame of the title does NOT mean that I can read it in real time. Give your audience a break – hold titles longer. I try for 5-8 seconds.
Frame rate isn’t a big deal for this title, as it doesn’t use animation. Otherwise, set the frame rate to match your FCP X project.
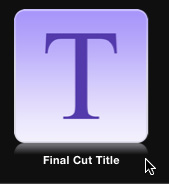
Once these settings are correct, double-click Final Cut Title to create a new Motion project.
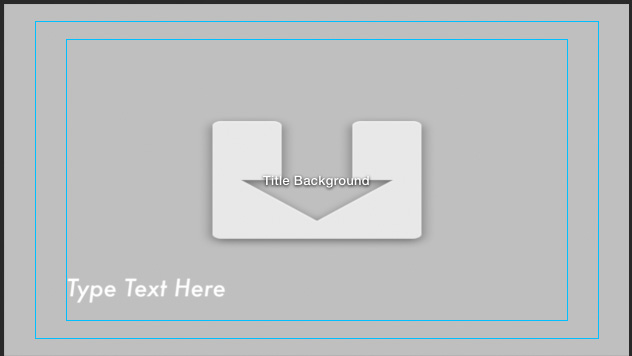
The gray background, with the down-pointing arrow, is a drop-zone. This is a place-holder for the video the title will be keyed over in Final Cut. We could simply remove this, or animate it in some way. However, to better illustrate this technique, I’ll leave it alone.
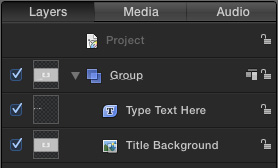
Because we need to control the position of the text separately from the background, we need to put the background and title into two separate groups.
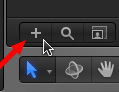
To create a new Group (which is simply a folder that holds stuff), click the Plus icon at the bottom of the Layers panel.
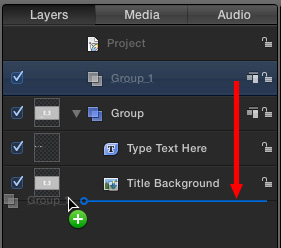
Drag the new Group below the current Group and make SURE that the blue line, which indicates the position of the Group within the hierarchy of the Layers panel, is as far to the left as it will go.
NOTE: This is really important. If the blue line is not all the way to the left, the new Group will be stored inside the top Group and the effect won’t work. Getting the position correct is tricky, as Motion does not make dragging easy.
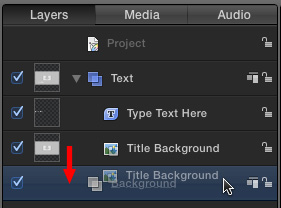
Rename the top Group: “Text”, the bottom group “Background”, then drag the Title Background layer into the Background group so that the entire Background layer is highlighted, as indicated in this screen shot.

Select the Rectangle drawing tool in the Toolbar at the bottom, and draw a rectangle in the size and shape you want for the gray background in the Viewer. For projects going to the web, I keep all text inside the Action Safe (outer) rectangle.)
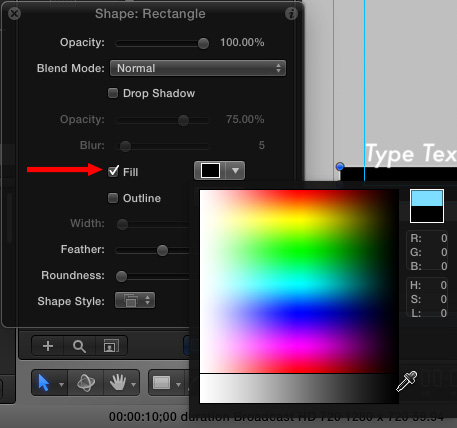
Choose the Arrow tool in the Toolbar, make sure the rectangle is selected in the Viewer, then change the color of the Rectangle fill to black. The HUD is perfect for this.
NOTE: You can, if you want, add rounded corners, change the color, or add a border. Feel free to spruce this rectangle up. However, I tend to prefer simple, clean looks.
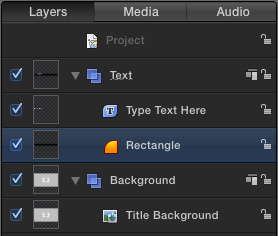
Then, if you are like me, you’ll discover you drew the rectangle into the wrong Group. Sigh… Drag it up into the Text Group, but below the Text layer.

Select the Text layer then, in the Viewer, position it on top of the black rectangle. Format and style the text as you see fit.
NOTE: In this example, the text is Futura Medium Italic 28 pt., flush left. You can use any fonts or style you prefer. While both the text and its formatting will be editable in Final Cut, I try to set the defaults in Motion so that I need to make as few changes later in Final Cut as possible.
ADD THE CONTROLS
At this point, the creation of our effect is done. Now we need to add the position and opacity controls to use in Final Cut. We can get really carried away with this using widgets and rigging.
But, again, I prefer simplicity.
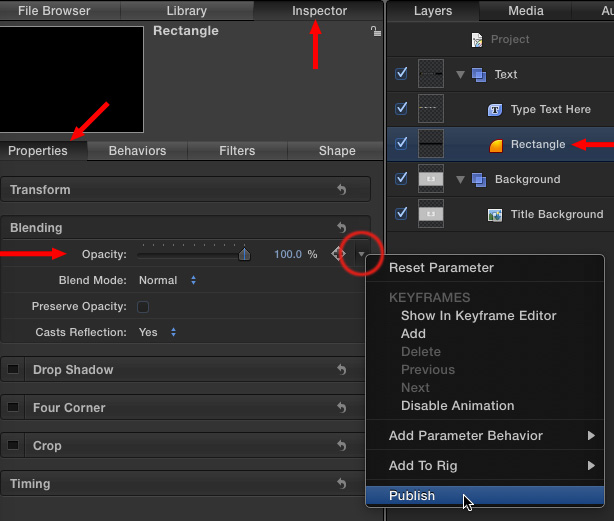
Select the Rectangle layer in the Layers panel.
Then, go to Inspector > Properties > Blending and click the SMALL downward pointing arrow to the right of the Opacity setting. Check Publish.
Then, change the Opacity setting to 72%. (This sets the default opacity setting for Final Cut, you can use any value you prefer. I have not changed this setting yet in the screen shot.)
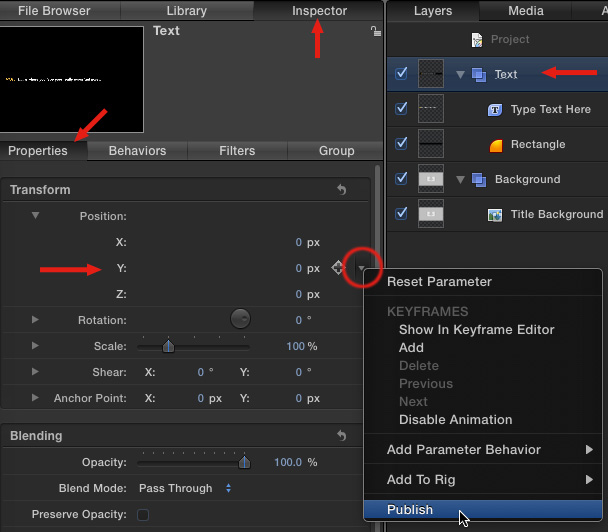
Next, select the Text Group, not just the text layer itself.
With the Group selected, go to Inspector > Properties > Transform.
Twirl down Position, then click the downward-pointing arrow to the right of Y (vertical) position and check Publish.
What we’ve just done is create a control for the opacity of the black rectangle and set it’s default setting to 72%. (Yeah, I know, I still haven’t set the Opacity to 72%.) Then, we created the ability to change the vertical position of both the text and the background in one setting.
SAVE YOUR WORK FOR FINAL CUT PRO X
All our creative work is now done. Time to save the project, then test it in Final Cut Pro X.

Choose File > Save. This opens the template dialog. (If you don’t see this dialog, its because you didn’t choose Motion Title when you first created this project.)
Give the template a name that makes sense to you.
I store all my custom titles in a category called “Larry.” (Um, I couldn’t think of anything really creative.) I don’t use Themes, so I leave this blank.
Then, click Publish.
OPEN FINAL CUT
Instantly, the new title appears in the Title Browser in Final Cut.
Drag it on top of a clip and look at the controls in the Inspector. You now have a useful lower-third title with complete control over background opacity and vertical position. Plus the text is fully editable.
NOTE: If you need to make corrections, Control-click the text template in the Titles Browser, and choose Open in Motion. Make your changes in Motion, then save your work. The template will be instantly updated in Final Cut. (However, any versions of this template on the Timeline will not be changed.)
Yes, we could have created this in Final Cut, but it would have taken longer. Also, creating a template saves a lot of time when you need to use this title more than once.
Cool.

2,000 Video Training Titles
Edit smarter with Larry Jordan. Available in our store.
Access over 2,000 on-demand video editing courses. Become a member of our Video Training Library today!
Subscribe to Larry's FREE weekly newsletter and
save 10%
on your first purchase.
10 Responses to Motion 5: Create an Adjustable Lower-Third Title
Thanks! I had challenges with FCP X lower third just a week ago (I’m an intermittent editor! LOL).
The rule of thumb I learned, in my youth, for titles of any kind, especially the kind you want folks to read, is to read the title three times and check the time.
It seemed to work in my 16mm film days and amazingly it works in my digital dotage!
Thanks again for all your diligent efforts to keep us informed and useful!
Larry, thank you for this tutorial. I can finally get some consistency in the concerts I edit. How can I move this to another editing system. I built this on my office iMac and got halfway through a concert. I decided to finish the titles at home on my laptop and got the red screen of unhappiness because the motion template wasn’t on my laptop.
How can I copy and move it?
Lee:
Motion templates are stored in two places in FCP X 10.3: Your Home directory and the Library. Because you don’t have access to the effects when you moved the library, this says that the effect is still stored in your Home Directory.
Quit FCP X.
On the first system, go to: [Home Directory] > Movies > Motion Templates. You’ll then find one or more folders called: Effects, Generators, Titles, Transitions. Your custom effects will be a folder inside one of those folders.
Copy the folders containing effect(s) you want to move to a thumb drive.
On your NEW system, create the exact same folder structure inside your Home Directory. Then copy the folders from your thumb drive to the exact same location on your new system.
Now, when you restart FCP X, you’ll find all your custom effects now work.
Larry
Thank you. I knew you would have the answer. I t was one of those times when Dr. Google couldn’t help. I didn’t know the correct search terms and was getting thousands of off-topic results.
BTW: I’m looking forward to getting cosy with your FCPX 10.3 videos that I purchased. Even though I’m anApple certified FCPX trainer I expect I’ll learn a great deal and enjoy the process.
Thank you again and have a Merry Christmahanukkwanzaakus !
Thanks for this great tutorial!
I was just wondering if it was possible to edit even the dimensions of the rectangle since not all text have the same lenght and it could be helpful to have some anchor even for this aspect and not only for the text.
Thanks for your future help and keep up with your great work!
PS: if is not possible to get the level of customization that I am looking for what can I do instead? Open the movie directly in motion once has been edited in FCPX?
Andrea:
Yes, you can publish X / Y controls that determine the size of the box in Motion, which FCP X can then adjust.
Larry
How do i “link” text layers dynamically?.. Not cloned, but two layers – i want one layer to be fill and another to be outline. I will be using the fill layer for a mask – overlaying a dropzone…
Pete:
Blend modes.
You will need to use a combination of Stencil Alpha and Silhouette Alpha and nesting.
Larry
Hi Larry,
I have followed your tutorial judiciously, however once I apply the new title to an FCPX project I can only move the text. The rectangle is fixed. Presumably I need to link the two?
Also, how can I ensure that as text length increases or decreases so does the size of the rectangle?
Many thanks
Greg:
You need to store both the text and rectangle in the same group. Then, change the position of the group, which will then move both of them.
As for the length, that’s trickier. Publish the Property that controls the width of the rectangle. You’ll need to set the length manually.
Larry