
![]() Motion is designed to get visual objects moving. But for people who are new to Motion the big question is: “How?” This article describes several ways to control the movement of objects in Motion.
Motion is designed to get visual objects moving. But for people who are new to Motion the big question is: “How?” This article describes several ways to control the movement of objects in Motion.
If you are new to Motion, you’ll find this article especially helpful.
DEFINITIONS
KEYBOARD SHORTCUTS
GET STARTED
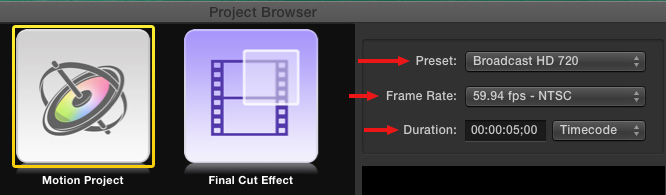
In the Project Browser, set the Preset to match the settings for the movie you want to create, then double-click Motion Project to get started.
NOTE: Motion always creates motion graphics at the highest possible quality. What you are determining here is the output format for your completed movie.
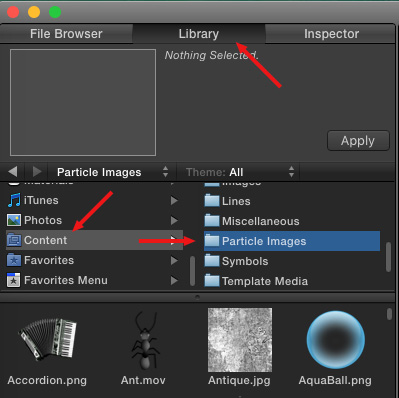
While these techniques will work with any image, video clip or text, let’s pick something simple to work with.
At the top of the Utility window on the left, click Library. Scroll down the left column to Content. Select the Particle Images folder on the right. Then, drag the AquaBall image into the center of the Viewer.
NOTE: To hide the blue Action Safe/Title Safe boundaries in the Viewer, click in the center of the Viewer and type apostrophe ( ‘ ).
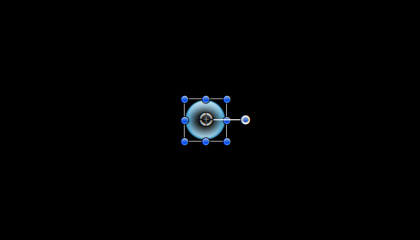
If the AquaBall isn’t selected, click it to select it.
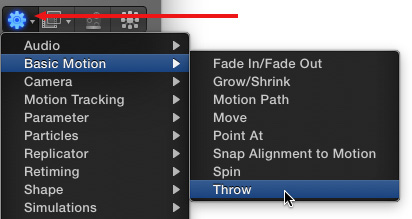
Click the Gear icon in the lower right corner of the Motion interface. This displays the Behavior menu.
NOTE: You can also find Behaviors listed in Library > Behaviors. Two different ways to the same result.
Movement is controlled using Behaviors > Basic Motion. There are eight behaviors that control the movement of an object.
NOTE: That isn’t completely accurate. There are LOTS of different ways to control movement. But, to keep our brains from exploding, we’ll work with these eight, which are the most important to know to get started.
We’ll look at each of these, starting with the easiest and moving to the most complex, but first, let me explain some basic operations within Motion.
APPLYING A BEHAVIOR
To apply a Behavior:
Personally, I use the Gear menu.
MODIFYING A BEHAVIOR
Behaviors can be modified using the HUD (F7), which is the fastest, easiest and most visual; or in Inspector>Behaviors, which provides the most complete set of controls.
Most of the time, I use the HUD.
It is generally best to modify Behaviors when the Timeline is playing, this allows you to instantly see the results of your work. (Press the Spacebar to start or stop playback.)
To delete a Behavior, select it in the Layers panel and press the big Delete key on your keyboard.

The timing and duration of an effect is determined by the location and duration of the purple bar in the Mini-Timeline when that effect is selected in the Layers panel.
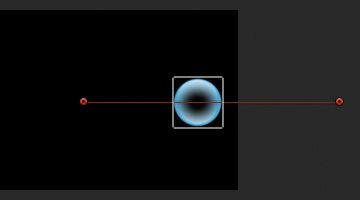
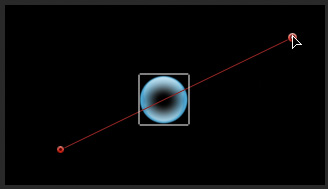
BEHAVIOR: THROW

Throw causes an object to move in the direction and speed you specify by dragging an arrow around in the HUD.
The red line on the screen indicates the motion path the object will follow over the duration of the effect.
This creates movement quickly, but it lacks precision.
3D NOTE: In 3D space, you can also throw an object to or from the camera in Z-space.
BEHAVIOR: FADE IN/FADE OUT

Fade In / Fade Out dissolves an object to or from transparency in the Viewer. Fades occur at the beginning and ending of the purple effect bar.
To set the duration of the fade, drag one of the vertical lines in the HUD. Sometimes, I will use two separate effects: one for the fade in and a second one for the fade out. I’m not sure if using two effects is really helpful, though.
NOTE: To prevent problems with flash frames, be SURE that the duration of the object matches the duration of the Fade effect.
3D NOTE: This works the same in 3D as in 2D.
BEHAVIOR: GROW/SHRINK
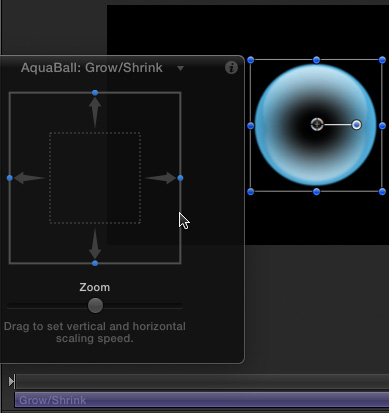
Grow/Shrink increases, or decreases, the size of an object by scaling it.
Drag outside the square in the HUD to enlarge an object over the duration of the effect. Drag inside the square to make it smaller.
3D NOTE: This does not move an object in 3D space. Throw would be a better option to make something get bigger or smaller in 3D space.
BEHAVIOR: SPIN
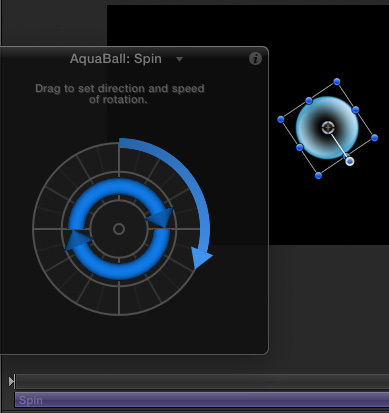
Spin causes objects to rotate. The outside circle in the HUD controls speed and direction; the longer the arrow the more the movement.
This rotation is on the Z-axis.
3D NOTE: Dragging the inner blue arrows allows adding rotation on the X and Y axis. The best way to discover how this works is to play with it.
BEHAVIOR: MOVE
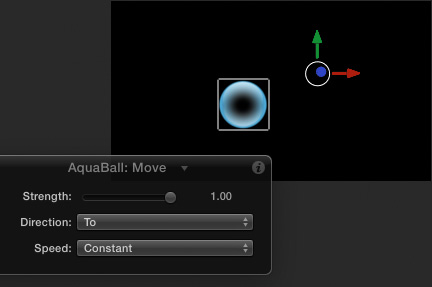
Move is tricky. Think of this as a simpler form of the Motion Path behavior, allowing you to set the starting and ending points of a move, without the other options provided in the Motion Path effect.
Move sets a point in the Viewer, indicated by the color arrows, to or from which the selected object will move.
To use this, put the AquaBall where you want it to end (for a TO move) or where you want it to start (for a FROM move.) Then, apply the effect.
Next, drag the AquaBall where you want it to start moving (for a TO move) or where you want it to end moving (for a FROM move.)
Now, when you start playback, the AquaBall will move TO or FROM the point you just set.
3D NOTE: The effect is especially designed for 3D, but too complex to explain here.
BEHAVIOR: MOTION PATH
When you need more control and options than the Move behavior provides, you need Motion Path.
Motion Path is one of my favorite Behaviors because it allows us to control the starting and ending positions of the object precisely, along with the shape of the path the object travels.
When you first add the effect, you may need to zoom back on the Viewer to see the ending position. The end is always off the screen to the right.
To change either end point, drag them where you want them to be.
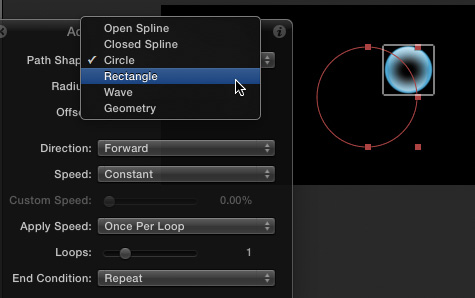
Using the HUD, you can change the movement from a straight line to a geometric shape; as well as vary the speed and acceleration settings.
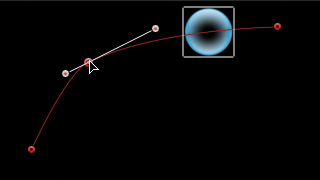
Double-click on the red line, then drag to add a Bezier control point. This allows you to control the curve of the line. Drag the white dots to change the shape of the curve.
3D NOTE: This effect is unchanged in 3D.
BEHAVIOR: POINT
Point rotates the selected object so that it points – on the X, Y, or Z axis – to another object.
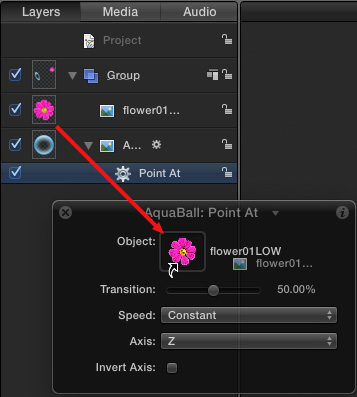
After applying the effect, set the target by dragging the ICON of the layer to which you want to point from the Layers panel into the graphics “well” (rectangle) in the HUD.
NOTE: Dragging from the Viewer does NOT work!
As you playback the clip, the AquaBall rotates so that it is pointing to the pink flower. The speed of the rotation is determined, as always, by the duration of the effect in the Mini-Timeline.
3D NOTE: This effect is especially effective in 3D, particularly with 3D text.
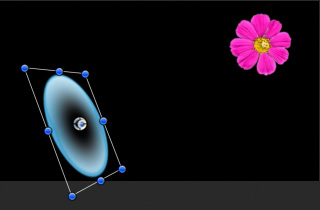
BEHAVIOR: SNAP ALIGNMENT TO MOTION
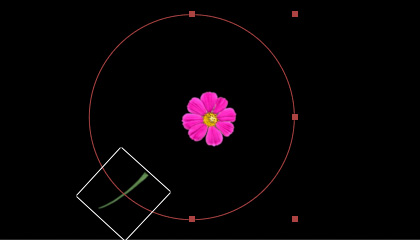
This Behavior aligns the rotation of an object to match changes made to its position during animation. (Truthfully, this is an effect that I used for the first time in writing this article.)
Here, for example, I’ve added a green blade of grass and applied a Motion Path to it. In the HUD, I changed the shape of the Motion Path from Open Bezier to Circle. Then, I adjusted the size and position of the circle, by dragging the control squares, so that it surrounded the pink flower.
With the grass blade selected, I then applied Snap Alignment to Motion
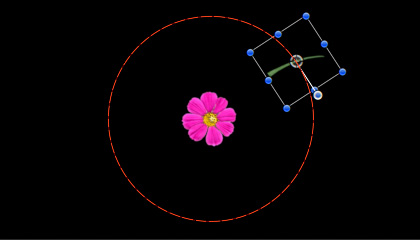
This “snaps” the base of the blade so that it always points to the pink flower.
NOTE: To point the head of the blade to the pink flower, check “Invert Axis” in the HUD.
SUMMARY
Motion gives us lots of ways to control the movement of objects in our projects. To learn even more tips, read the Basic Motion section in the online Help files.

2,000 Video Training Titles
Edit smarter with Larry Jordan. Available in our store.
Access over 2,000 on-demand video editing courses. Become a member of our Video Training Library today!
Subscribe to Larry's FREE weekly newsletter and
save 10%
on your first purchase.