
![]() I’ve written in the past about the built-in proxy workflow for Adobe Premiere Pro, when Premiere creates the proxies. The current implementation in Premiere makes this fast and easy.
I’ve written in the past about the built-in proxy workflow for Adobe Premiere Pro, when Premiere creates the proxies. The current implementation in Premiere makes this fast and easy.
NOTE: Here’s the link to a tutorial that illustrates this.
But, what’s the workflow when you are getting proxies sent to you directly from the set, while the high-res master files will arrive a few days later on a hard disk? You need to start editing now, without waiting for the high-res masters to arrive. But, you don’t want hassles when the camera masters arrive.
Premiere has you covered for this as well, but there are two steps that aren’t intuitive. Here’s how this works.
TWO CAUTIONS
Tell whoever is creating your proxy files that they MUST follow two rules:
H.264 files are about 1/10th the size of ProRes Proxy. However, if you want to use a codec like H.264 for your proxies (for space requirements to send online, etc.) you CAN’T, because Premiere can only render H.264 in the MP4 container—and that container only supports 2 channels of audio. The workaround is either to use ProRes, DNxHR codecs, which create larger files, or use Davinci Resolve to generate proxies and use a Quicktime filetype and the H.264 codec.
Be sure to follow these two rules when creating proxies to avoid problems later.
CREATING THE PROJECT
In this example, I’m working with a 4K camera master and 1/2 size proxy file.
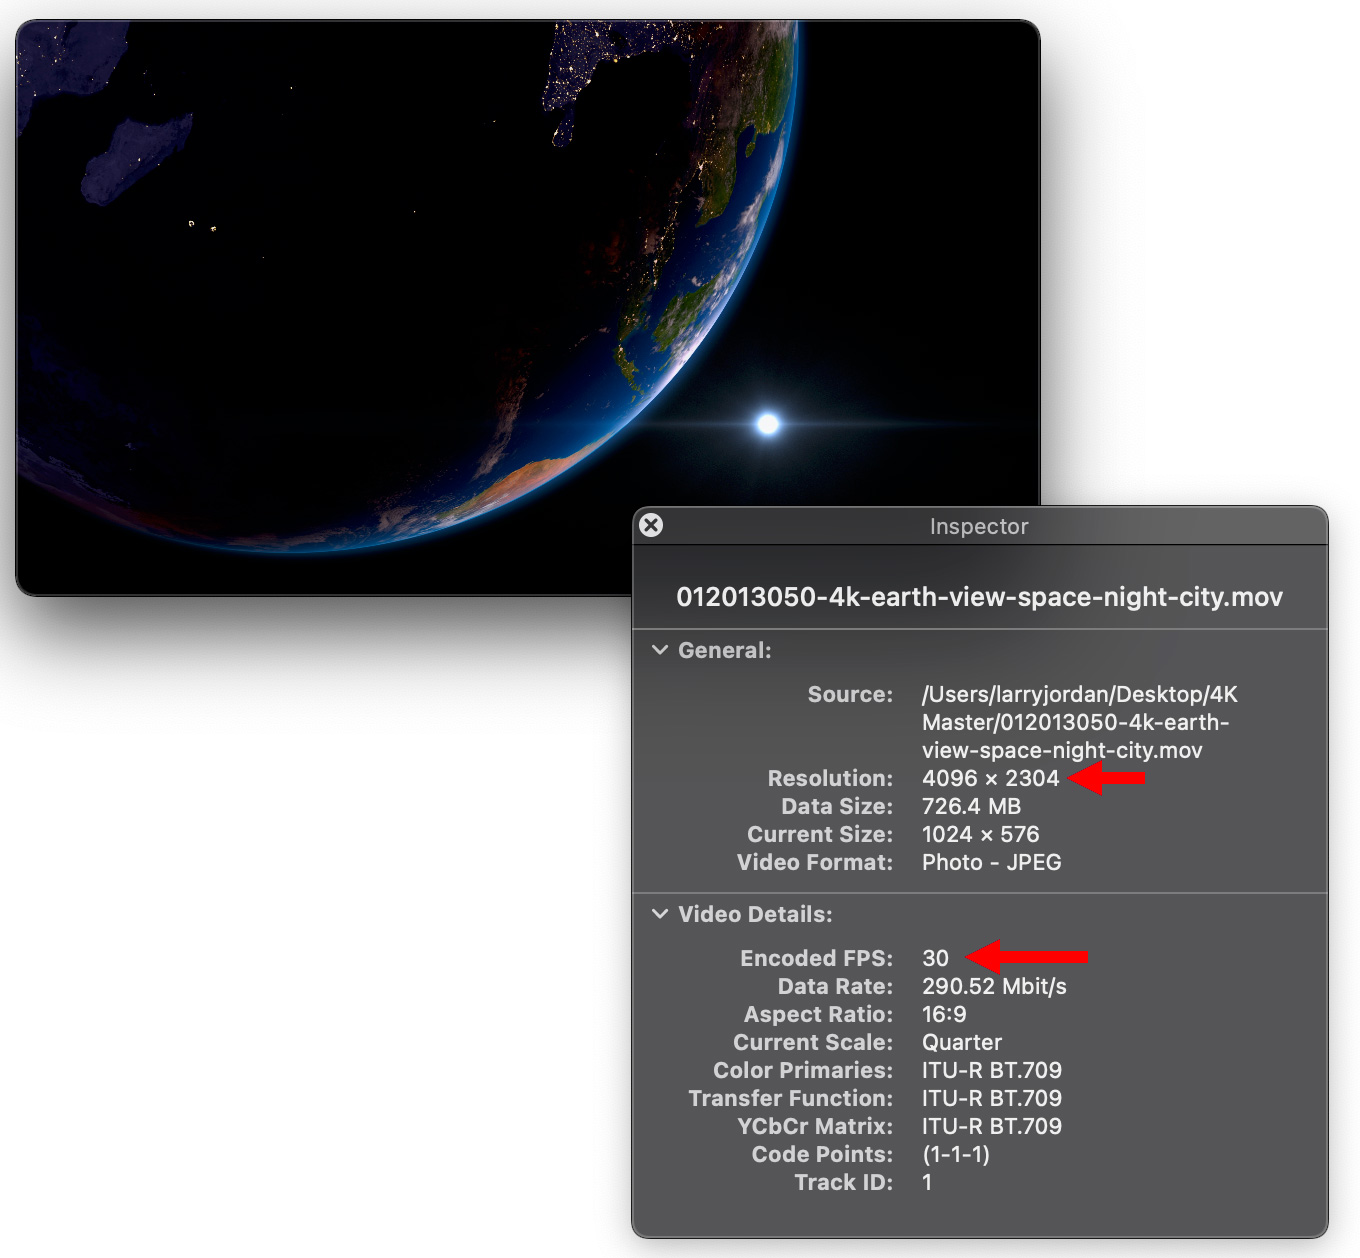
Here’s my master file (I shrunk the display size to fit onto this webpage. Frame size is 4096 x 2304 at 30 fps, as indicated by the two red arrows.
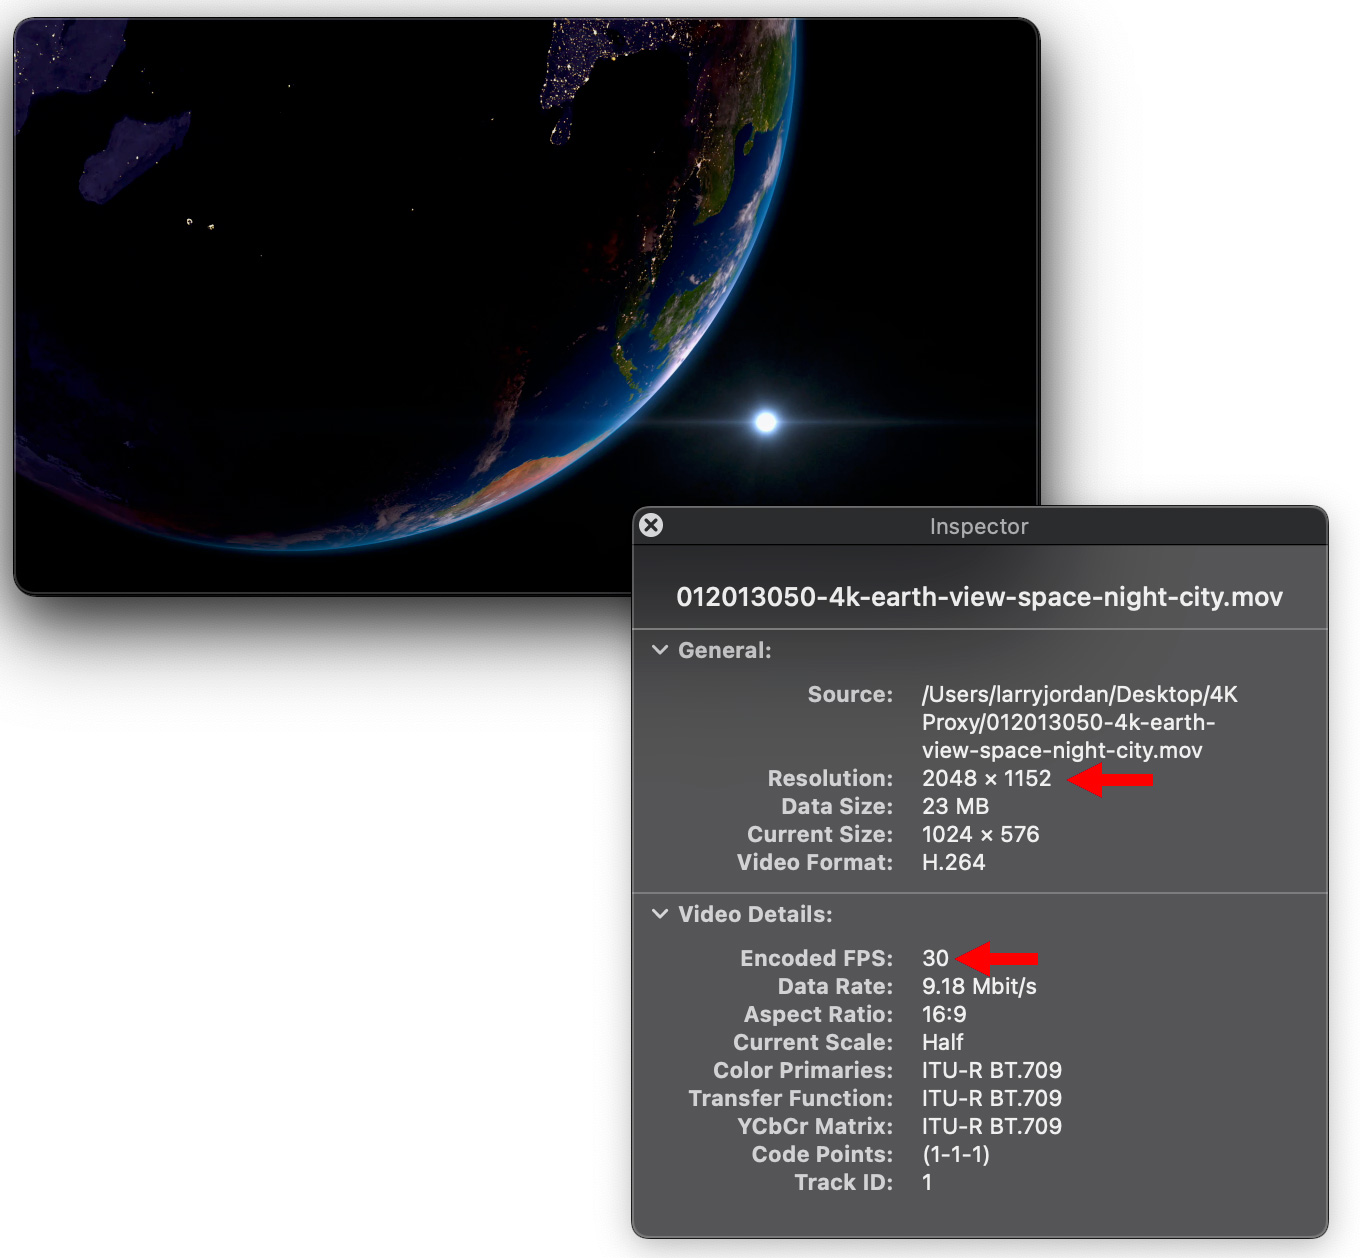
Here’s my proxy file. This is 1/2 the size of the master file. Frame size is 2048 x 1152 at 30 fps. Notice that, while the frame sizes don’t match, the frame rates do.
Let’s pretend that all we have to work with today is the proxy file, the source file is coming “shortly.” So we need to create our project and start editing with files who’s frame size is smaller than the camera master.
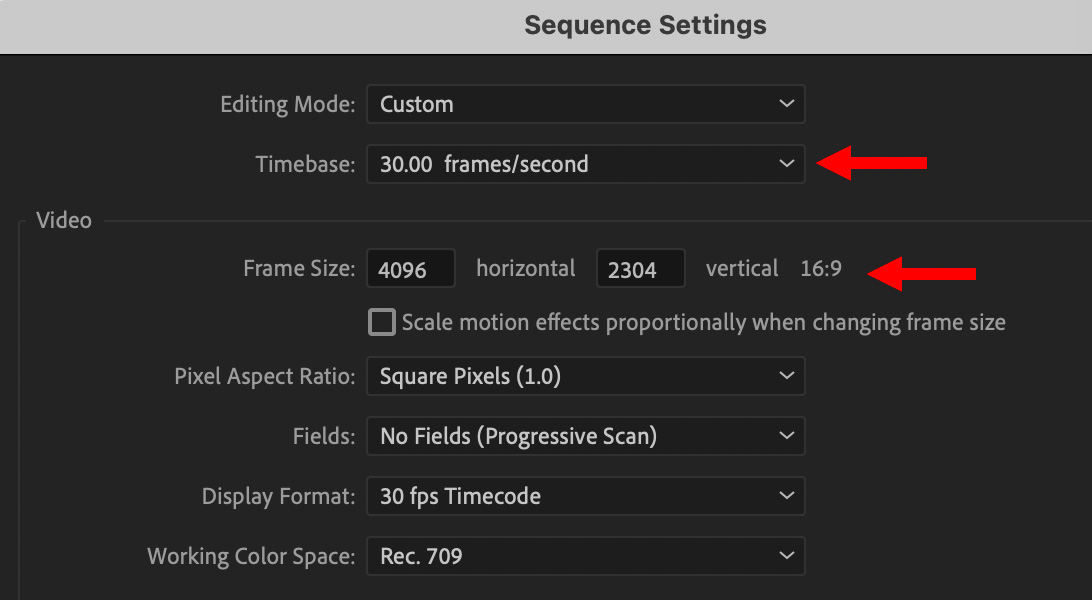
Create a new project the same as always. Then, create a new sequence who’s setting matches the frame size and frame rate of your camera source media. In this case, 4096 x 2304 / 30 fps.
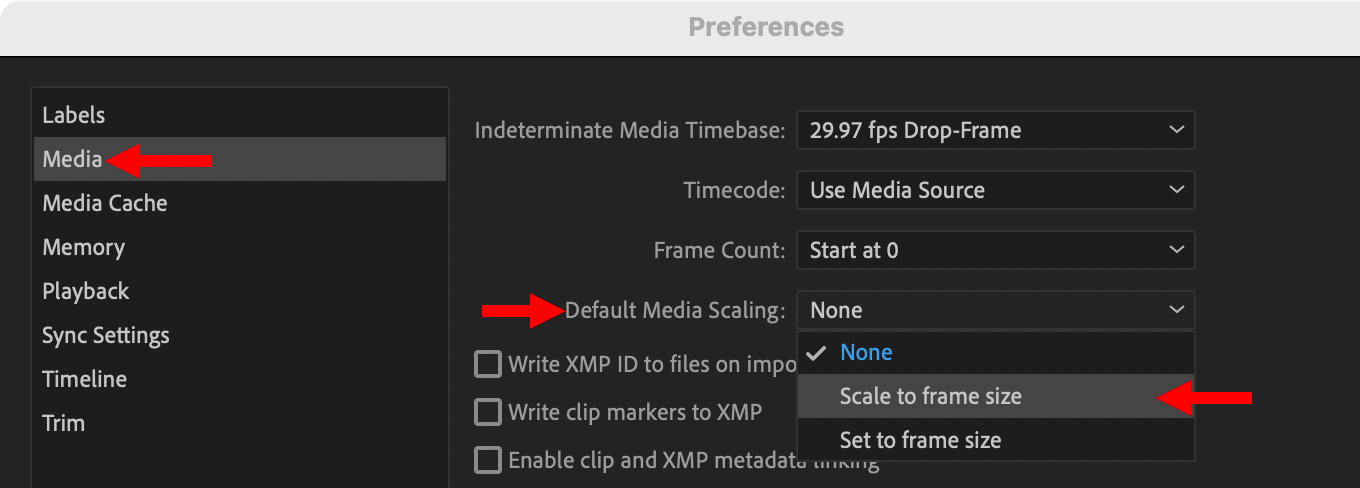
Before you import any footage, we need to change a preference setting: Preferences > Media. Change the Default Media Scaling to Scale to Frame Size.
Normally, I recommend using Set to Frame Size. However, when working with externally-created proxy media, as in this example, AND you want to adjust scale or position of the proxy clips, changing this preference means that the camera native media will match the scale and position of your proxy files, even though the frame sizes don’t match.
NOTE: Verify you’ve set this correctly when you edit a proxy clip into the timeline. The Scale % in Effect Controls should say 100%. If it does, you’re all set. If it doesn’t, you set this preference incorrectly.
EDITING
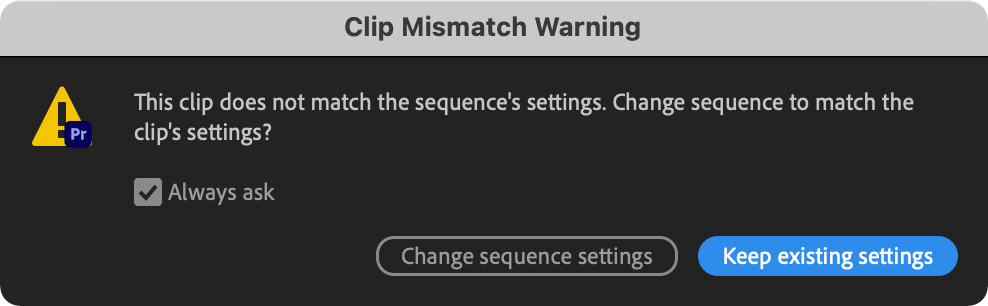
Import and edit proxy media as though you were working with the camera masters. If Premiere asks if you want to change sequence settings the first time you edit a proxy clip into the Timeline, be sure to say: “Keep existing settings.”
Because the preference setting we adjusted earlier tells Premiere to automatically set all proxy clips to match the frame size of the sequence, the proxy file expands to fill the frame; as you’d expect. Yet, the image scale remains set at 100%.
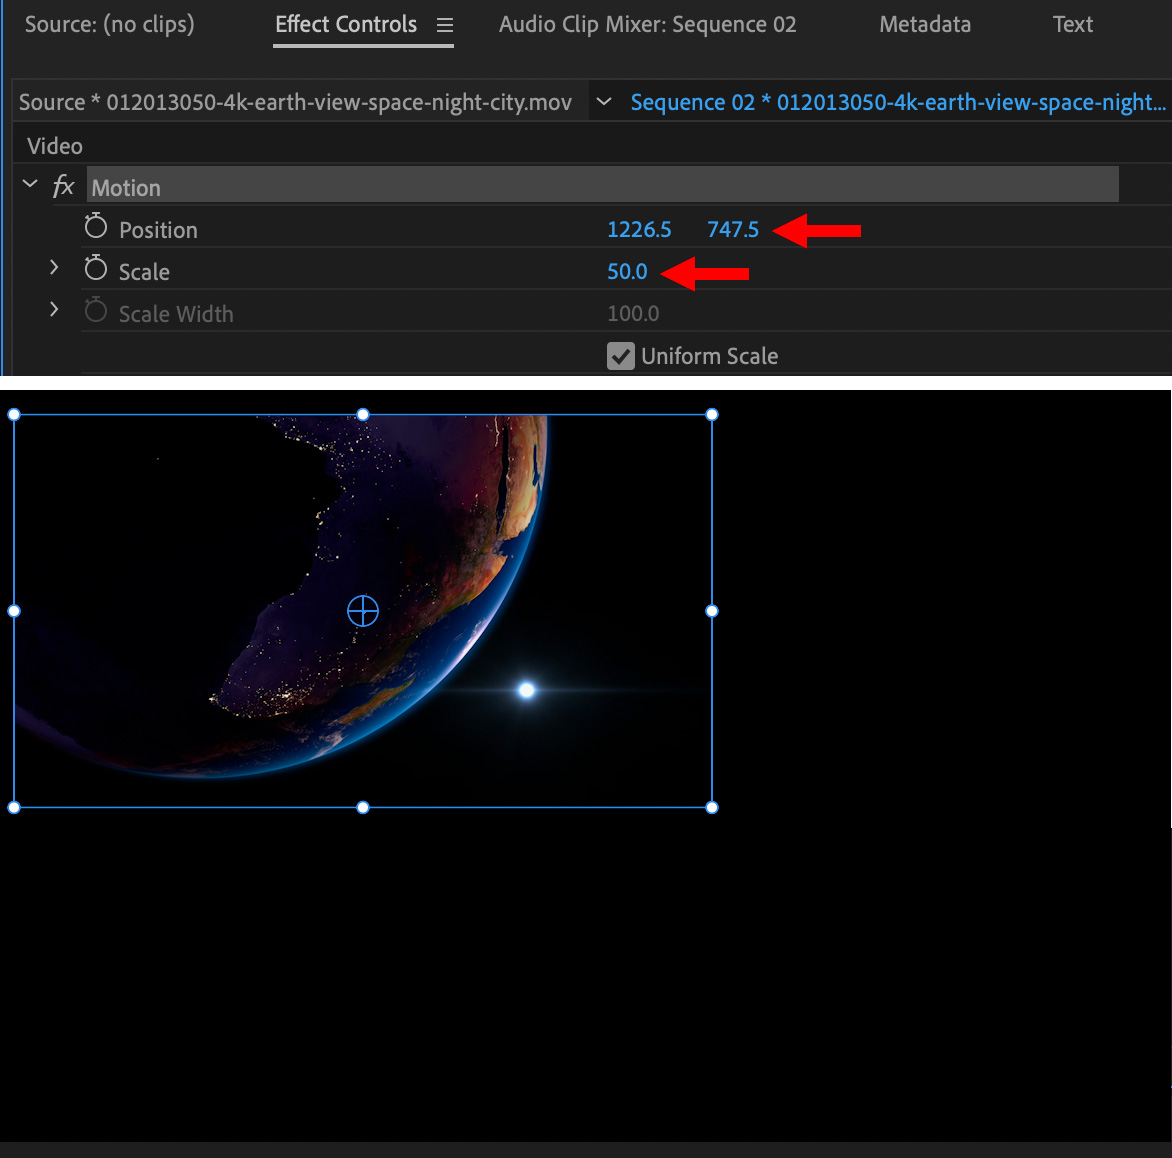
Now that I’ve edited a clip into the timeline, let’s make this more interesting and scale the proxy clip 50% and move the image to the top left corner. Here are the settings I used and the resulting image.
CONNECTING THE MASTERS
Finally, the masters arrive and we need to connect them to the proxies so that we can easily switch between proxies and masters.
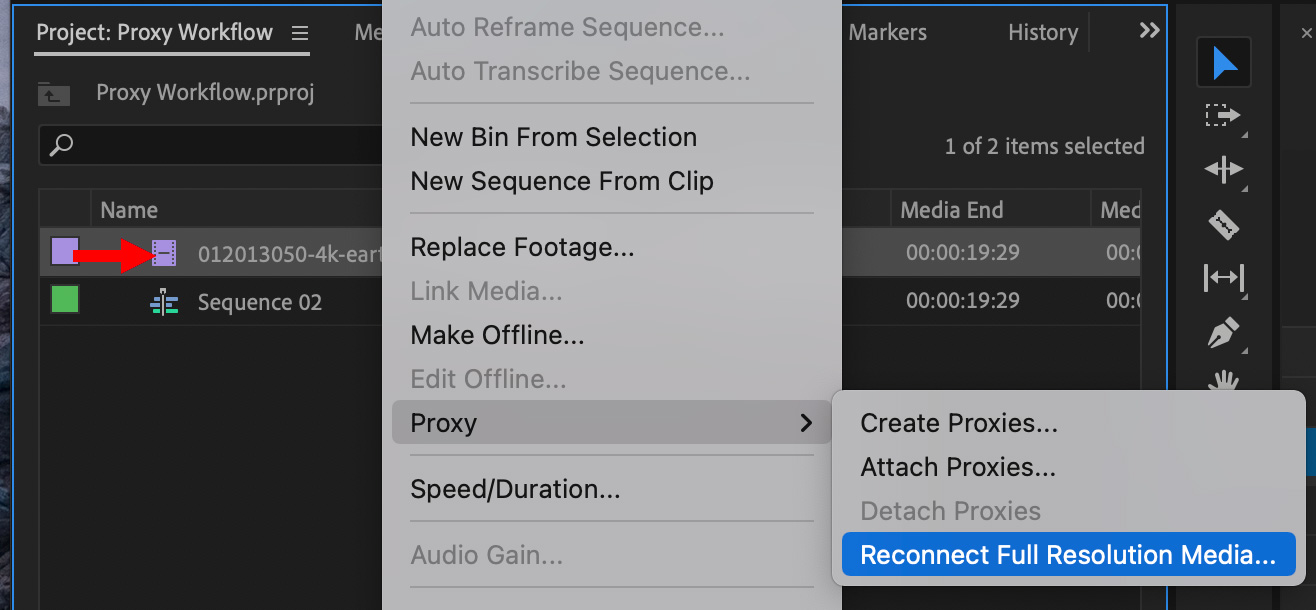
In the Project panel, Control-click the proxy clip and choose Proxy > Reconnect Full Resolution Media.
NOTE: You’ll probably have more than one proxy file. Select all of them, then follow this procedure. If they don’t link properly, select and connect them one at a time.
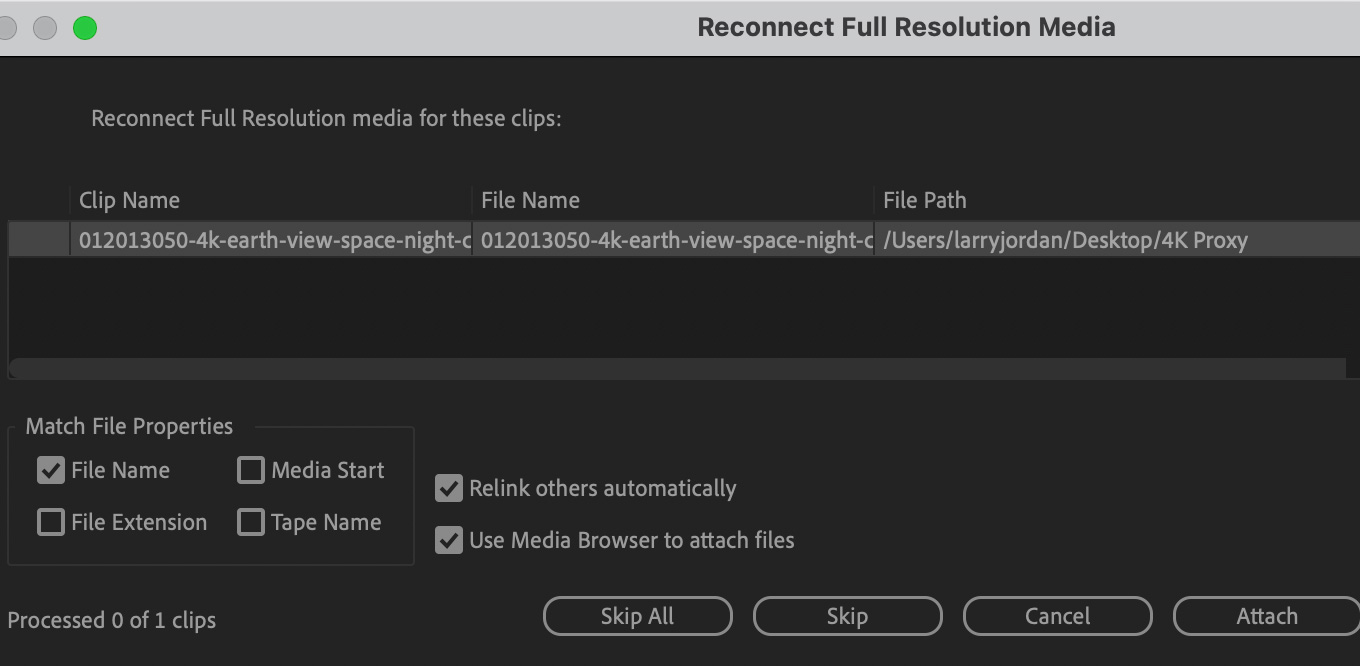
First, make sure the proxy clip you clicked is displayed in this first dialog. Select it and click Attach.
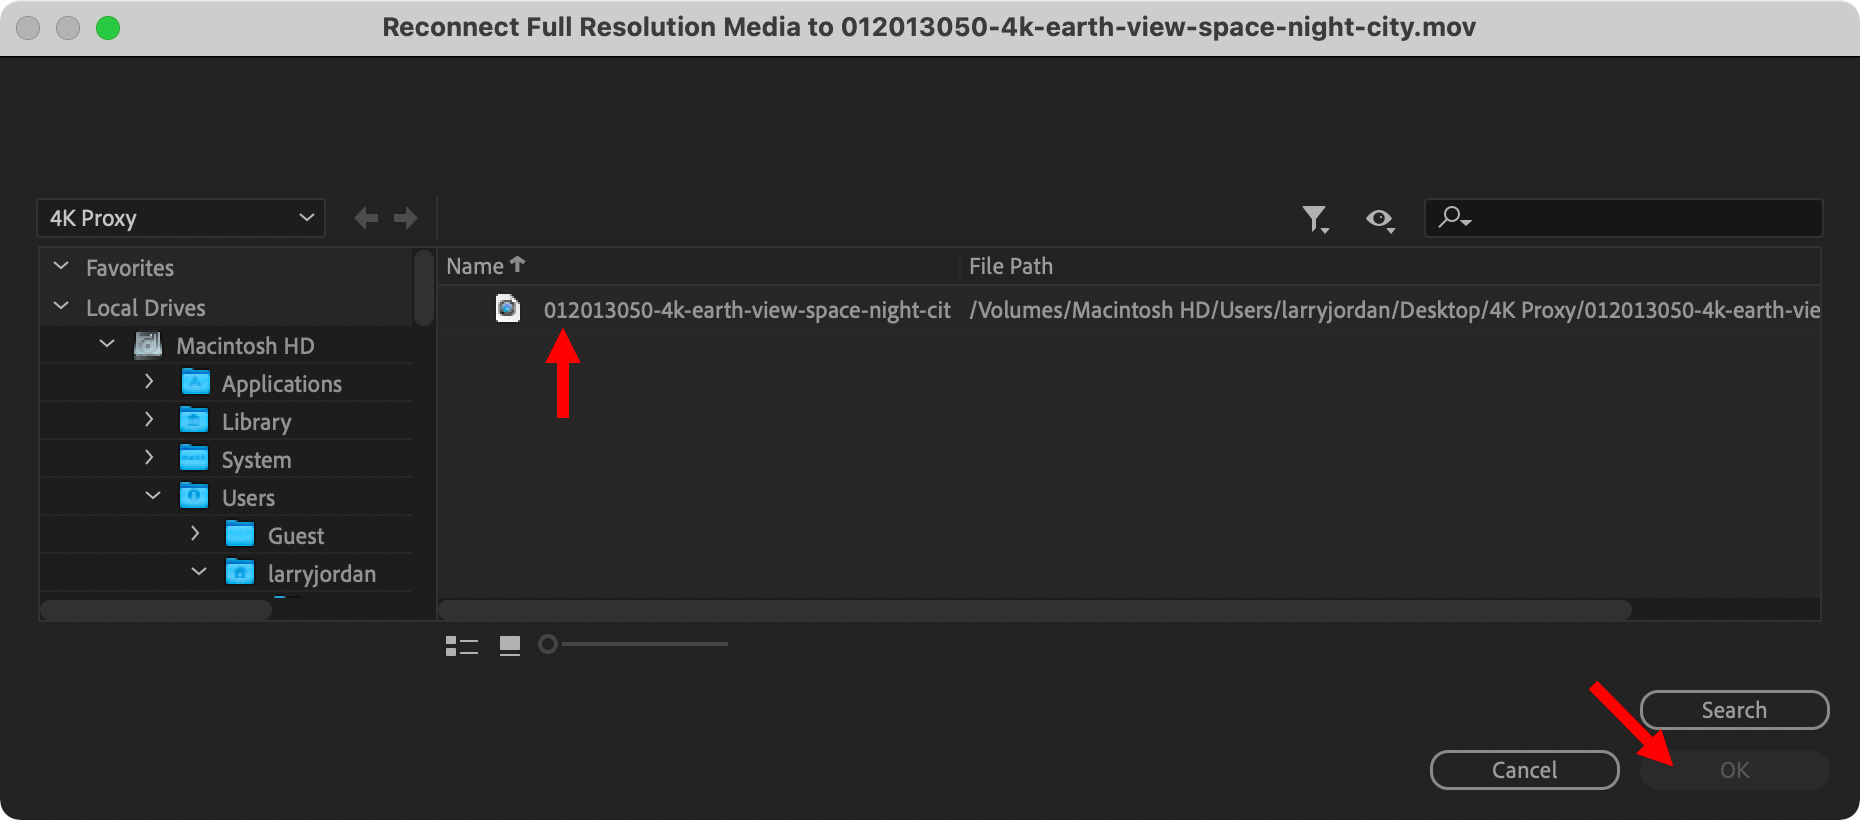
(Click to see larger image.)
Navigate to where the high-resolution clip is stored, select the appropriate high-res clip and click OK.
You’ve now connected the high-res and proxy clips. If other clips are in this folder, they should reconnect automatically. If not, repeat this manual process until they are all connected.
Also, notice when you get back to the timeline that the high-res clip is scaled and positioned identically to the initial proxy clip, even though the two media clips have different frame sizes.
SWITCHING BETWEEN MEDIA
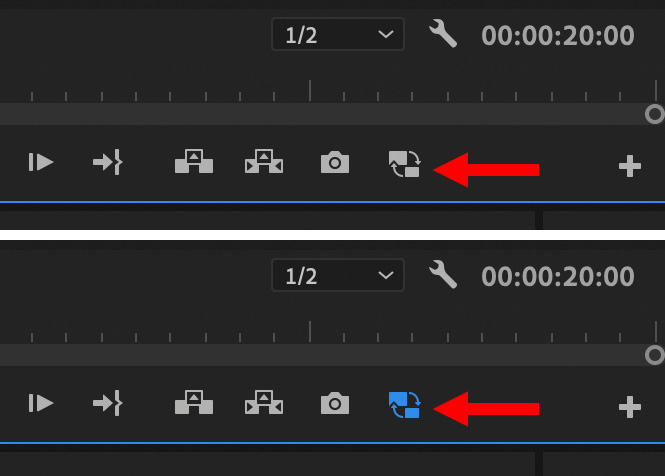
To switch between proxy and source media, click the Toggle Proxies button in the Program Monitor tool bar. Blue means proxies are displayed. White means source clips are displayed.

NOTE: To add this button to the button bar, click the Plus icon, then drag the proxy icon from the Button Editor into the Program Monitor button pane.
Done.

2,000 Video Training Titles
Edit smarter with Larry Jordan. Available in our store.
Access over 2,000 on-demand video editing courses. Become a member of our Video Training Library today!
Subscribe to Larry's FREE weekly newsletter and
save 10%
on your first purchase.
16 Responses to Linking Media to Proxies Created Outside Premiere Pro
Thank you, Larry, for answering my proxy question here, ahead of the ask-me-anything webinar. Much obliged.
Joe:
You’re welcome. I figured Premiere could do it, but I had no clue how. It was fun researching the answer as I was writing this.
Larry
This is standard for working with proxies and connecting later to the hi rez files but how do you deal with syncing audio to proxies or creating multi cam files and then later connect to the original files. It doesn’t seem to link to the synced or multi cam files. Thanks!
Rick:
Syncing is based on frame rate and timecode. Both of which are identical between original and proxy files created using Premiere. If you are creating proxy files outside of Premiere, MAKE SURE that both timecode and frame rates match. Otherwise, things break.
This is true for single files, synced files and Multicam files. If you are experiencing something different, contact Adobe Support.
Larry
Hi there Larry!
I have a question regarding the audio and proxies as you mentioned:
If your master files have more than two channels of audio, even if one or more of those extra audio channels is empty, use either ProRes Proxy or DNxHR LB codecs for your proxy files.
I was handed over a Premiere Production with what seems like 1080P Prores 442LT media and then on the drive elsewhere all full resolution media, 4K Prores 4444XQ.
I’m trying to re-link the full resolution media but basically nothing happens after I choose “reconnect full resolution media”
I did some testing on a separate test project and it seems like the audio is different on these, the Proxy 442Lt has 2 channel stereo audio and the full res media has 5 channel mono audio, although not all channels are being used it seems.
The only work around I’ve found is to choose “replace media” and then choose the full res media,but obviously then don’t have proxies so would have to make new one’s from inside premiere and auto attach.
Is there any other work around that you are aware of?
Thanks so much.
Best,
Marcel
Marcel:
ProRes in all formats supports more than two audio channels. This appears to be someone creating proxies who wasn’t paying attention to the audio settings (as the default for most software is to output a stereo pair).
Sigh…
My recommendation is to contact Apple Support. This issue of relinking to media where the audio channels don’t match is a long-standing problem and I don’t have a solution. I’ll see if I can find one, though.
Thanks,
Larry
Thanks for the reply Larry!
Have followed up in the adobe forum and looks like people are trying to get a feature added to decide if the audio is used or not. hat would be amazing!
https://adobe-video.uservoice.com/forums/911233-premiere-pro/suggestions/35172364-proxy-media-and-full-resolution-media-must-have-ma
https://adobe-video.uservoice.com/forums/911233-premiere-pro/suggestions/37444813-allow-proxies-and-master-clips-to-have-different-a
Anyhow I will have to figure it out.
Thanks for the great articles, they really are most useful.
Marcel:
Thanks for the update. I sent your comments anonymously to the Premiere team asking for their response.
I’ll update this article – or publish a new one – if they answer.
Also, just for the record, Final Cut Pro does not currently support relinking clips where the audio does not match.
Larry
Marcel:
Just heard from Adobe. They said: “This is a long-standing problem that we don’t have a solution to presently. We simply do not allow you to reconnect unless the audio matches . . . which is especially confusing with proxies.”
So, they know about it, but haven’t a fix yet.
Larry
Hey, I have a question about linking full resolution media to the proxies I already have in my PP project.
Our workflow is that we make proxies manually with ME and then import them into CatDV for logging and adding descriptive clip names. Then export en XML which we import into Premiere so that it brings over the new clip names and the log in markers.
The problem is that when i try to reconnect full resolution media, all the clip names revert back to the original file name. Which if there were 10-20 clips wouldn’t be a big deal, but when you have over 1000 clips it makes it a huge hassle.
So i was wondering if there is a workaround to this?
Hakon:
This is a great question – and I don’t have a definitive answer. But, I THINK, that you will need to change your workflow. As I understand it, when Premiere links to any clip, the file name is an essential part of the path name. Which means that when you shift from proxies to source, the file name MUST change because that is part of the link path.
The only workaround I can think of is changing the name of the source file to match that of the proxy – which may or may not be possible given your workflow.
Please check with Adobe support to verify this, then, let us know what you find out.
Larry
Thank you so much <3
Hi Larry,
I’ve been struggling with the ” automatic relinking of all proxies” function in premiere. Im creating proxies with handbrake on an older machine wich works great, but cant seem to mass reconnect proxies created outside of premiere.
I’ve tried renaming the files with the right title _Proxy, putting them next to original media in a folder called Proxies. Ticking and unticking options in the attach proxies dialog box.
I’m thinking either their search function is lousy, or there is some kinda of meta data baked in when you create proxies on ingest. In ingest or create proxies in premiere mode the search and attach function is not used since they attach automatically one by one.
Anyway I know utlimatly I can just use media encoder instead of handbrake or ffmpeg, but where is the fun in that automation and programming wise?
Thanks!
Thomas
Thomas:
Hm… Interesting. I don’t have an answer, but, hopefully, another reader will.
Thanks for letting us know.
Larry
I like this article a lot! I have one issue, where I’m intending to master in 1080 to allow for room to scale up creatively, but the full-res media are some flavor of 4K. Is there a known workaround to have a 1080 timeline and still keep the full-res media from scaling upon attachment? This seems to work out fine when you link the proxies to the full-res media in the beginning, but not the other way around.
Gabe:
If you edit 4K media into a 1080 timeline, and you adjust the size using “Set to Frame Size,” it will output as 1080p. If, at some point in the future, you decide to create a 4K version, change the sequence size to 4K and the media should scale up to 4K.
Larry