
![]() Lydia sent me an email asking: “Is Broadcast Safe in Final Cut Pro X broken? It doesn’t seem to work for me any more.”
Lydia sent me an email asking: “Is Broadcast Safe in Final Cut Pro X broken? It doesn’t seem to work for me any more.”
The short answer is no, it isn’t broken. But it does have a new behavior that you may not know about.
WHAT IS BROADCAST SAFE?
Broadcast Safe is an effect in Final Cut Pro X that prevents video white levels from exceeding 100% or black levels from going below 0%. As well, it guards against the chroma (color) levels in a clip from over-saturating.
If your work is heading to the web, you don’t need to worry about video levels. If the image looks good to you, it is good. The web is VERY flexible. However, if your work is heading to broadcast, cable, OTT or DVD, you need to be SURE that video levels stay within spec. Excessive video levels mean your program will be rejected for image quality, it won’t air and you won’t get paid.
It’s a big deal at the high-end of the market.
NOTE: This effect also exists in Final Cut Pro 7 (Broadcast Safe) and Premiere Pro (Clamp Signal). Here’s an article that explains its use in both Premiere and FCP X in more detail. FCP 7 is similar to FCP X in operation.
HOW DOES BROADCAST SAFE WORK?
What Broadcast Safe does is “clamp,” or “lock” your white and black levels so that they don’t exceed the levels you specify. By default, this means no white levels over 100% and no black levels below 0%.
NOTE: These levels apply to Rec. 601 and 709 video. HDR video (Rec. 2020) has totally different specs and we will ignore it for this article. At this point, I don’t recommend using Broadcast Safe for HDR video.
Like any effect you apply Broadcast Safe using the Effects Browser. You can either search for it, or find it in the Color category.
The easiest way to apply it is to use an “adjustment layer.” However, these are not supplied natively with Final Cut. Here’s an article that explains how to create one.
Otherwise, select all the clips in your project, then double-click the Broadcast Safe effect in the Effects Browser. Double-clicking applies the effect to all selected clips.
NOTE: You could drag this effect on top of each individual clip in your edit. But, golly, who has THAT much time?
(Click to view larger image.)
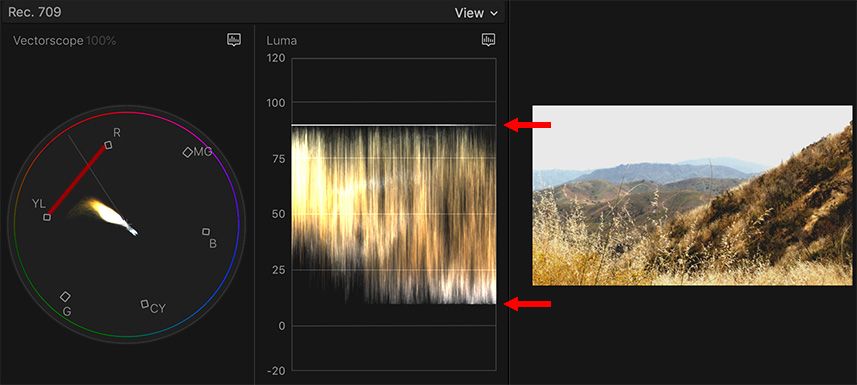
Here’s an example.
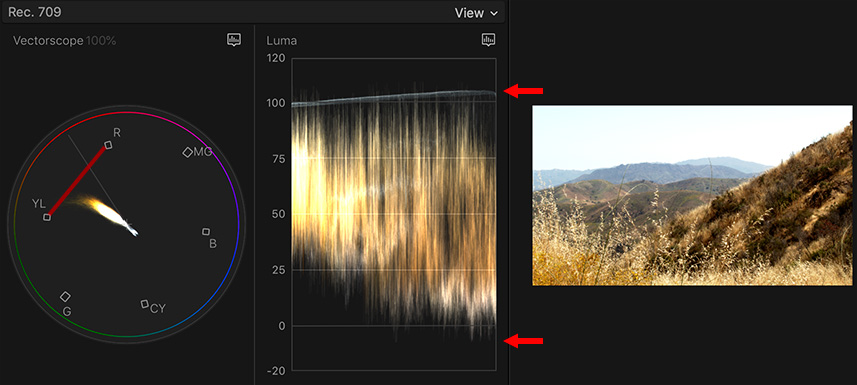
Notice that while the chroma levels are within spec (indicated by the red bar, which I added in Photoshop), the white levels exceed 100% and the black levels go below 0%. Both of these are illegal levels; meaning that they are outside of the technical specs required for broadcast, cable or OTT.
(Click to view larger image.)
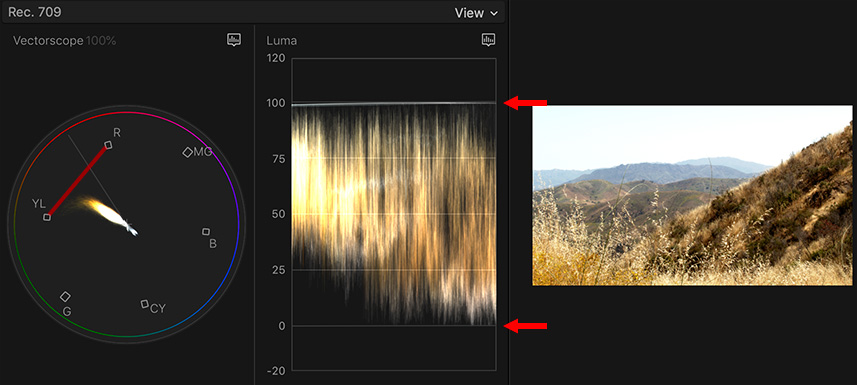
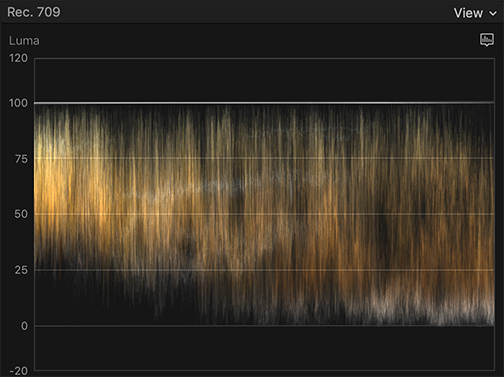
When we apply the Broadcast Safe effect to this same image with the excessive levels illustrated in the earlier screen shot, notice how the white levels are clamped precisely at 100%. Nothing goes over. The black levels are also clamped at 0%. Nothing goes lower.
The problem is that when you clamp levels, you lose the inherent texture in those highlights and shadows. You can see this in the sky where the gray shading in the clouds has turned into a universal blob of undistinguished white.
NOTE: Excessive chroma levels are also clamped, but you don’t see this in the Vectorscope because the current levels are within safe criteria.
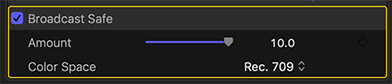
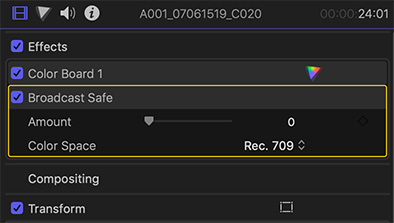
Not all distribution outlets want white levels exactly at 100%. For many years, PBS set maximum white levels to 90%. You can adjust where the limits are using the Amount slider in the effect itself.
(Click to view larger image.)
The problem, and it is a BIG problem, is that adjusting the slider pulls white levels down but it ALSO pulls black levels UP.
I can’t think of a single case where I want to raise black levels, but I can think of many where I need to adjust the maximum white level. For this reason, I don’t recommend using the Amount slider, it is very poorly designed in the current version of FCP X.

A MUCH better option, but less efficient than applying the Broadcast Safe filter is to make adjustments using the Color Inspector controls. Why?
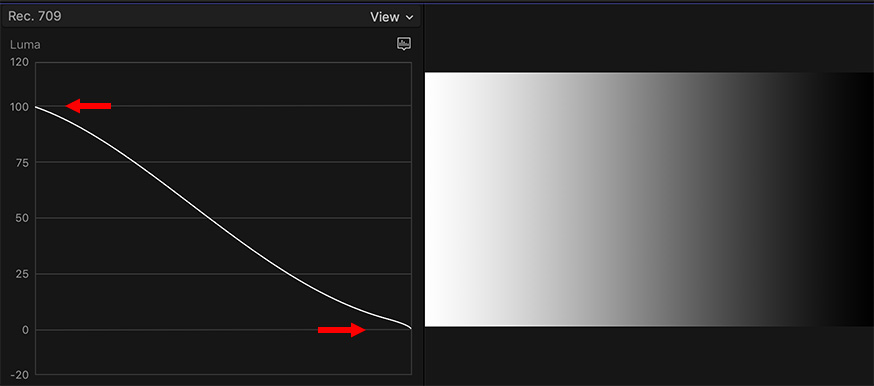
Because when you adjust the gray-scale settings for a clip, you retain the proportions, the subtle variations, between all the different gray-scale values in a clip (top image). While the Broadcast Safe filter scrunches them into a single flat value at the top and bottom of the scale (bottom image).
Adjusting the gray-scale settings keeps all the texture and subtlety in an image, while the broadcast safe filter converts similar values into a blob.
This is why color grading takes a while. You need to examine each clip and figure out how to adjust the color so it looks exactly the way you want for your story, without exceeding critical levels.
However, if you’ve already color graded your material, adding the broadcast safe filter will assure that your program is not rejected due to an errant specular. Speculars never contain data which we need to retain.
THE EXCEPTIONS
There are two significant exceptions to how the Broadcast Safe effect works:
In the Video Inspector, the stacking order makes a difference. The Broadcast Safe filter MUST always be at the bottom. Putting a color grade under the Broadcast Safe filter removes any level protection provided by Broadcast Safe.
(Click to view larger image.)
Second, importing a digital still image or a Photoshop graphic automatically sets levels for that image in a Rec. 709 project such that the brightest level does not exceed 100% and the darkest level does not go below 0%. FCP X is basically doing an automatic gray-scale adjustment to keep all the texture while not allowing any excessive levels.
For this reason, the Broadcast Safe effect is not needed for still images, though applying it won’t hurt anything.
SUMMARY
If you are creating programs for the web, you can ignore Broadcast Safe.
If you are working with stills, levels are adjusted to safe settings automatically.
If you are creating programs where you have specific video level specs to meet, using the Broadcast Safe filter AFTER your color grade will prevent errant levels from damaging your program.
However, in general, it is better to apply a color adjustment than to broadly apply Broadcast Safe. You’ll create more subtle, textured images, especially in the extreme highlights and shadows of your image.

2,000 Video Training Titles
Edit smarter with Larry Jordan. Available in our store.
Access over 2,000 on-demand video editing courses. Become a member of our Video Training Library today!
Subscribe to Larry's FREE weekly newsletter and
save 10%
on your first purchase.
4 Responses to Final Cut Pro X: The Broadcast Safe Effect
How if your camera outputs full range but your external recorder records it in video levels? Then you have “lost/crushed” some data in both highlights and shadows, but it can be recovered in both Resolve and Premiere. In those cases you just tell the NLE that the files should be treated as full range and not video range. That simple fix bring back the “lost” data in the highlights and shadows.
Being a FCPX user Im looking for the same easy fix, but I cant find anything that fix this in FCPX 🙁
Anders:
Thanks for your comment. I have not seen this feature in Premiere – where is it?
Larry
Are there recommended safe levels for projects that go through Compressor to Blu-ray? Or for other Compressor built-ins?
Is multi-pass of use managing extreme levels?
Thanks!
Eric:
Video levels are controlled during the editing/color grading process.
One the master file is exported, you would not adjust them using Compressor, except for converting to the H.264 codec that Blu-ray uses.
Larry