
![]() One of the headline features in the 10.4.9 update to Final Cut Pro X is a number of improvements to proxy editing.
One of the headline features in the 10.4.9 update to Final Cut Pro X is a number of improvements to proxy editing.
COMMENTARY
For some reason, proxy editing has developed a negative connotation which I don’t understand. If you found a free utility on the web which would improve file handling and boost performance in Final Cut, would you download it?
Of course you would! All of us are searching for free utilities that do magic.
That’s what proxy editing is – a free utility, built into Final Cut, that increases performance, decreases storage bandwidth, speeds rendering, and gives you control over image quality. All at the click of a single button.
Proxies could not be easier or more helpful.
Several times a week I get emails from editors who are buying new gear. One of the most requested features is to: “Future-proof my system, so I can edit 8K video without proxies.”
First, in today’s technology-driven culture, it is impossible to determine where the future is going; “future-proofing” is a fool’s errand. Buy what you need today, emphasizing the GPU and RAM. Second, though, is discounting the value of proxies. To edit 8K natively – especially HDR 8K – requires a high-end Mac Pro, with very fast, very big storage. However, most of us aren’t editing 8K HDR footage natively and there’s no reason to spend all that money “just in case.” Instead, when dealing with large frame sizes, simply switch over to proxies and work with much less expensive gear.
Proxies are your friend, not an acknowledgement of weakness.
OK, I’m done now.
WHAT’S NEW
Apple made many improvements to proxy editing with this update. For example, we can now:
Let’s take a closer look at what these options mean in practice.
CREATE PROXIES ON IMPORT
There are two places to create proxies:
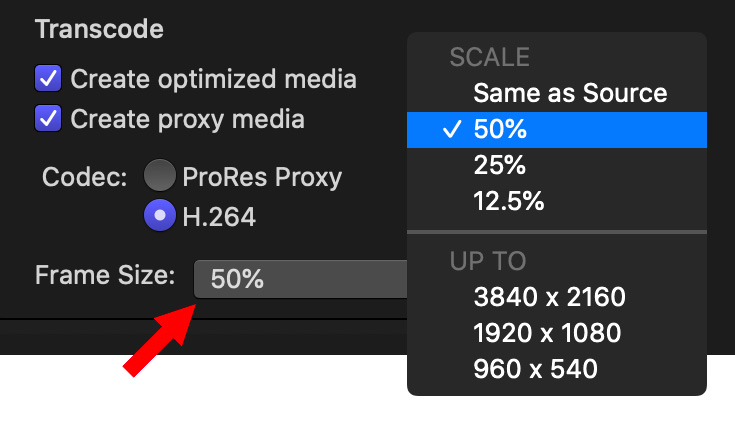
In addition to rearranging the settings on the right of the Media Import window, Apple added two significant choices to creating proxies:
If file storage is not a big issue or if you are editing on an older system, choose ProRes Proxy. This is a highly-efficient codec, optimized for editing, that runs well on slower systems. It also provides higher image quality, compared to H.264.
If conserving file storage is important, you need to share project files with another editor, or you have a newer system, H.264 may be the better choice.
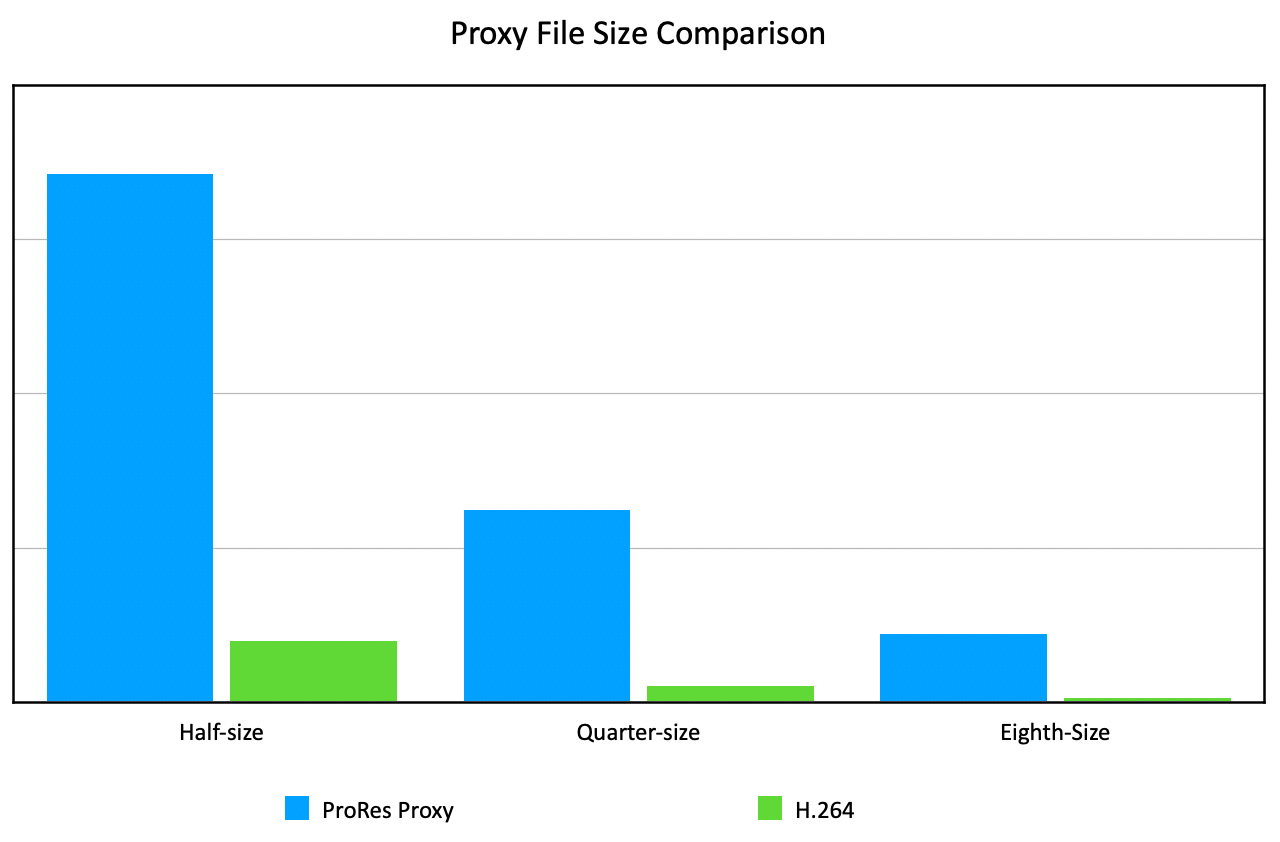
I did a quick test. Starting with a 1 GB ProRes 422 master, a half-size ProRes Proxy file was about 90% smaller. H.264 was about 10% the size of each ProRes Proxy file. Each reduction in frame size cut the file size by roughly 2/3.
Three reminders:
NOTE: There are a few file formats that do not support proxies: audio, video with alpha channels and still images. I would also expect that titles and generators to not support proxies, either.
PROXY DISPLAY

Here’s a simple sequence of three master clips that illustrate another change in proxies: how they are displayed in the timeline.
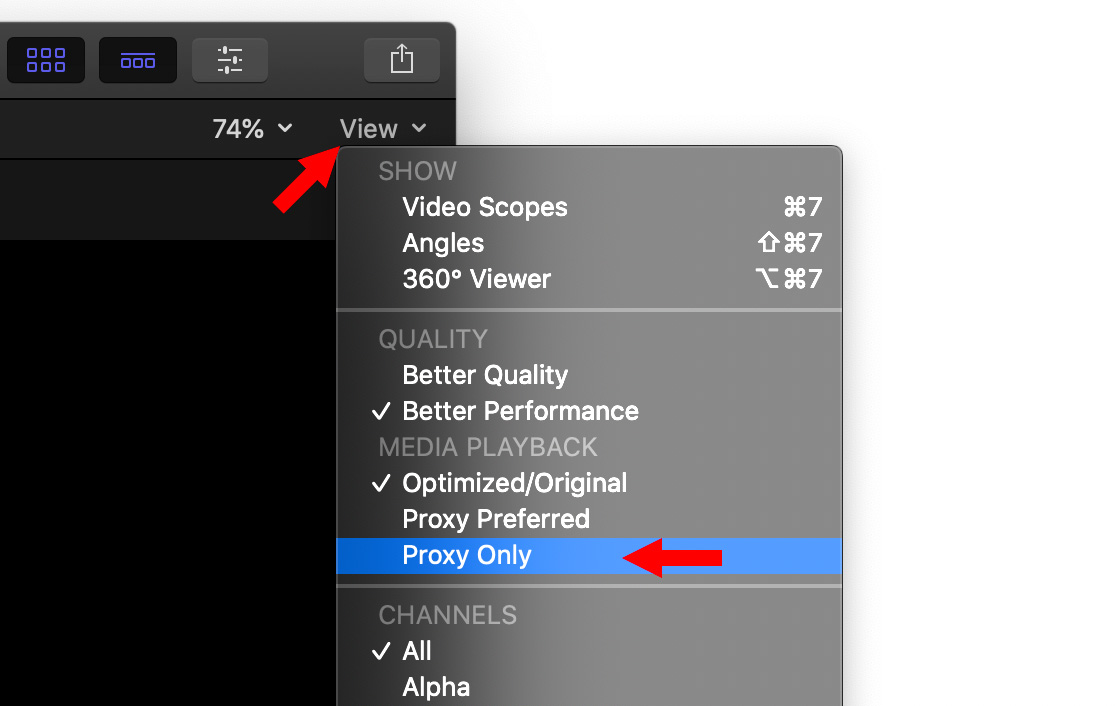
To switch from optimized or original footage to proxies, go to the View menu in the top right corner of the Viewer and choose Proxy Only.
NOTE: To switch back to optimized or original footage from proxies, simply select Optimized/Original in the View menu. Relinking is automatic and instant.

When you select Proxies, clips that have proxies are displayed in the timeline. Clips without proxies are displayed as red boxes. Frustrating!
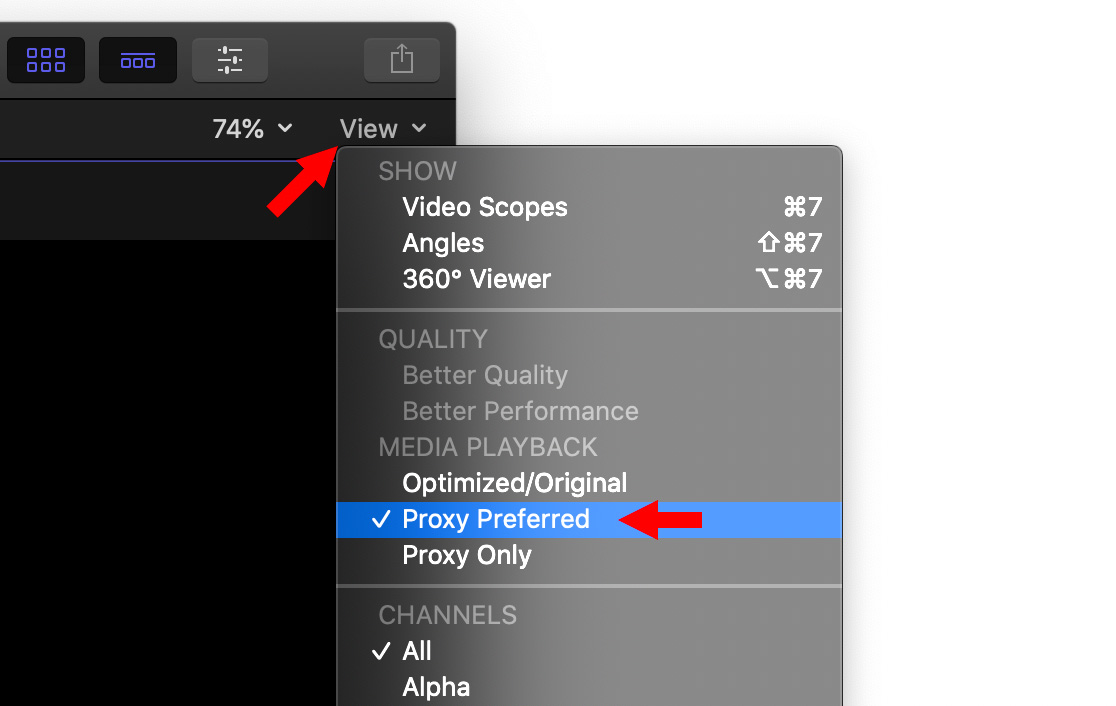
Instead, when you select Proxies Preferred, if proxies exist, they are displayed. If not, the camera master/optimized clip is displayed. This removes one of the big frustrations of using proxies – that of not creating them in the first place.
NOTE: To create proxies after import, select the clips that need proxies in the Browser, then choose File > Transcode Media. As with importing clips, you get to select the codec and frame size of the proxies you create after the fact.
The benefit to creating proxies from Browser clips is that you can select the specific clips you want to create proxies for, rather than creating proxies for all imported clips using Media Import. (We can’t create proxies or optimized media by selecting Timeline clips.)
SIDE NOTE

If you want to know which versions of your media exist, select the clip, then go to the Info Inspector and scroll to the bottom.
A green light means that format exists. A red light means it doesn’t. In this screen shot, the camera master and proxy file exist, an optimized version does not.
Click the Transcode Media button to create different formats of your media, the same as using the File menu.
COLLABORATION – SHARING PROJECTS
When compared to Premiere, Apple has taken a different approach to collaboration.
Premiere is designed for collaboration where all team members are working off the same shared network, able to easily exchange media and projects. Up until the current pandemic, that choice made a lot of sense.
Apple views collaboration as a remote endeavor, where one editor sends files to another editor. While this didn’t make a lot of sense when the entire editorial staff is in the same building, it does today, when we are all working remotely.
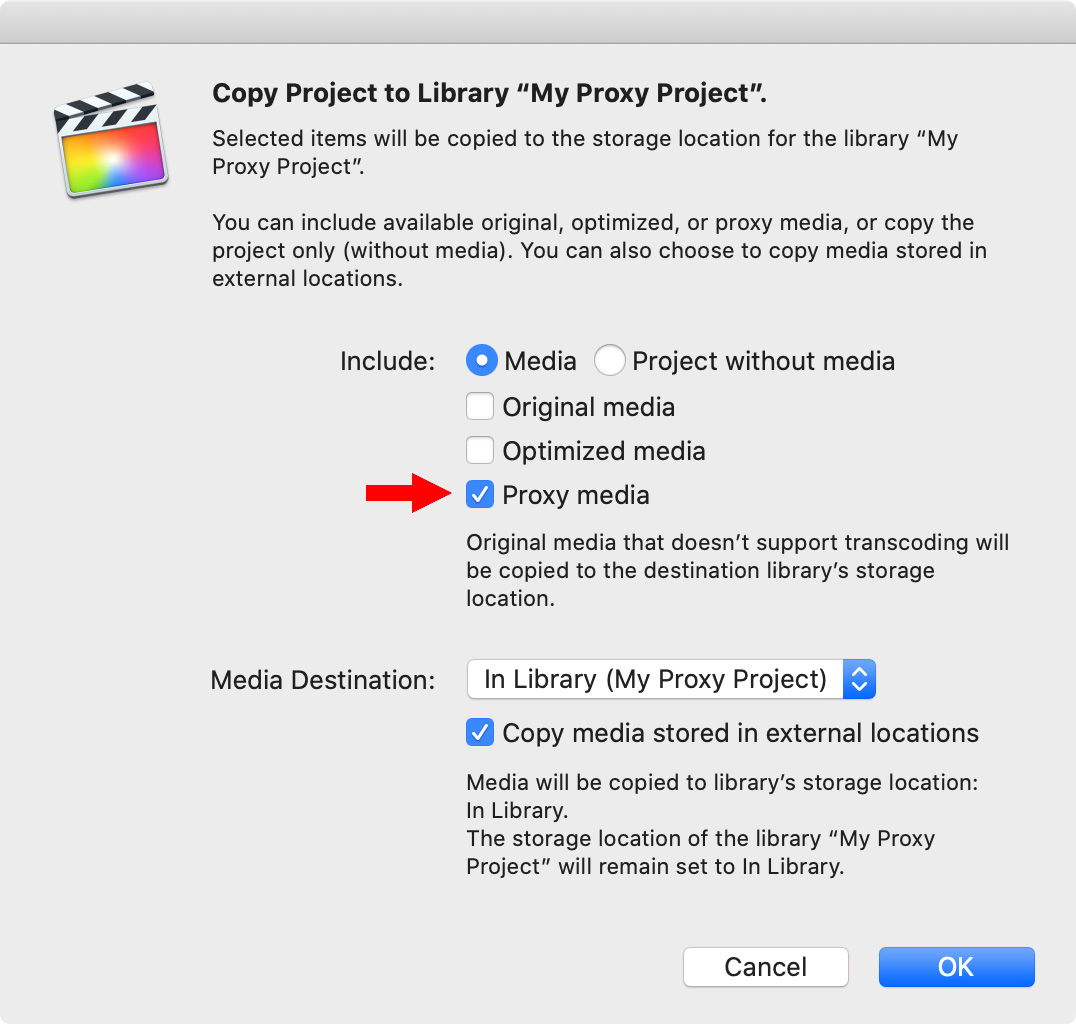
Another new feature is that we can now create proxy-only versions of projects, events and libraries. To create a proxy-only project:
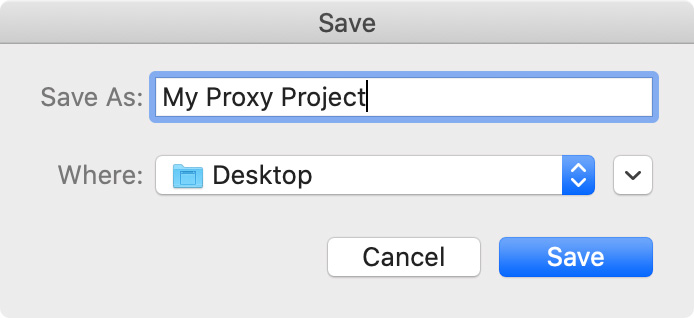

What I also discovered is that once that new library is created, Final Cut opens it so you can verify everything looks good. (This was done so seamlessly, I didn’t notice it for a few minutes.)
To send this library to another editor, select the library, then, in the Finder, choose File > Compress [project]. Zipping is necessary because it protects all the different files in a library from getting damaged during web transfer.
The new editor can edit this project as much as they want, even add new media to the library. When they are done, they should select the library, ZIP it and send it back to the original editor.
RELINKING A PROXY-ONLY PROJECT
When the original editor, who has all the master files, gets a proxy-only project, they can easily relink it. Here’s how:
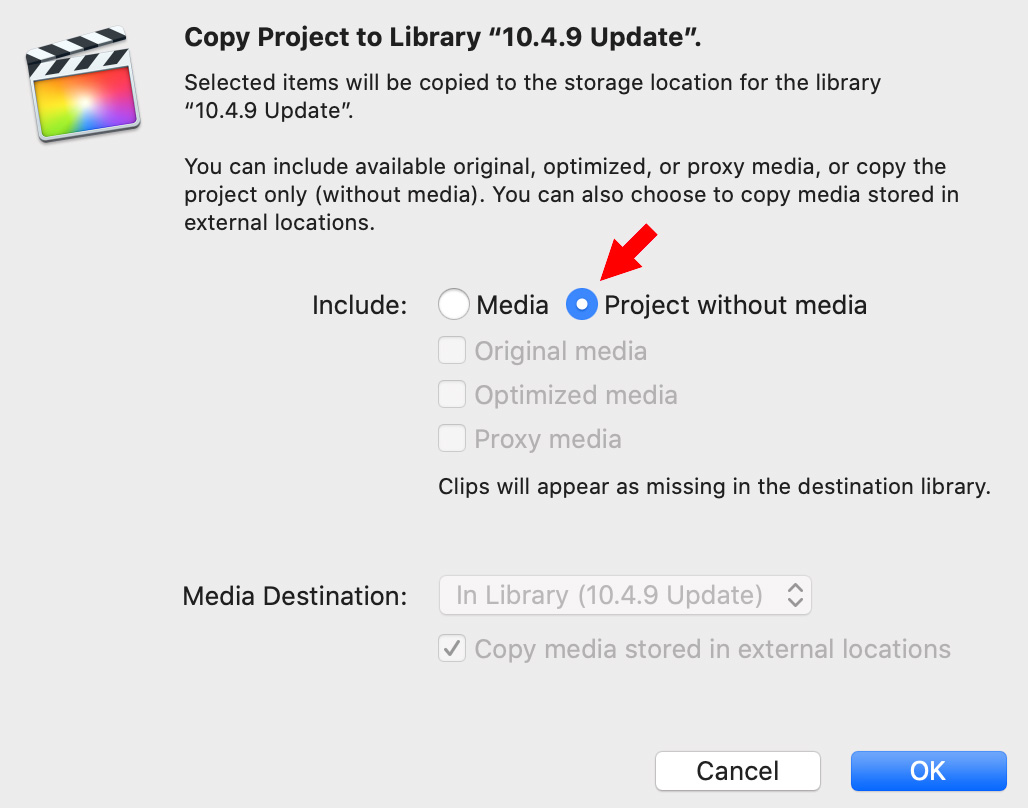
In this window, which appears after you drag the project, select Project without media. The project is copied and all media is relinked automatically.
NOTE: If you added new media to the project and want the new media to be copied to the original library, select Media in the Include section, then select the Original media checkbox.
SUMMARY
Proxies have been a part of Final Cut for many years. But the improvements made with this update make working with – and sharing – proxies a whole lot easier.
If you are currently editing HD media, you don’t need proxies – though they will help when doing multicam editing. But, as you expand into larger frame sizes, HDR, or extensive multicam projects proxies will streamline your editing workflow. And when you need to share a project between editors, the new proxy workflow is a BIG help.
EXTRA CREDIT
Also, after reading Apple’s press release I realize I should also mention that third party developers like Frame.io, Keyflow Pro, and Postlab also support these new proxy features – as well as very powerful multi-user workflows.
Here’s a link to an Apple KnowledgeBase article that explains more about proxy-only libraries.

2,000 Video Training Titles
Edit smarter with Larry Jordan. Available in our store.
Access over 2,000 on-demand video editing courses. Become a member of our Video Training Library today!
Subscribe to Larry's FREE weekly newsletter and
save 10%
on your first purchase.
35 Responses to Final Cut Pro X: New! Improved Proxy Workflow
Newer Comments →-
 Wayne Ettel says:
September 7, 2020 at 8:58 am
-
 Larry says:
September 7, 2020 at 9:15 am
-
 Martin says:
October 30, 2020 at 9:09 am
-
 Larry says:
October 30, 2020 at 9:36 am
-
 Dan Weissman says:
December 7, 2020 at 8:50 am
-
 Larry says:
December 7, 2020 at 9:44 am
-
 Jesse Hollington says:
December 12, 2020 at 10:12 am
-
 Larry says:
December 12, 2020 at 10:50 am
-
 Jesse Romine says:
March 10, 2021 at 6:11 am
-
 Larry says:
March 10, 2021 at 7:41 am
-
 David Wilson says:
March 18, 2021 at 1:07 pm
-
 Larry says:
March 18, 2021 at 1:35 pm
-
 Reynaldo says:
April 7, 2021 at 5:19 pm
-
 Larry says:
April 7, 2021 at 6:59 pm
-
 Ryan Ehler says:
July 15, 2021 at 9:06 am
-
 Larry says:
July 15, 2021 at 9:09 am
-
 Barbara says:
May 2, 2021 at 2:16 am
-
 Larry says:
May 2, 2021 at 8:57 am
-
 Barbara says:
May 4, 2021 at 12:34 am
-
 Larry says:
May 4, 2021 at 9:48 am
-
 Daniel Scherl says:
June 10, 2021 at 9:45 am
-
 Larry says:
June 10, 2021 at 11:09 am
-
 harm says:
June 11, 2021 at 6:54 am
-
 Larry says:
June 11, 2021 at 8:46 am
-
 Evan says:
October 19, 2021 at 5:31 am
-
 Larry says:
October 19, 2021 at 5:54 am
Newer Comments →In an effort to save space would it be best to use proxy media only? Is there any real advantage to using optimize media for editing.
Wayne:
Keep in mind that proxy media is, at best, 1/2 the resolution of the camera original. If you are shooting 4K and editing 1080, the proxy media will look virtually the same as camera native. However, if you are shooting 4K and editing 4K, proxy media will look worse.
Larry
Thanks for convincing me to go the Proxy route. The ONLY justifiable reason to ditch my 2015 MBP would be higher performance in FXPX but allowing for a little bit of extra time creating proxies during import (while I pack away my gear).
I’ve instead installed a fast 2TB SSD for $240 (instead of $400 add-on custom order in newer MBPs). Note: after 2016 no MBPs can be customer upgraded.
Martin:
Thanks for your comment.
Larry
What I’d really like to know — perhaps I don’t because I’ve just not done the deep dive — is what happens when you’re working with a proxy-only library and you use an effect. Does FCP:
1) render using proxy media only (if that’s a thing) and keep the newly-generated clip in the library, or
2) render using original/optimized media, then render a proxy of the newly-generated clip, and store the proxy in the library, and store the other… where?
3) some other method?
It seems to me that if the idea is to keep the library small, the default behavior should be that only the proxy of the newly-generated clip resides in it.
Dan:
Apple has taken a very simple and straight-forward approach. When you render proxy files, you use proxy media. When you switch to high-res files, all proxy render files are deleted and FCP X re-renders everything automatically using the higher-quality media.
Larry
This is a great writeup and a big help, thanks!
I got excited when I first read about the new proxy workflow features, but hadn’t had the time to really dive into them, but thanks to your instructions, I’ve managed to get a workflow that saves me having to travel to my church just to be able to work on stuff on the Mac Pro.
In fact, this worked so well that I was able to create ProRes Proxy projects that performed surprisingly well on my aging 2013 MacBook Pro — rendering is naturally a bit sluggish, but nowhere nearly as bad as it would have been with the original media, and the sizes are much more tolerable.
In fact, I’ve even able to use a Remote Desktop session to upload and relink up the proxy projects and render the final versions on the Mac Pro from afar; I simply point Compressor to a shared folder so the results are automatically there for review as soon as it’s done.
Now I just wish it was possible to open a Final Cut project directly from an iCloud folder, but I can understand why that’s rife with potential problems (but I’m going to keep dreaming that maybe someday Apple’s iCloud team and their FCP team will get together for a few beers and hash out how to make it work properly 😀 ).
Jesse:
This is SUCH a cool note – thanks for sharing. And thanks, also, for the kind words.
Larry
Any Updates on this requested update?
Jesse:
Which update are you looking for?
Larry
Hi Larry,
Your insight is so valuable, thank you!
Because of 4.2.2.10bit (a7sIII) I have moved into proxies and they are amazing. My question is regarding colour correction or any other manipulation to a proxy clip. I don’t know of any colour changes to a proxy will be applied to am original media clip during a final render. I don’t imagine any colour work to a proxy is not advisable but it needs to happen somewhere during the edit and post processing. I can’t work with 4.2.2. 10bit and trying to colour correct and/or apply a LUT on original footage is next to impossible. Can this work be done on a Proxy file and the tweaks be rendered in the final? I need help understanding the best way to approach this challenge.
Also, in many split screen or collage plugin’s, you need to import a clip into the allotted holder, and those clips are not editable one in place. I usually do a stringout, colour correct and whatever and then render that clip so it’s finalized for placing into the plugin. How do I address this when using 10bit clips that are too heavy to colour correct as Original media. Can proxies be used and then render individual clips of placement into the plugin?
David:
My understanding is that any change you apply to a proxy – including color correction – will be applied to the source file when you switch between proxies and source. This is easy to test for yourself:
* Switch to proxy display
* Apply a bizarre color change that would be easy to recognize
* Switch to Orginal/Optimized media and see if the color change makes the transfer.
I suspect it will.
And, no, you can’t color correct a clip once it is imported into a drop zone. You’ll need to adjust color for the entire image – or – create a mask that just shows the image portion you want to correct – or – you will need to correct it before you import it.
Larry
Thank you very much Larry. As always, you’re the most trusted source for Final Cut Pro X explanations.
My question is regarding storage locations. I edit on a 2018 Macbook Pro a large capacity portable USB 3 hard drive for my original media, and a portable USB 3 solid state drive for Library (project) files. When creating proxy files within FCPX, is there a way to direct the generated proxy files to be stored on my Media drive, and not inside my Library file? The capacity on that drive isn’t high.
I noticed in the Library Properties (in the inspector tab), that there is a modify storage location dialog box. I’ve never used it before, but could that be the solution?
Thank you!
Reynaldo:
Thanks for the kind words!
You are correct – the secret is Library Properties. Here’s a short video that explains how these work:
https://larryjordan.com/articles/final-cut-pro-x-how-and-why-to-modify-library-properties/
Larry
Hi Larry,
Is there a reason you like to store the original media files on a different drive than the Library drive?
Thanks
Ryan:
Performance and efficiency. Render files and all generated files are stored in the library. By storing media on a separate drive, it maximize speed because different drives are used when accessing render vs. media files. Also, storing media separately simplifies backup.
This is NOT required, but it is how I work.
Larry
Hi Larry, Thanks a lot for your insight. Another question from my end:
I edit on a 2015 Macbook pro and an SSD 2T drive. I am editing a huge project at the moment, I created both proxy and optimised on the import. But my project is already 1,9T without even any editing done. So if I would delete the optimised folder and edit only in proxy, how can I export it still as optimised without having that folder? Cause the final output should be highest possible quality of course…
Is there a button to only import the optimised media that’s needed during the final final export?
I would be so happy if the above is possible…
Barbara:
As long as you have the camera master files, you can delete the optimized files as optimized files can always be recreated from the masters. But if you don’t have the camera masters, then you need to keep the optimized files for final export.
Then, from the View menu in the Viewer, select Proxy (or Proxy Preferred) and edit using only proxies until you are ready for final export.
Give this a try to make sure you are comfortable with with approach before deleting anything.
Larry
Thanks a lot for your quick response! Yes I do have the camera master files still in place.
Am I right that, If I delete the optimised folder, edit with proxy but then finally when I’m done; export ‘master file’, that fcpx creates optimised media for only the clips I used in my timeline?
Barbara:
That is not quite correct. First, to delete optimized files: Select the library then choose File > Delete Generated Media. This is MUCH safer than trying to delete files from within the Library using the finder.
Second, if you edit using Proxies, then switch back to Original/Optimized, if you don’t have optimized media, FCP will use your camera masters. There’s no need to create optimized media at any time if you don’t need it.
Larry
HI Larry! Thanks for this article! I have a project we shot overseas on three different cameras (Canon R6, drone, and iPhone 11 Pro Max). Everything was shot in 4K. I was going to create proxies for all the video on import as most of the footage was sorted ahead of time.
I’m editing on a 2018 MBP with 32 GB RAM, a Radio Pro Vega 20 4 GB, and the footage is all on an external Samsung high speed SSD.
I have two questions about the edit:
1) I’ve edited for decades, but never done proxy. I’m excited to dip my feet in and want to be able to edit as fast as possible, do the color grade, then switch from proxy back to master clips, and export the final picture lock. My SDD is 2TB, and the project files before importing total about 250 GB in size. Do you recommend ProRes for the import or H.264 and what frame size? I don’t care if the footage is lower res visually for editing, I know how sharp and good it looks in the master files. I want speed and the fastest render times for ease of editing and color grading and keeping the demand on the laptop reasonable. Speed of being able to zip around the edit quickly and make color changes, etc. is the most important to us as long as the generated proxy files will fit on the the SSD. 🙂
2) Is it also an option to edit the project in 1080p and then when I’m all done, create a new project that’s 4K, and then copy and paste the 1080p timeline into the 4K project and let it re-render before exporting a master? Is that faster as well, or does proxy editing do the work so that editing in 4K won’t be slowed down?
Thanks so much!
Daniel
Daniel:
Great question! use Option 1 – using ProRes Proxy as your codec and 1/4 size as your proxy size. Small files, very high quality, should be plenty “zippy.”
However, don’t do color grading on proxies – it is always best to color grade master files.
Larry
Hi Larry,
Cheers for all the insight. A question, I try to keep my macbook pro as empty as possible so I run Librarys from HD’s and SSD’s. I recently got into working with proxies but every time I import files I cannot uncheck the Copy files into Library tab, where I would like to save time and leave files in place. I googled fo the answer and found thta FCPX won’t let leave files on a memory card…Both the Library and the files are on the same external harddrive, I just don’t want to copy them into the Library.
Is there a way to achieve this?
Best,
Harm
Harm:
There are a few reasons why FCP requires copying files into the library:
* They are in a format, like AVCHD, where the components of a media file are stored in different locations, rather than a unified movie.
* They are stored on a camera card, or other removable media.
* And, um, maybe one other reason that I can’t remember at the moment.
In your case, it sounds like the removable media is the problem. Just copy the files to your HDD or SDD, then, when you import, the media can remained stored outside the library.
Proxy storage location is determined by Project Properties > Storage Locations > Media. The default is “In Library,” but you can set proxies to be stored anywhere you want.
Larry
Amazing write up! Is there a way to make proxies external to a library so you can use them in multiple libraries?
I have two libraries, one called current project ( it’s small so I’m using all original media), and then I have another library called Back Catalog that’s 800gb of proxies files. It’s years of footage, and I often need a few clips from it for my ongoing projects so I shrunk it all down using proxies. I just don’t know how to use proxies from the Back Catalog library in the Current Project library without duplicating them and taking up a ton of space
Evan:
Hmm… maybe. FCP links proxies internally to source media, but what may be possible is to import a proxy into a new library, because you can’t link the same proxy to two different master files in the same library, select the proxy, then choose File > Relink Media. You may then manually link that proxy file to its master file, thus reusing proxies.
I’ll have to test this and, if it works, I’ll write up a tutorial that explains this in more detail.
Larry