
![]() Roles allow us to group audio clips in Apple Final Cut Pro X without using buses or tracks. While I’ve written about Roles before, see the list of related tutorials at the end of this article, in this article I illustrate how I use Roles every week as part of my webinar workflow.
Roles allow us to group audio clips in Apple Final Cut Pro X without using buses or tracks. While I’ve written about Roles before, see the list of related tutorials at the end of this article, in this article I illustrate how I use Roles every week as part of my webinar workflow.
When I was first introduced to Roles, I found them very confusing; especially because I was so used to more traditional tracks and buses. However, I’ve been using them every week for the last year or two and find them indispensable to editing and releasing my weekly webinar.
Let me show you how you can use them, even for simple projects.
THE BASICS
Definition: Roles and subroles are labels which you can apply to audio or video clips. Roles and subroles allow you to group clips to simplify organization and mixing. (We could call these “metadata,” which they are, but it is easier to think of them simply as ways of labeling our clips.)
At the simplest level, you don’t need to know anything about Roles to successfully edit and output a project. The defaults allow you to import clips, add effects and music, adjust levels, then output a finished project for YouTube. It all works, no problems.
However, Roles become very useful when you are working with both source clips and final mixes, multiple languages, or audio effects.
EXAMPLE: THE FINAL MIX
Each week, I record and publish my Wednesday Webinar. This is a screen capture recording of a live training presentation that I then offer in my store and, via streaming, to members of my Video Training Library.
My post-production workflow is:
Roles are involved when I import the final mix back into FCP X, then output the finished master file from Final Cut.
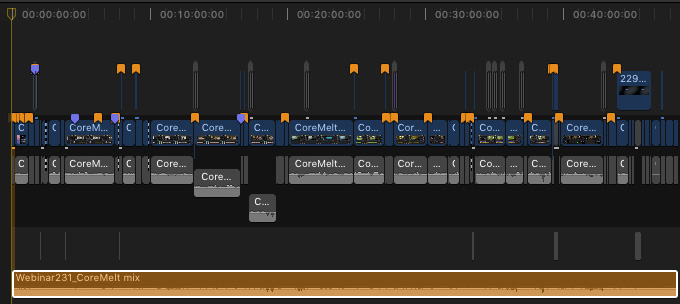
Here’s a typical example of a finished webinar, ready for export. The source audio – including all voice overs – is gray, while the final stereo mix is orange. Because I never want to lose the source audio, nor do I want to run the risk of it going out of sync, it is still attached to the video clips.
The final stereo mix is output as a single stereo pair from Audition, then imported into FCP X. (Because Final Cut does not support mono audio output, I create all final mixes in Audition as stereo pairs, even though I convert them during compression to mono to save space.)
Because I have the final stereo mix, I don’t want to hear the source clips; however, I don’t want to lose them, either.
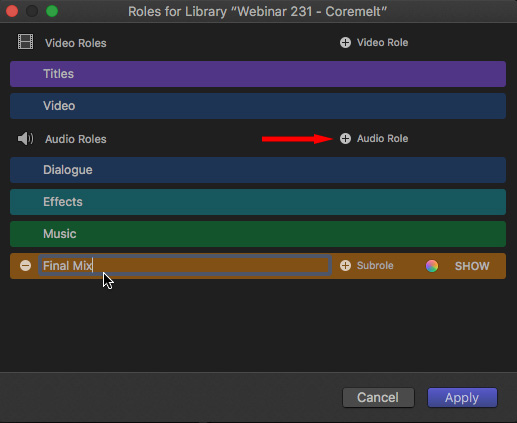
So, I choose Modify > Edit Roles, from the menu bar, and create a new Audio Role called “Final Mix” (There’s no magic in the name, you can call a Role anything.) This new Role joins the default Roles of Dialogue, Effects and Music.
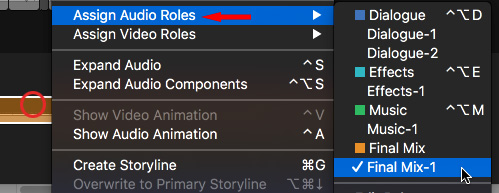
Then, I assign this new Role to the stereo mix. There are several ways to do this, I find the easiest is to right-click the clip itself and choose Assign Audio Roles, then choose the Final Mix Role.
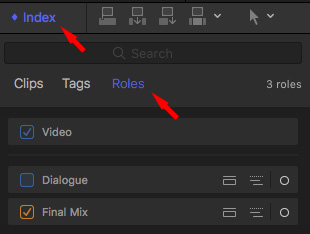
Now, in the Timeline Index, click the Roles text button at the top and the two audio Roles are displayed. Unchecking a Role disables all clips that are assigned to that Role. So, I uncheck Dialogue. This mutes all Dialogue clips in the Timeline. Since Dialogue is the default clip setting, this mutes all Timeline clips EXCEPT the stereo mix that I just assigned to the new Final Mix Role.
HOWEVER!! – and this is a big note – Changing the Roles in the Timeline does NOT affect final output; only playback in the Timeline. The reason is that disconnecting Timeline Roles from Export Roles means that you can easily export multiple versions of the same project, without messing with clips or settings in the Timeline.
When it is time to export, choose File > Share > Master File. This not only provides the highest possible audio and video quality, it also provides the most flexibility in export options.
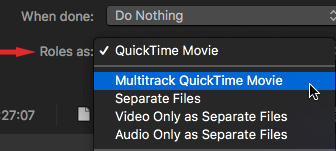
Click the Settings tab at the top, then change Roles as to “Multitrack QuickTime Movie.” This allows us to export separate audio tracks and include them all into a single QuickTime file.
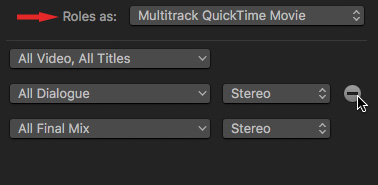
This displays all the Roles current in the project being exported. To disable a Role, which means it won’t be exported, click the Minus button.
NOTE: Remember, export Role settings don’t affect the Timeline and Timeline Role settings don’t affect export.
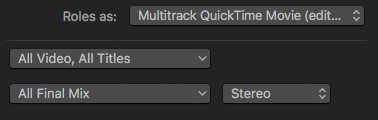
This shows that I’m exporting all video, all titles and ONLY the audio that’s assigned the Final Mix Role.
MORE EXAMPLES
Roles extend throughout all of Final Cut, for both audio and video. Here are other articles and videos I’ve created that show different ways to use Roles.
Articles
FCP X 10.3: Understanding Roles and Lanes
FCP X 10.3: Role Components Make Stems Possible
Apple’s White Paper: Audio Roles
Videos
Organize the Magnetic Timeline Using Roles
Roles, Audio and the Timeline Index
SUMMARY
You don’t need to be doing highly-complex projects to take advantage of Roles. In fact, even simple projects can benefit from Roles, once you understand how they work.