
![]() This tutorial started with a question from Wes:
This tutorial started with a question from Wes:
“I’m using a proxy workflow. If you create multicam clips and select automatic settings for size, etc., say for this example it is 1080p, and you are editing into a 4k timeline and the source footage is 6k (5760 x 3240), do I have to go back and change every multi-cam clip’s setting to 5760 or 4k or will the project automatically use the larger size footage when I reconnect to the originals?”
Wow, that’s a lot of numbers!
Let’s take a step back. Regardless of whether you are using proxies or not, you should create multicam clips at the size you need for your project. For example, if you are editing a 4K timeline, your multicam clips should be set to 4K. If you need 6K output, then create your multicam clips at 6K.
If your clips have a different frame size than your timeline, you should NOT choose Automatic when creating a multicam clip.
NOTE: If your source footage is smaller than the ultimate multicam, for example, you are adding HD footage into a 4K clip, the smaller footage will become soft when its enlarged. For best image quality, footage should be set to 100% size or smaller.
If you use source media larger than the multicam clip, 6K in Wes’ example, FCP will automatically scale those clips to fit into a 4K multicam clip.
The key is to set your multicam clip size to the correct size when you first create it. You should not rescale media after creating a multicam clip.
CREATE PROXIES
You can create proxies when you first import media into Final Cut, using the Media Import window. But, assuming you didn’t do that, select the clips you want to create proxies for in the Browser, then choose File > Transcode Media.
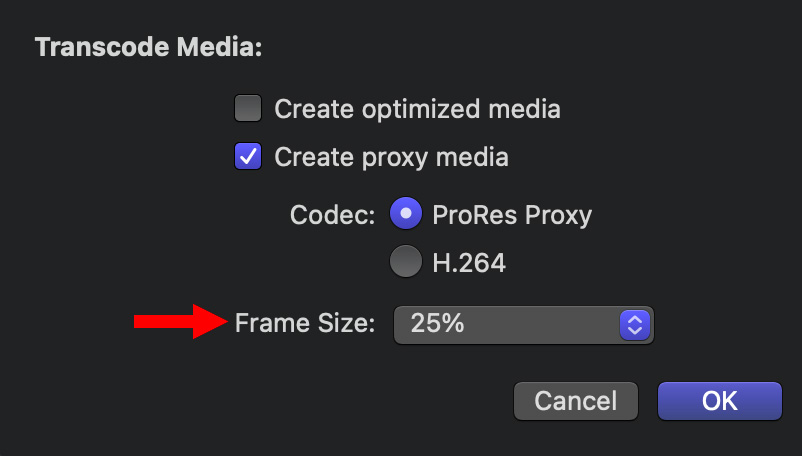
Because we are editing multicam clips, performance is more important that image quality, unless you are only editing 2-4 cameras. For this reason, create very small, highly-efficient proxy files. I recommend ProRes Proxy at 25% the size of the native files.
The less data your computer needs to process the more camera angles it can edit. When you need to see image quality, you can switch back to native media at any time, though with 4K clips they may not play smoothly in a multicam.
CREATE YOUR MULTICAM CLIP
Select the clips you want to build into a multicam clip in the Browser, then choose File > New > Multicam Clip.

In the dialog that appears, click Custom Settings. This allows you to specify the specific size of a multicam clip, rather than defaulting to the size of the files you are bundling into it.
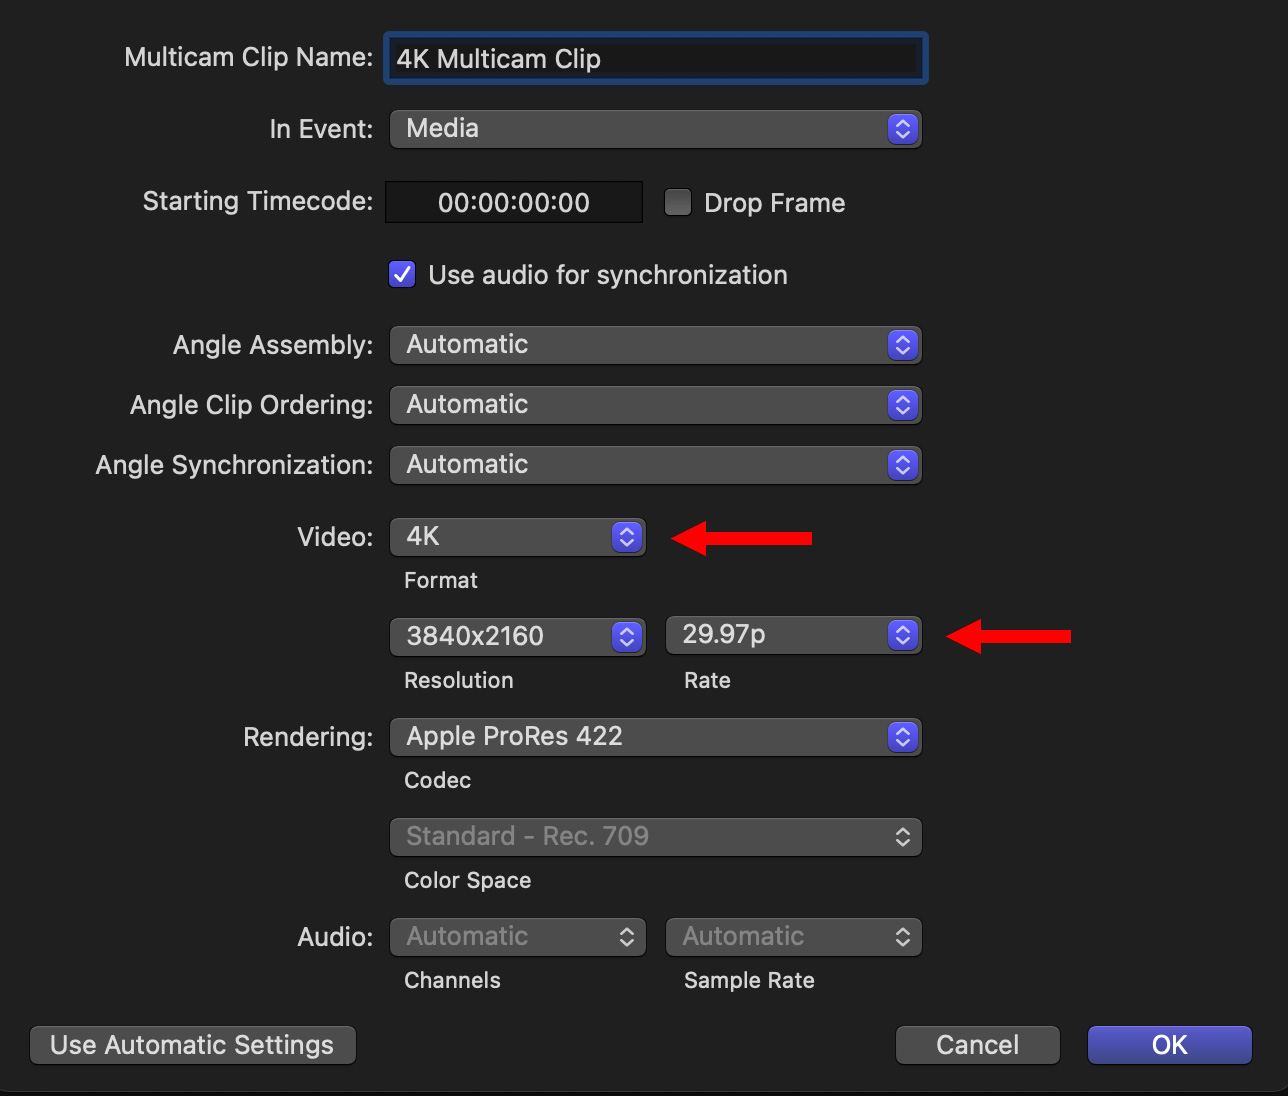
Set the Video menu to the frame size you need for your project, along with verifying that Resolution and Rate are also what you need.
NOTE: Other multicam settings are also important, and can be referenced in this article.
ENABLE PROXIES
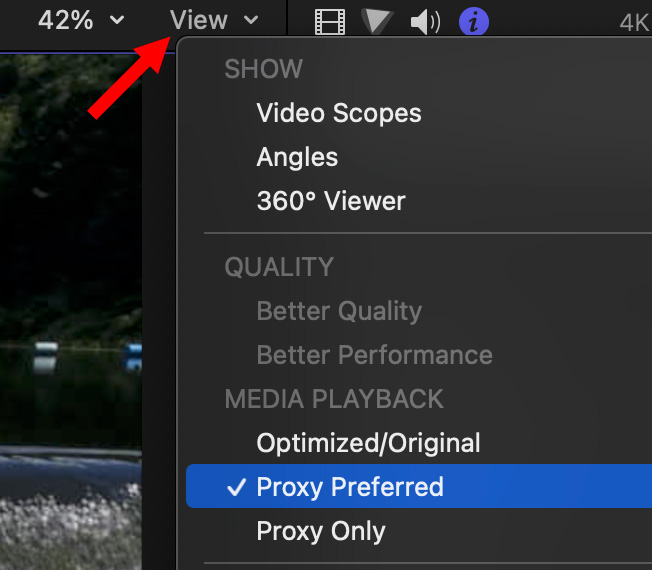
Next, enable proxies by going to the View menu in the top right corner of the Viewer and choosing Proxy Preferred. What this does is display proxies, if they exist. And, if they don’t, it displays camera native media.
As I was writing this, I decided to test the advantage of using proxies. I bundled four 4K clips that were stored on a server into a multicam. The multicam would not play when I selected camera native, but played perfectly when I switched to proxies.
The way that Final Cut handles proxies is that, as long as you create the original multicam clip at the size you need, proxies will be substituted for camera native media with no problems even if the proxies are a fraction of the size of the originals. Final Cut handles all the necessary resizing automatically.
3 Responses to Final Cut Pro: Working with Proxies in Multicam Clips
Thanks Larry. I frequently resize 4k clips in a 1080 timeline. This allows me to reframe a shot, or apply a digital pan or zoom. Would it it make sense to make my multi cams in 4k for editing into a 1080 timeline? And out of curiosity, why is it so important to have the MC match the editing project? Many thanks. Brian Russell
Brian:
Yes, you can rescale individual clips in a multicam clip. For example, create a 4K multicam clip and edit it into the Timeline. Then, if you need to reframe specific shots, select that shot in the Timeline and rescale/reposition it. However, the Video Inspector in FCP won’t show that the original clip was scaled, so you’ll need to be careful, if you enlarge it, not to go past its original 100% size.
As an example, if you edit 4K clips into a multicam clip, then edit it into a 1080p timeline, you can safely scale each clip up to 200% without losing quality.
The general reason for creating a multicam clip at the same size as the project is to avoid excessive rescaling. However, wanting to reframe specific shots is a good reason to create the multicam clip at a size larger than your project. There’s no hard and fast rule – except to avoid enlarging clips more than 100% of their native size.
Larry
Thanks Larry … very helpful.