
![]() The Precision Editor is new with FCP X – and it allows you to visually trim the edit point where two clips touch with precision and simplicity.
The Precision Editor is new with FCP X – and it allows you to visually trim the edit point where two clips touch with precision and simplicity.
NOTE: Here’s a video I did recently that shows the Precision Editor in action.
Before I explain how to use the Editor, though, we need to change a preference setting.
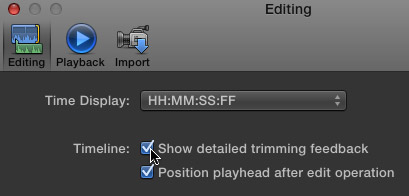
Select the Final Cut Pro > Preferences > Editing tab and turn on Show Detailed Trimming Feedback.
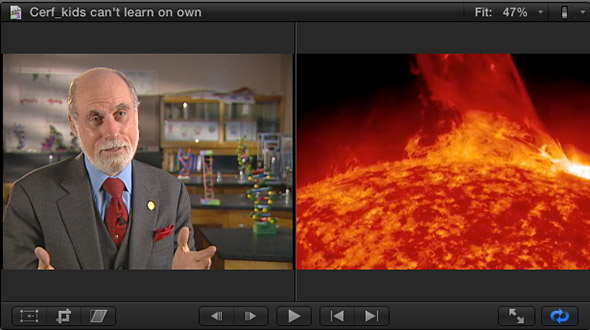
This changes the display in the Viewer when the Precision Editor is open. Normally, we only see one image in the Viewer. When the Precision Editor is open, the Out is displayed on the left and the In on the right. This makes it much easier to see what we are trimming.
NOTE: If you forget to change this preference, hold the Option key while trimming to temporarily switch the Viewer to a Two-Up display. The display reverts back to normal when you let go of the Option key.

Here, I have two clips containing both audio and video that I want to trim. (I turned off the display of audio to make it easier ot see what I’m doing.) There are three “sides” to any edit:
The “edit point” is where the ends of two clips touch.
Trimming one side of the edit (the In or the Out) is called a Ripple trim, because it’s effects “ripple” downstream (to the right) of the edit.
Trimming both sides of the clip at the same time is called a Roll trim, because you are rolling the location of the edit point.
WHY TRIM?
We generally adjust the In or the Out to match the action between two clips.
We generally adjust both the In and the Out to adjust the emotion in an edit. For example, cutting before, during, or after a particular action creates an entirely different emotional impact.
THE PRECISION EDITOR
To open the Precision Editor, double-click the edit point (remember, that’s where the ends of two clips touch).
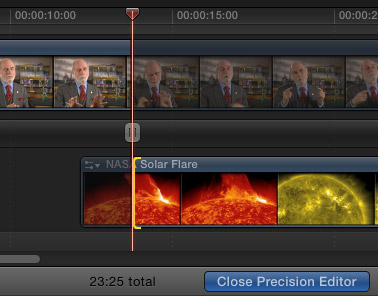
The out-going clip moves to the top, the in-coming clip moves to the bottom and a blue button lights up at the bottom: Close Precision Editor.
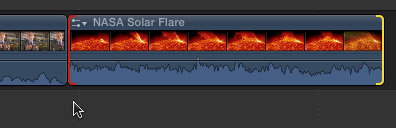
The brighter portion of each clip is included in the edit in the Timeline. The dimmer portions are called “handles.” This is media which is attached to the clip, but not displayed in the Timeline during playback.
A NOTE ON HANDLES
Handles are extra media before the In or after the Out. Handles are essential for trimming and transitions. Final Cut Pro X makes it very easy to see if you have handles. Select the end of a clip with the Arrow or Trim tool. If the end glows yellow, you have handles. If it glows red, you don’t. Red indicates that you’ve reached the end of a clip. You can make the clip shorter, but not longer.
TRIMMING
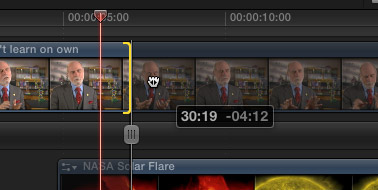
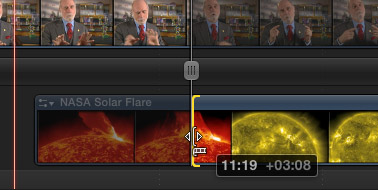
To adjust the Out, grab anywhere in the top clip and drag left (to make the clip shorter) or right (to make it longer).
The small black numbers indicate the amount you are changing the position of the Out; in this case, I’m moving it left, shortening the clip by 4 seconds and 12 frames.
To adjust the In, grab anywhere in the lower clip and drag left (to lengthen the clip) or right (to shorten the clip). (When it comes to dragging, the In and Out work in opposite directions.)
The small black numbers indicate the amount you are changing the position of the Out. I’m moving the In to the right 3 seconds and 8 frames.
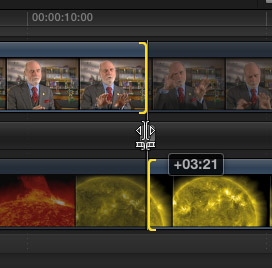
To adjust both the In and Out at the same time, drag the gray thumb located between the two clips, left or right.
When you are happy with the edit point, either click the blue Close Precision Editor button, or, what’s faster, press Enter.
Done.
A SLIP TRIM
There’s another trim that I find very useful, called a Slip edit. This “slips” the content in a clip, without changing its location in the Timeline or its duration.
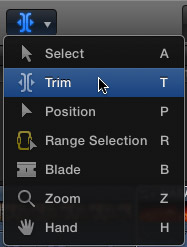
To create a slip trim, select the Trim tool (press T).
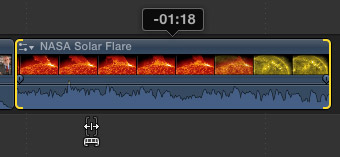
Then drag anywhere in the middle of a clip. ( I moved the cursor below the clip so you can see it.) As you drag, you are changing the content, but not the duration or location of the clip.
FASTER TRIMMING
While we can only trim three sides of an edit, there are several ways to trim faster, either in the Precision Editor or in the Timeline.
Select an edit point (In / Out / Both / or the Trim tool):
For example, +12 [ Enter ] moves the selected edit point twelve frames to the right.
-40 [ Enter ] moves the selected edit point 40 frames to the left.
Minus moves left, plus move right. You can use these shortcuts for ripple, roll, and slip trims.
SUMMARY
The thing I like about the Precision Editor is how it helps you see exactly what you are adjusting, how much you are adjusting, and what the results look like when you are done adjusting.
Cool.

2,000 Video Training Titles
Edit smarter with Larry Jordan. Available in our store.
Access over 2,000 on-demand video editing courses. Become a member of our Video Training Library today!
Subscribe to Larry's FREE weekly newsletter and
save 10%
on your first purchase.
6 Responses to FCP X: Precision Editor
You can also slide a clip when the trim tool is selected. Just option-drag a clip to the left or right in the timeline.
[…] Use the numerical keypad to adjust more accurately than clicking and dragging. Share this:TwitterFacebookLike this:LikeBe the first to like this. […]
Hi, Larry!
I’ve googled my question half an hour, but no luck.
Maybe you could clarify this:
Is it right that Precision Editor didn’t work on Secondary storyline?
In my FCPX 10.0.9 it’s grey out in contextual menu.
Segrey:
You are correct. The Precision Editor only supports the Primary Storyline.
Larry
Thanks, as always!
Editing audio transitions in secondary storyline is a pain)) Ho-ho, I should screencapture what happens when you are fighting with it – various funny bugs there)) manually to do it much faster. Wish to report this to Apple, but they don’t care : (
Sergey:
I’ve found the Precision Editor to be an EXCELLENT training tool, but not a useful editing tool. I agree, manual is better.
And I’ve also found that Apple does care – just use the “Send Feedback To Apple” form inside Final Cut Pro X.
Larry