
![]()
(This article was first written as an update to my book: Final Cut Pro X – Making the Transition. However, this update was never published.)
Probably the most exciting new feature in the 10.0.3 release of Final Cut Pro X is multicam. This is designed to edit events that you are shooting simultaneously with more than one camera. Performances and sports come instantly to mind.
Apple set the standard for multicam editing with its initial release in Final Cut Pro 5. In FCP X, they just raised it. In a single multicam clip you can:
Multicam editing is not designed for switching live events. Instead, you record and capture all your video first, then edit it using the multicam feature.
NOTE: Optimizing media, even though it requires more hard disk space, is the preferred way to prep your media for multicam editing. H.264, MPEG-2, and AVCHD are very computer-intensive formats and for large multicam projects will cause your computer to work so hard decompressing the media that it may not be able to process your clips fast enough for real-time playback.
WHAT IS SYNC?
A multicam clip displays all your different camera angles running at the same time. However, in order for the action and audio to match between those shots, all your angles need to start at the same time. That point is called the “sync point;” a specific frame in every clip which is used to align all the clips so they all display the same action at the same time during playback. The sync point is almost never the first frame of each clip.
SETTING A SYNC POINT
Multicam clips assume that all cameras are recording the same event at the same time. (Multicam clips are not appropriate when you are shooting multiple takes of the same thing from different angles using a single camera.) The recording from each camera is called an “angle.” You could also think of each angle as a separate “stream” of video.
You can synchronize (“sync,” which means “lock together and match to time”) all these streams using one of five methods:
If you are at a live performance where using a clapper slate is not possible, a great “Plan B” is to have someone shoot a flash picture after all cameras are recording. The flash is short and bright enough that, while it only lasts for a frame, it is bright enough to be seen by all cameras.
Another great tip is to record audio on all cameras, even if you have to use the camera mic. That way you can sync either on the flash or the audio. Choices are always good.
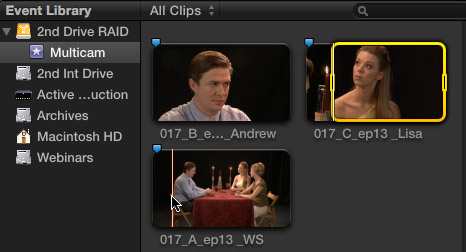
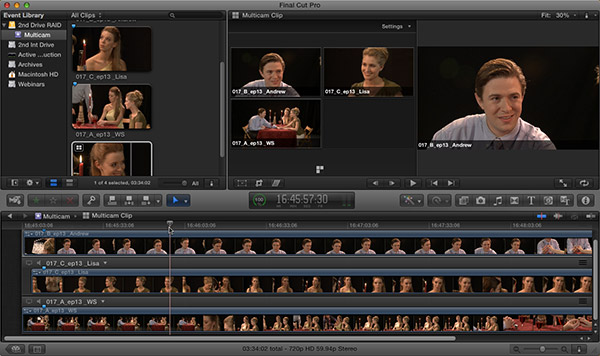
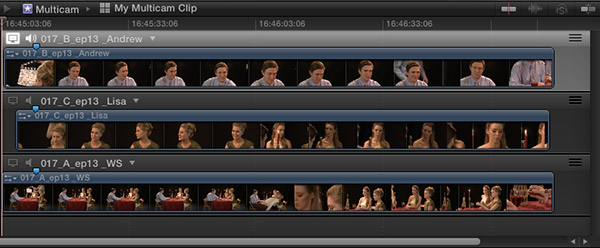
This screen shot is an example of three shots that I want to build into a multicam clip (which is also called a “multiclip”). On this shoot I used a clapper slate to indicate the sync point for all three cameras and set a marker (shortcut: M) at the moment the clapper closes. (This scene is taken from an episode of my podcast: www.2reelguys.com.)
Theoretically, FCP X should sync clips based upon matching the audio waveforms from each angle. However, this is not always reliable. Either one camera doesn’t have audio, or some cameras are wildly out of sync. Plus, using audio to match sync can take a while.
For this reason, I made it a habit to always use either a clapper slate or, on productions with a budget, matching timecode. This is MUCH faster than waiting for automatic sync on audio to work. This way, if audio sync works, great. If not, you have a fall-back option.
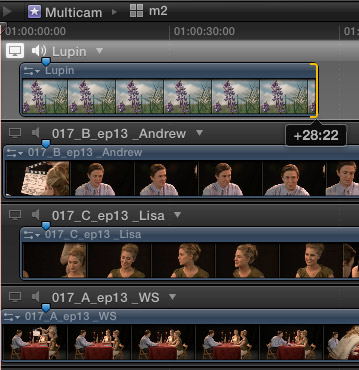
Once you have your markers (or other sync point) set, select the clips you want to build into a multicam clip and select File > New Multicam Clip. You can only select and assemble multicam clips using source clips in the Event Browser.
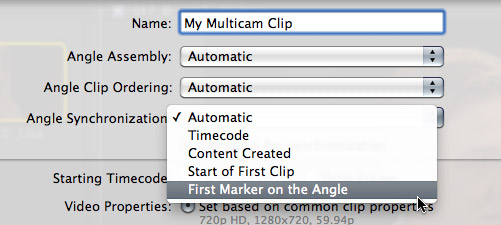
This opens the Multicam Setup dialog. Give your clip a name, then change the option in Angle Synchronization from Automatic (which means it syncs on audio waveforms) to First Marker (or whatever option you’ve decided to use for sync).
If you decide to sync on markers, be sure to turn “Use Audio for Sync” off. When using markers, or any sync other than Automatic, using audio synchronization will significantly delay the creation of your multiclip and may throw off your sync.
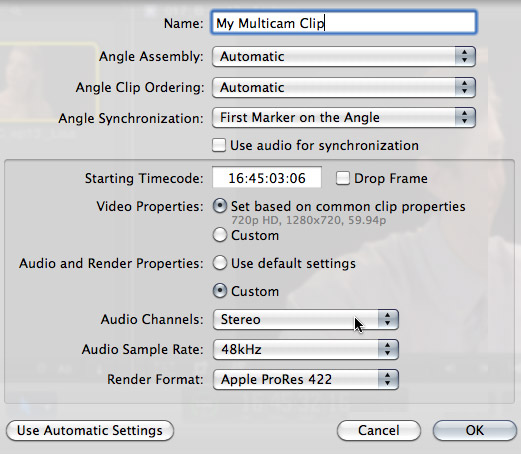
The remaining section of this dialog is just like starting a new project. When the rest of the settings are to your liking, click OK. (As a note, Apple changed the default audio setting from Surround to Stereo in this release as well.)
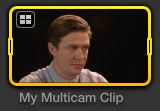
A new icon is displayed in the Event Browser for your multiclip. Notice the small “four squares” icon in the top left corner? That indicates this is a multiclip.
THE ACTIVE ANGLE
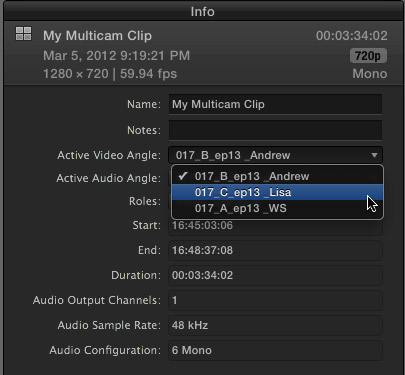
The Active Angle is the image and audio displayed in the Viewer for a multiclip before you do any editing. There are several different places you can change this, but the easiest is the Inspector. (Another is the Angle Editor, which we will talk about in a minute.)
Select the multiclip and open the Inspector. Change the Active Video Angle, or Active Audio Angle to the clips you want to see and hear. You can also use the Inspector to change the Roles assigned to this multiclip.
EDITING A MULTICAM CLIP
Just as with any other clip, set an In and an Out to mark the portion of the multiclip that you want to edit to the Timeline. (The sync point is just used to get the clips to match, in almost every case, the actual multiclip you edit to the Timeline starts somewhere else.)
For instance, say you recorded a dance recital. Instead of editing one gigunda multicam clip to the Timeline, it makes more sense to edit each individual performance piece as its own clip into the Timeline, and separate them with shots of the audience applauding. So, if you have ten dances, you would have ten different clips derived from the same multiclip.
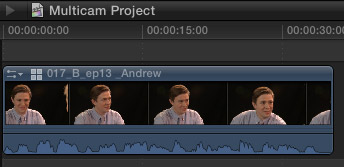
A multicam clip edited to the Timeline looks just like any other clip – except for the small “four squares” icon in the top left corner of the clip icon. Also, a new multicam clip displays the active video and audio angles.
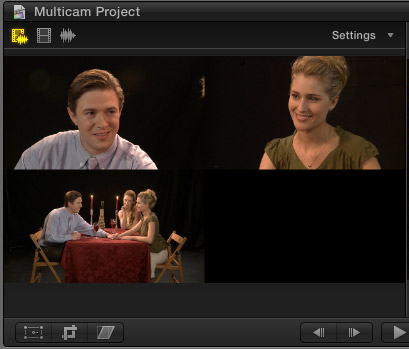
To see the individual angles within a multiclip, select Window > Show Angle Viewer. This displays all the individual angles of the multiclip in a new window – the Angle Viewer.
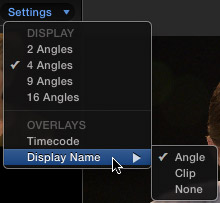
To change how images are displayed, click the Settings text button in the top right corner. This allows you to set how many images are displayed at one time, along with any text shown at the bottom of each image.
Also, you can toggle the display of timecode, angle name, and other clip information using the Display Name menu. Feel free to experiment with changing these to see what happens.
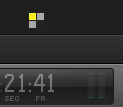
If there are more shots in your multicam than will fit in the window — the options are 2, 4, 9, and 16 images — FCP creates “banks” of images where each bank holds up to 16 images and there are four banks in all, for a total of 64 discreet angles. These three squares indicate there are three images in the multiclip. The yellow square indicates the active angle. Clicking these small groups of squares at the bottom of the window allows you to change between image “banks.”
A WORD ABOUT DATA
Multicam editing REQUIRES really fast hard disks. One optimized HD video angle is about 18 MB per second. So, a four-angle multiclip will require about 72 MB/second. This approaches the maximum speed of a FireWire 800 drive.
Editing more than 4-5 angles requires a fast RAID attached via Thunderbolt, or, if you have a MacPro, you can use eSATA or mini-SAS connections. Editing 64 angles of optimized HD media would require about 1.1 GB/second – which is about the maximum data transfer rate of a top-quality Thunderbolt RAID.
Serious multicam editing requires seriously fast storage. [ Here’s an article that talks more about RAIDs and Thunderbolt.]
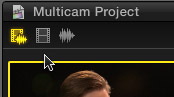
See these three icons in the top left corner of the Angle Viewer? These determine whether you are editing (from left to right): audio & video, video only, or audio only. Generally, we edit multiple video clips to match a single audio track – either a mix from the audio board for a live event or a CD track for a music video.
So, for a performance video where audio is from a mixer, to configure the starting audio and video sources:
It is important to select the audio source before selecting the video source. Whichever of these you select last is the one you’ll edit. In this case, we will lay down an unedited audio track and edit just the video on top of it.
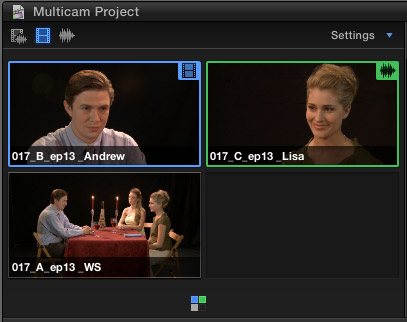
Here, the blue video icon is lit in the top left corner. This means we are editing video and leaving the audio untouched. The video will start with the blue-boxed clip and will change whenever you change shots. The audio will come from the green-boxed clip and won’t be edited.
Or, if you want to switch both audio and video at the same time, click the far left icon at the top, then click the clip you want to start with. Now, when you change shots, both the audio and video will change at the same time.
You can either edit shots in real-time, or by precisely positioning the playhead where you want the shot to change. The procedure is exactly the same.
To switch shots in real-time using the Viewer, start playback then click the image in the Viewer to which you want to switch. As soon as you click, an edit point is inserted in the Timeline and the downstream shot changes to the clip you click. Or, simply put the Playhead where you want to switch shots and click the clip you want to switch to in the Viewer.
To switch shots using the keyboard, start playback (or position your playhead) then type a number on either the keyboard or keypad that corresponds to the shot you want to use. (Unlike FCP 7, you do not need to hold down any modifier keys; just type a number.) Keyboard shortcuts allow you to edit up to ten angles at a time.
A WORD ON THE SKIMMER
If the skimmer is active, and you are using keyboard shortcuts to edit, the edit point is inserted at the position of the skimmer. If the skimmer is not active, the edit point is inserted at the position of the playhead. I find using the Playhead faster and simpler.
This is one of the reasons that I love using the Skimmer in the Event Browser, but turn it off for editing in the Timeline. (Keyboard shortcut: S)
TRIMMING A MULTICAM CLIP
To replace a shot with a different angle, hold the Option key and either click the new image in the Angle Viewer that you want to replace the image in the Timeline, or hold the Option key and type a number corresponding to the new angle you want to use. This is like a fast “Replace Edit.”
Trimming a multiclip is the same as trimming any other clip – except that you can’t use a Ripple trim as it would knock the multicam clip out of sync. To adjust the timing of an edit point, select the trim tool (press T) and roll the edit point to the position you want.
If audio is slightly out of sync – which happens with cameras located in the back of a large hall – select the Trim tool, hold the Option key down and drag the middle of the clip you want to slip left or right. This is the same slip technique you use when slipping normal clips. (For every 37 feet a camera is distant from a sound source, the audio arrives 1 frame later than video when shooting at 30 fps.)
THE ANGLE EDITOR
Sometimes we need to adjust the contents of the multiclip master. We can do this in the Angle Editor; which is new to FCP X. To open a multiclip in the Angle Editor, double-click it in the Event Browser.
The Angle Editor opens the master file of the multiclip from the Event Browser, not the clip we edited into the Timeline. This means that any changes we make to the multiclip displayed in the Angle Editor are reflected in every version of that multiclip.
For instance, to change the display order of clips in the Angle Viewer, drag the “thumb” — the three horizontal lines in the top right corner of each track — up or down.
Or, you could apply a filter — say color correction — to a master clip in the Angle Editor. That filter is then applied to every iteration of that angle from that multicam clip in every Project. Think of the time savings in making color adjustments!
You can also trim clips in the Angle Editor, or use the Position tool to drag them into sync, in case your sync points were not set perfectly. (You can also make an individual angle invisible, or visible, by typing V.)
If you are including a still image in your multicam clip, you’ll need to adjust the duration of the image in the Angle Editor so that it lasts long enough to edit into your project. Include the still image as one of the selected clips when you build the multicam clip. Then, open the Angle Editor and adjust the duration of the still image by dragging an edge of the clip to the length you need.
You can use this technique to add a number of stills to your multicam clip, say, for creating a stills montage.
NOTE: If you are trying to lengthen a PSD file, you’ll need to change the duration of every layer of the PSD file, first.
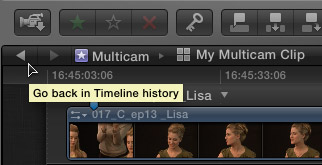
To exit the Angle Editor and return to editing your multiclip, click the left-pointing arrow in the top left corner of the Timeline (this section is called the “Timeline History”). This takes you back to the last Project you were editing. To return to the Angle Editor, simply double-click the source multiclip in the Event Browser.
SUMMARY
When it comes to editing multiple cameras, multicam is amazing! The two essential points to remember are to properly set your sync point and make sure your storage is really fast.

2,000 Video Training Titles
Edit smarter with Larry Jordan. Available in our store.
Access over 2,000 on-demand video editing courses. Become a member of our Video Training Library today!
Subscribe to Larry's FREE weekly newsletter and
save 10%
on your first purchase.
32 Responses to FCP X: Multicam
← Older Comments-
 Dan says:
July 1, 2014 at 4:39 am
-
 LarryJ says:
July 1, 2014 at 8:34 pm
-
 Patrick says:
July 16, 2014 at 2:51 pm
-
 LarryJ says:
July 19, 2014 at 1:18 pm
-
Multicam Madness | Larry Store says:
October 12, 2014 at 11:44 am
-
 Danika says:
September 8, 2015 at 11:22 am
-
 sol says:
April 27, 2016 at 3:48 pm
-
 Larry says:
May 2, 2016 at 5:32 am
-
 Steve Warneke says:
October 31, 2017 at 6:07 am
-
 Larry says:
October 31, 2017 at 6:52 am
-
 Peter Dunnet says:
January 31, 2018 at 3:16 pm
-
 Larry says:
January 31, 2018 at 3:17 pm
-
 Alex says:
December 17, 2018 at 12:18 pm
-
 Larry says:
December 17, 2018 at 1:26 pm
← Older CommentsHi Larry,
Thank you for your helpful article.
I was wondering if you knew of a way to find a section of a clip within a multicam clip? For example, say I’m editing a multicam clip and I realise a section of video needs to be stabilised. How do I find that section of video in the Angle Editor, once the multicam clip has already been trimmed?
3 minutes into the multicam clip could be anywhere in the Angle Editor!
Thanks in advance,
Dan
Dan:
Try this. Put your playhead in the Timeline clip at the position you want to match and type Shift+F.
This should open the source multicam clip and position the playhead in the exact same position. Type Control+Y to read the timecode of that position in the Browser clip.
Then, double-click the multicam clip to have access to the portion you want to stabilize.
Larry
Hi Larry, which is the best way to colorsync two cameras to be shooting at the same event? One is the AG HMC 150 and the other is the smaller HDC ™ 900 both from Panasonic. I seem to get different color casts from these cameras after white balance and I then have to color correct all my clips in FCPX. Is there a smart way to do better?
Thank you very much
Patrick
Patrick:
You are doing it about right.
Get them as close as you can in production, then make them perfect in post.
Larry
[…] Step-by-Step Guide […]
Hello Larry, I too have a problem I haven’t been able to solve.I have a fcpx 10.2.1 multicam clip of a concert that I already edited but then found A LOT of sync problems. I want to use plural eyes to fix my already edited multicam but can’t find the way to export xml of the multicamclip for plural eyes to work with. Is there a workaround for this issue? I mean when you want to use pluraleyes AFTER you already cut the multicam clip? Thanks in advance!
Hi Larry,
Thank you very much for your time.
I was wondering if you can export an xml of a project with multicam pieces but that it makes reference to the original audio, not the multicam clip. I need to send some xml, omf or something to the audio editor.
thank you very much
Sol
Sol:
An XML export should reference the original audio – a multicam is simply a special group, the media it contains should point to the master files.
Larry
Larry:
You are always the best sir! I have a multicam clip I’ve created and I want to do a split screen with 2 of the camera angles at the same time. Is that possible? Thanks
Steve:
No. Multicam clips, by design, can NOT create more than one image at a time.
To create a split screen, simply stack the clips above each other on the timeline and scale/crop as needed.
Larry
Hi Larry,
I do not see how to finalise a multi-cam clip. After i have edited it by switching angles, when I play the multi cam clip it has not changed. I must be missing something basic.
thanks,
Peter
Peter:
Unlink FCP 7, FCP X does not support finalizing a multicam clip.
Larry
Hi Larry,
I wonder, is there a way to breakdown a multi-cam in the separate elements that are inside?
I’m having problems going to online in da vinci…
Best
Alex
Alex:
I don’t have a solid answer – but you can’t deconstruct a multicam clip without losing all your edits.
Larry