
![]() OK, I’ll just say this right at the top – this article has a lot of heart in it.
OK, I’ll just say this right at the top – this article has a lot of heart in it.

So, here’s the question: When do you use a Luma key? And the answer is: When you don’t have any color to work with. For instance, here is an animated dancing heart (courtesy of Pond5.com). Unlike a green-screen key, the background here is pure white. A chroma-key won’t work. Time to use a Luma key.
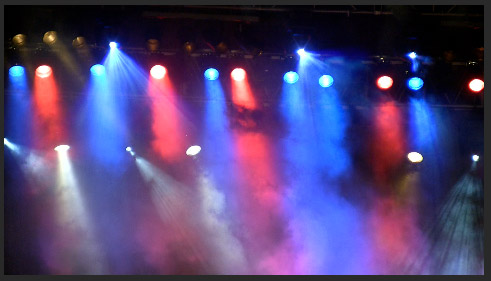
I want to composite this dancing heart over the lights of a stage concert. To do this, we will use a Luma Key to make the white background disappear. And, with the recent 10.3 update to Final Cut Pro X, the Luma Key has even more adjustments than it did before.
In the Timeline, stack the two clips so the foreground clip – the heart – is above the background clip.
From the Effects browser, drag Keying > Luma key onto the foreground clip.

Things immediately look worse. Don’t panic. By default, the Luma key removes the darkest portions of an image; which is the opposite of what we want.
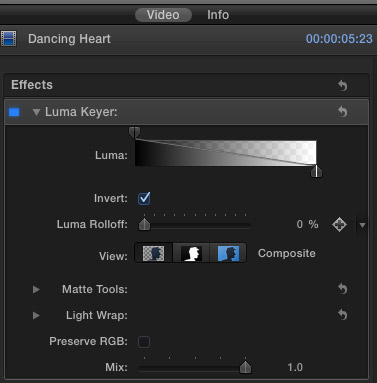
Open the Inspector (Command+4), click the Video tab, and check the Invert checkbox.

This removes the white background, but it also removes a lot of the heart, itself. Time to tweak.
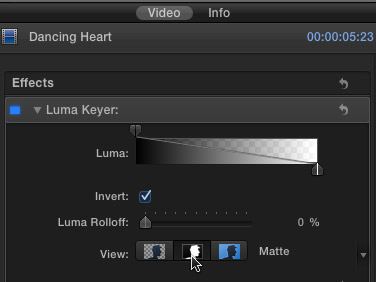
Click the middle View icon to switch to Matte view. It is ALWAYS best to adjust a key while watching the matte.
Our goal is to make the foreground completely white, which means it is totally opaque, and the background completely black, which means it is totally transparent. Currently, the dancing heart is gray, which means it is translucent.
Normally, we’d use the Fill Holes setting, but this only makes things worse.

Instead, twirl down Matte Tools, then twirl down Levels. This allows you to adjust how Final Cut Pro X perceives the levels of the image, without actually changing the picture quality itself.
Because there are so many reflections on the heart, along with shadows under its feet, I’ll tweak the Levels to get the cleanest key that I can. Always by looking at the matte and trying to get the foreground solid white, with no shadows in the middle of the image.
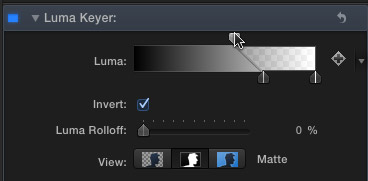
Next, at the top, is the Luma adjustment. Again, we are making these adjustments to get as close as we can to pure white/pure black and no shadows or shades of gray.
Move gently when making these adjustments, keep checking how the image changes.
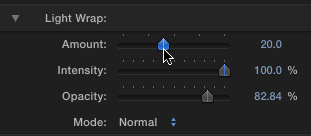
Next, to blend some of the background color with the foreground image, twirl down Light Wrap and slide the Amount up. This adds background color to the edges of the foreground, which makes the two layers blend more seamlessly. Try changing the Mode, while watching the edges of the foreground image. Pick the blend mode that provides the cleanest results. Light Wrap is very subtle, so look carefully.

Finally, I flipped the background image upside-down, and positioned the heart lower in the frame to make it look like he is standing on the stage.
The Luma key makes all this possible. All it takes is a little tweaking and a lotta heart.
(Sigh… I couldn’t resist.)

2,000 Video Training Titles
Edit smarter with Larry Jordan. Available in our store.
Access over 2,000 on-demand video editing courses. Become a member of our Video Training Library today!
Subscribe to Larry's FREE weekly newsletter and
save 10%
on your first purchase.
6 Responses to FCP X: Create a Luma Key
The feet look a mess compared to the original.
It may have been better to chroma key the red and invert that instead to get a more accurate key
Perhaps, but then I couldn’t have shown how to create a luma key.
In this example, I’m illustrating the process, rather than the final result.
Larry
I use a pure white background for the videos I produce twice a week, so I will use this process a lot is there a way to create a custom filter with all these changes as the default setting so I don’t have to do all the tweaks each time I edit a video portion? I don’t always want a background, so I may be switching back and forth within a single 10-15 minute video. It would be very labor-intensive to have to make these changes each time I want to drop something into the background…
Thanks! I found this tutorial and your video on youtube to be very helpful! It was exactly what I was looking for to learn about luma keying.
Hi Larry
I followed this tutorial to the best of my ability. I am using FCPX 10.2.2, not 3, so maybe that’s the problem.
Anyway, things went along well. I now have a background that is black and a foreground that is (mostly) white. The clip is parked on top of another that I want to show through. Problem is that the image on the bottom does not show through. I just have a black and white clip.
Any idea where I must have gone wrong?
Would be most appreciate of some help.
Pat
Patricia:
Its impossible to tell from your description. So, send me a screen shot of your timeline and Inspector to [ larry at larryjordan dot com ] and I’ll see if I can help.
Also, keep in mind that a Luma key allows you to have either the white area transparent (key out brighter) or the dark area transparent (key out darker) but not both. Also, the image you want to show through the transparent area must be below the black and white image.
Larry