
If you are interested in improving your audio, Final Cut Pro X made several huge steps forward by incorporating all the Logic/Soundtrack Pro audio filters with the application. Because I principally create programs which are driven by audio – what is being said – rather than action, it is essential to me that viewers are able to clearly hear the dialog.
This means that a filter that before FCP X was only available in Soundtrack Pro, is now part of the audio effects suite in FCP X. It’s called the Limiter filter and I want to show you how to use it. The purpose of the Limiter filter is to make soft audio louder while preventing the louder passages from distorting (which happens when audio levels exceed 0 dB). In fact, when used properly, the Limiter Filter virtually guarantees that your audio won’t distort.
What the Limiter filter does – on an instant-by-instant basis – is raise the level of that instant of the clip by an amount you specify, provided the audio level doesn’t go over a maximum limit that you also specify. Audio gain that attempts to go over your limit is thrown-away.
The three key settings in the Limiter filter are: Gain, Gain Reduction, and Output Level.
DISCLAIMERS
The last time I wrote about setting levels I got severely taken to task by an audio engineer complaining that my numbers were all wrong. So there are five things you need to understand:
WHERE TO APPLY THE FILTER
The Limiter filter works best when it is applied to dialog and narration, not sound effects or music. This means that you need to be selective about where you apply the filter. (I strongly discourage using the Limiter filter for music.)
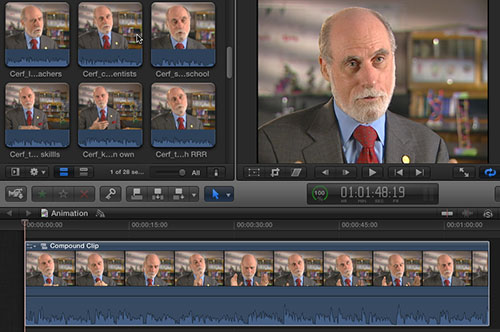
In general, audio effects in FCP X are applied to the clip. However, in the case of the Limiter filter, it may be a better idea to make a compound clip of all your dialog clips. This allows you to apply one filter to a group of clips, which makes adjustments a lot easier. All clips in a compound clip do not need to be next to each other. Here’s an article that explains this more.)
NOTE: For really complex mixes, you are always better moving your audio out of FCP X into ProTools or Adobe Audition or Soundtrack Pro because they can deal with applying filters to multiple layers of audio clips better than FCP X can.
Here is a set of of four Soundtrack Pro tutorials that can help you improve your audio.
APPLYING THE FILTER
Whether you apply this to a compound clip, a collection of individual clips, or just one clip, the process and adjustment is the same.
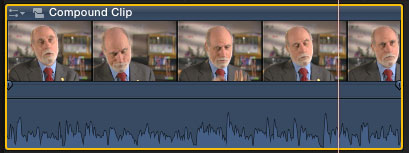
1. Select the clip(s) to which you want to apply the filter. In this case, I’m applying the filter to a compound clip.
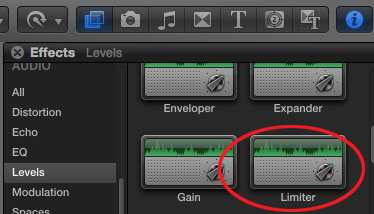
2. Open the Effects Browser (type Command+5) and select the Audio > Levels category. Scroll down the list of filters on the right side until you find the Limiter filter. (While there are a number of settings files in that category, most are simply presets derived from the Limiter filter.)
3. Drag and drop the Limiter filter on top of the clips to which you want to apply it. (Or, if all the clips are selected, simply double-click the Limiter filter to apply it to all selected clips.)
NOTE: To remove the filter, select all the clips that contain the filter you want to remove, go to the Inspector, select the name of the filter, and press Delete.
ADJUSTING THE FILTER
1. Select the clip(s) that contain the filter.
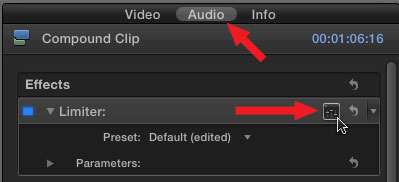
2. Open the Inspector (type Command+4) and click the Audio tab at the top. The Limiter filter is displayed at the top of the Inspector.
3. Click the small icon to the right (its under the cursor in this screen shot) to open the Limiter interface.
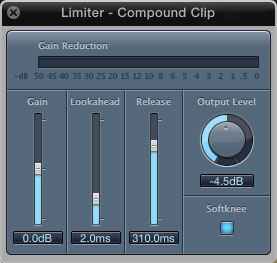
4. For all dialog and narration, I recommend setting the Limiter to the following settings:
As audio levels are additive, setting the Limiter to -4.5 dB means that you have room in your mix to add sound effects and music, while still able to hear dialog. On tracks which are narration-only with no other audio in the mix, I will increase the Output Level to -3 dB. However, currently, I tend to set everything at -4.5 dB.
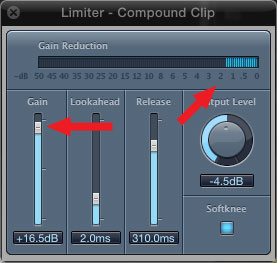
5. Here’s the one setting you need to adjust: Gain. This setting varies each time you apply the filter. Start by playing your clip. Slowly increase the Gain slider until you start to see small blue bars at the right edge of the Gain Reduction display at the top. Continue increasing the slider until you are throwing away 1 – 3 dB of gain during the loudest portions of the audio. Levels displayed in the Gain Reduction slider is audio level that would normally exceed the Output Level, but is caught by the Limiter.
This filter has the effect of increasing the softer passages of your audio while making sure neither the louder passages, nor the amplified passages of your clip are louder than the Output Level. This prevents distortion (audio levels that exceed 0 dB) while making your entire clip MUCH easier to hear by leveling out audio levels.
In this example, I am raising the audio of the entire clip by 16.5 dB, however, the Output Level guarantees that at NO TIME do any of the audio peaks in the audio exceed -4.5 dB. (Every clip’s settings will be different, this specific number applies only to this example.)
NOTE: This filter is especially good at leveling out audio with lots of pops, clicks, or extreme level changes.
I find this filter indispensable in my mixes. And, once you start using the Limiter filter, I suspect you’ll wonder how you lived without it.
IMPORTANT NOTE: If you assign multiple audio filters to a clip which has the Limiter filter applied, make sure that the Limiter filter is applied LAST. It should always be at the bottom of the list of audio filters in the Inspector. Otherwise, you lose its ability to prevent audio distortion.
To change the stacking order of audio filters, drag their names up or down in the Inspector.

2,000 Video Training Titles
Edit smarter with Larry Jordan. Available in our store.
Access over 2,000 on-demand video editing courses. Become a member of our Video Training Library today!
Subscribe to Larry's FREE weekly newsletter and
save 10%
on your first purchase.
40 Responses to FCP X: The Limiter Filter
Newer Comments →-
 Rusty Earl says:
January 23, 2012 at 7:49 am
-
 BrAd Steiner says:
January 30, 2012 at 3:04 pm
-
 Tom O'C says:
February 14, 2012 at 2:51 am
-
 Larry Jordan says:
February 14, 2012 at 3:34 pm
-
 MICHAEL COX says:
February 16, 2012 at 8:45 am
-
 Luis Macias says:
February 17, 2012 at 11:59 am
-
 Rusty Earl says:
February 17, 2012 at 12:03 pm
-
 Luis Macias says:
February 17, 2012 at 12:16 pm
-
 Luis Macias says:
February 17, 2012 at 1:08 pm
-
 Rusty Earl says:
February 17, 2012 at 1:13 pm
Newer Comments →Holy Cow!
This works amazingly good. I have already been using a number of basic audio correction tools to save some of my clients bad audio, but this by far is the fastest, easiest, audio correction I have ever done. I have invested a quite a bit in my wireless mics to try and capture great audio from the start. This just boosted my confidence 10x in the ability to fix mediocre audio.
Thanks Larry!
I’ve used this back when I used Adobe Audition, and was happy with it’s results. Thanks for posting.
Could you comment on the difference between this and compression on audio? I’ve never had good luck using a compressor filter and wondering if I should give up and only use the limiter?
Thanks,
BrAd
“Audio gain that attempts to go over your limit is thrown-away.”
I know you didn’t mean audio gain but audio level 😉
May I caution your readers that this plugin if used in excess can sound terrible. It can make your sound-mix flat and cheap. The dangerous thing about it is that it can often create a sound thats much louder and apparantly very pleasing at first. Its later on (perhaps after your edit is published) you notice the audio sounds dead and lifeless. This plugin is responsible for the so-called “gain wars” in advertising (for eg) where certain programs sound over loud or make well mixed sources just sound too quiet in comparison. It can certainly be abused and over used!
The best way to use a limiter is for safety only. It is not a loudness booster as such. It allows you to raise the level of your audio without the worry that you might have a few loud peaks going “into the red”. That output level dial is the guarrantee that audio wont excede a set level. Its ideal if you have a few over loud peaks (eg a cough or door slam) to tame. Use it to keep your audio under control.
Basically if you see that limiter meter showing gain reduction is being applied all or most of the time you’ve set things too far and you’d be better to use other tools to get the effect your after (a compressor). The gain reduction meter should flicker occasionally – maybe showing a the occasional huge flicker (such as 10dB or more) on a “pop” or “bang”, but you need to see those meter lights unlit sometimes too! If they flicker just once or twice during your whole program then great.
If you want to make a recording sound fat and upfront and bold (such as a voice over) use a compressor.
I’m just saying be careful out there.
🙂
Tom:
These are excellent comments – thanks for sharing them. Anything used to excess causes problems, as you so clearly described.
If I could figure out how to describe the proper use of a compress that: a. Could be written in words, and b, Didn’t involved a degree in audio engineering, I’d be happy to do it. But while conceptually a compressor is easy to understand, operationally, I’ve found them to be unteachable.
Larry
Larry, after reading Tom’s comment above I thought I’d add that there is a 152 page (!) pdf file from Apple on the audio effects included with FCPX, and it does describe the compressor filter. Not that I understand it, but at least one can read about it. The pdf URL is
http://tinyurl.com/89znshl
But if you’d rather navigate to Apple’s page via Google search, enter terms: fcpx logic filter
Larry,
I’m having an issue with the limiter filter that makes it extremely difficult to use and I’m wondering if you or anyone else has had this same issue.
When I apply this filter, it’s causing some major audio glitches. First, parts of the clip’s waveform disappear. On top of that, when I hit play, the audio sometimes plays and sometimes doesn’t play. I usually have to hit the play button several times before the audio pops back in. This is all resolved if I remove the filter.
I thought maybe the 10.0.3 update might have fixed this glitch but it hasn’t. Of the several audio filters I’ve used, this is the only one that causes any problems.
Any ideas? Is anyone else having this same problem?
Thanks.
I had the same issue last week. For me, I restarted the program and it went away. i have 21 short projects I applied the filter for a web series i am doing. The audio issue came up twice, both times I would save what I had, close and reopen FCPX and then it would work just fine.
Good Luck.
Thanks for your suggestion. I just gave it a try and it didn’t make any difference. Interestingly, I just had the other editor in the office try adding the limiter filter to one of her clips and the waveform and audio were just fine. None of the problems I am having.
I wonder if I erase FCPX from my system and reinstall it, it would go away. I will have to try it and I’ll report my findings.
Thanks.
Just reinstalled FCPX and nothing has changed. The limiter filter is still causing the glitches I mentioned in the original post.
I don’t know what else to do.
I failed to mention that with one of the videos I worked on last week I decided to export/ share the video since I was basically done with the edit. Once it was exported it played back just fine. That means that during the export it was able to render out the sound just fine. Give it a try and see. If that is the case, I think I would simply finish the edit and move on. I know that’s no comfort in the long haul with an audio intense edit,, but for the 21 short 5 minute videos I added the limiter filter to, two of them had issues and the rest were just fine. I think it’s a FCPX bug not a limiter filter bug.