
[ This article is modified from the bonus material contained in my book: Final Cut Pro X: Making the Transition. Click here to learn more. ]
In addition to over 100 audio effects, Final Cut Pro X ships with some very interesting audio enhancements which can repair bad audio. In this tutorial, I want to illustrate how to work with these enhancement tools.
In spite of the name “enhancements,” these three settings are essentially doing audio repair; audio repair that Apple first introduced in Soundtrack Pro.
TWO KEY RULES FOR AUDIO
There are only two essential audio rules to keep in mind:
There are three locations where you can adjust your audio (aside from setting levels in the Timeline):
This article looks at adjusting audio in the Inspector.
IMPORT SETTINGS
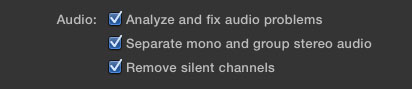
Unlike the settings for video import, my current recommendation is to check all three audio import settings.
THE INSPECTOR
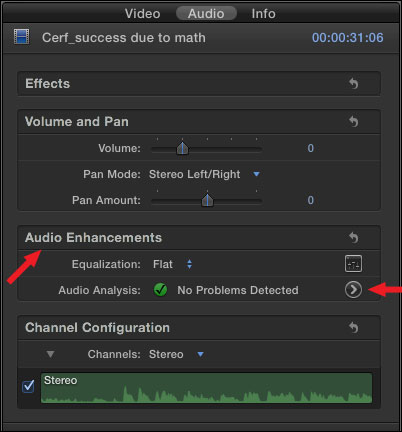
When you select a clip in the Event Browser, or the Timeline, it can be adjusted in the Audio tab of the Inspector. Here you can set volume, pan mode, and, if you set the Pan Mode to “Stereo Left/Right,” you can adjust the Pan Amount slider.
The Audio tab in the Inspector also lets you change:
Why Adjust EQ?
- Warm up a voice
- Improve the intelligibility of dialog
- Minimize a low-frequency rumble
- Remove a high-frequency screech
- Enhance the sound of a particular instrument
ENHANCING AUDIO

Hidden in plain sight is the button to go to the Audio Enhancements panel. Click the right-pointing arrow to the right of Audio Analysis to reveal the Audio Enhancements panel, or press Command+8.
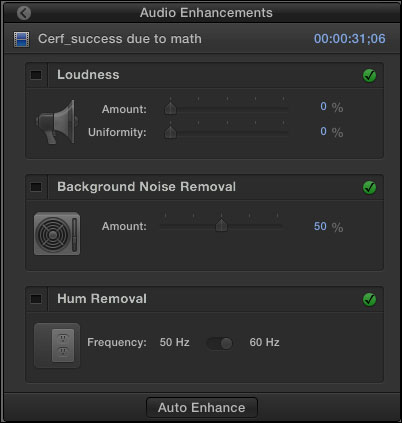
When you analyze a clip, either during import or afterward, FCP looks for problems in loudness, noise, and hum.
If you like the sound of your repaired clip, leave the settings in the Audio Enhancements panel alone. To disable a setting, uncheck the blue checkbox. To adjust a setting, move a slider. Pick the results that sound the best to you.

To return to the Inspector, click the Go Back button in the top left corner.
QUICK FIX OPTION
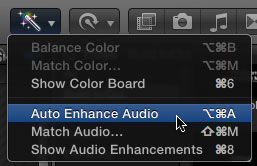
If you want to quickly repair an audio clip, or group of clips, select it in the Timeline and type Option+Command+A, or select Auto Enhance Audio from the Magic Wand pop-up menu in the Toolbar.
SUMMARY
We first saw these audio enhancements in Soundtrack Pro. Apple migrated them to Final Cut Pro X. Not all bad audio can be repaired, but, sometimes, these enhancements can work miracles.
The next time your audio needs help, give these a try.

19 Responses to FCP X: Enhancing Audio
← Older Comments-
 Stan says:
August 30, 2014 at 11:10 am
-
 LarryJ says:
August 30, 2014 at 11:37 am
← Older CommentsHey Larry,
I know this is an old article but I am looking for an answer to a question I can’t seem to find anywhere else on the internet. When applying the “Background and Noise Removal” effect in the “Audio Enhancements” menu it always defaults to 50%. I often find that when I am editing a project I will find the sweet spot for most clips, for example, 25%. However, final cut forces you to drag the slider to select a value instead of just entering a value into the field. Is there a way around this such as changing the default to another percentage? Or maybe copy paste attributes? Any help on this issue would be greatly appreciated!
thanks,
Stan
Stan:
Thanks for writing.
Sadly, you can’t do what you want to do.
Audio enhancements are not “effects,” so they can’t be copy and pasted. They aren’t controlled by preferences, so you can’t change the default. And, unlike most other parameter values in FCP X, you can’t select the percentage amount and type a new number.
Sorry,
Larry