
![]() Blend modes, which are called “Composite Modes” in Final Cut Pro 7, were a mystery to me for a long time. Even today, they seem a bit magical. Still, they can create some very cool effects very easily, which is what I want to show you today.
Blend modes, which are called “Composite Modes” in Final Cut Pro 7, were a mystery to me for a long time. Even today, they seem a bit magical. Still, they can create some very cool effects very easily, which is what I want to show you today.
Blend modes allow us to combine textures between two images based upon their gray-scale or color values. And the interesting thing about them is that you don’t need to adjust or set anything. If you like the look, keep it, if you don’t, don’t.
They are easy to apply, easy to see, and unlike any other effect in the software.
There are five categories of blend modes,
NOTE: Although these examples use Final Cut Pro X, you can achieve the same results using Final Cut Pro 7, by using Modify > Composite Modes. The names of the modes, and their results, are identical. By the way, Stencil Alpha is called Travel Matte – Alpha in FCP 7.
GET READY
Blend modes always require two clips and the effect is always applied to the top clip. While this is setting is generally applied to text, any type of clip can be used. You can get some very wild effects using two video clips.
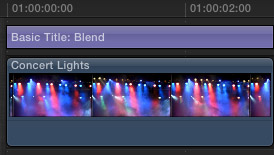
For instance, here, I have a text clip stacked on top of a background clip.

This is what the two clips look like with no effects applied. While you CAN work with pure white text, you will get more interesting results, if your text has a color and is not pure white or pure black.
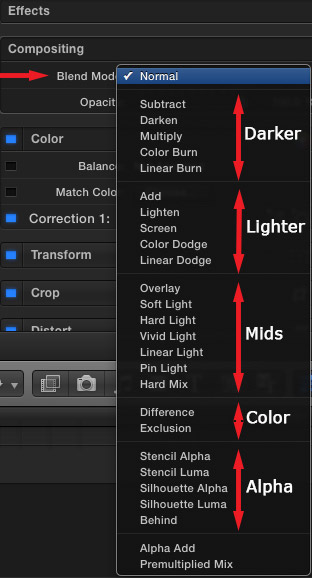
With the text clip select, open the Inspector (Command+4) and click the Video text button. Near the top of the Inspector is a list of all the available Blend modes.
Normal means that no effect is applied.
Let’s take a look at the effects we can achieve quickly and easily using Blend modes.
NOTE: To create these effects yourself, stack two clips with the text clip on top. Then select the text clip. Blend modes are applied from the Inspector.
ALPHA CHANNEL EFFECTS
“Alpha channel” is simply a fancy word that means “transparency.” When we create an alpha-channel effect, we are playing with the transparency values in a clip.
While full-screen video does not contain any transparency, text clips do. With text, whatever part of a text clip doesn’t contain text is transparent.

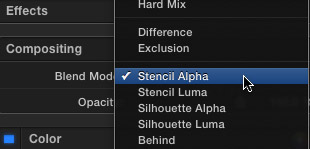
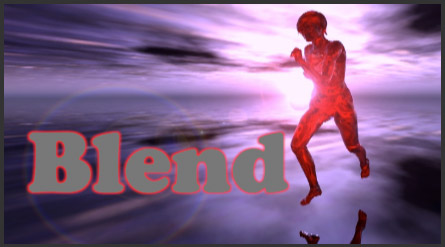
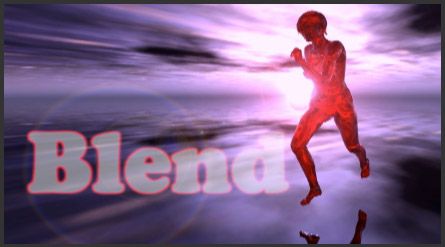
Here are the results of changing the Blend mode of the text clip to Stencil Alpha. The background video is composited (combined) into the text. In the “olde days” we would call this a traveling matte.
NOTE: You can take this one step farther and combine text and background clip into a compound clip. Then place that compound clip on top of a third clip, which fills the black area with a new image. This would create the effect of video playing inside the letters on top of a different video. (Um, OK. I added the drop shadow using the new Drop Shadow effect which Apple released with the 10.0.6 update. The effect was applied to the Compound clip.)

The opposite of Stencil Alpha is Silhouette Alpha, and gives us the opposite effect.
MID-TONE GRAY VALUES

Here’s the starting effect; notice that the text has a color with a medium-light gray-scale level.
The Overlay blend mode category combines two images based upon the mid-tone gray levels of both. This tends to be my favorite category and my two favorite options in it are Overlay and Soft Light; though all the options yield interesting results.

Here’s what the Overlay effect looks like. Notice how the texture of the sunset blends into the letters.
NOTE: With all these Blend modes, there is nothing to adjust. Try different modes and see which looks the best.
DARKER GRAY-SCALE VALUES

Here, I changed the text to a medium-dark gray, without any color.

This is what it looks like using the Multiply Blend mode. Notice how this emphasizes the darkest pixels, and how the background spotlights seem to emphasize the letters in the text.
All the options in this group combine images based upon dark gray-scale values.
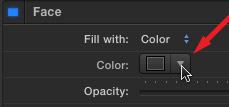
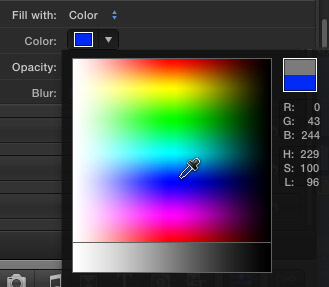
NOTE: A really effective way to optimize the look of your text is to click the down arrow next to the color chip.
This opens a “real-time” color picker, which we first saw in Motion. Drag the cursor around the colors, while watching the effect change, until you get the look you want. This allows you to adjust the results of the Blend mode in real-time by adjusting the color and gray-scale of the text.
LIGHTER GRAY SCALE VALUES
Screen represents the Blend modes that combine images based upon lighter gray-scale values.
Here, for instance, is the Screen mode. This combines lighter pixels from both images to share the background texture with the foreground. (I added the red glow just to be playful.)
NOTE: Never use the Add function, use Screen instead. Add always extends white levels over 100%, which is a no-no for most video. Screen clamps the video at 100%, keeping it safe for broadcast and DVD.
COLOR VALUES

We can also achieve some visually stunning (or weird) effects using two color blends: Difference and Exclusion. Difference tends to create stronger results.

Here, for example, the Difference Blend mode is applied.
Basically, this effect maps the gray-scale values of the background image onto the text, while changing the color of the text to its opposite. This effect looks best when the text has a highly-saturated color applied to it.
SUMMARY
If you haven’t played with blend modes, they can be a great deal of fun. They are the ideal choice when you want the foreground text to share the background texture.
Best of all, they are very easy to apply, or remove.

2,000 Video Training Titles
Edit smarter with Larry Jordan. Available in our store.
Access over 2,000 on-demand video editing courses. Become a member of our Video Training Library today!
Subscribe to Larry's FREE weekly newsletter and
save 10%
on your first purchase.

12 Responses to FCP X: Blend Modes
Larry, don’t forget that these modes can also be functionally useful. You can beef up weak type, or really pound images, by placing a duplicate clip over the base and using the “multiply” mode.
Cheers!
Hi Larry,
Could you do a tutorial about broadcast safe? It seems like in today’s world of Youtube, Vimeo, Twitter and etc. there are more rules being broken. It would help me to know what the “rules” are so I at least know when I’m breaking them. I don’t have a formal education at a film school. I edited videos in High School, College and took editing jobs that didn’t have broadcast rules.
As always, thanks for your help!
Bobby
Bobby:
Great idea – I’ll write this soon. In the meantime, for projects displayed on the web, you don’t need to worry about Broadcast Safe. For projects destined for DVD, cable or broadcast, you do.
Larry
Hi Larry,
Over the years, I have used just about all the blend modes except for “difference” & “exclusion.” I don’t believe I’ve ever seen them used in any tutorial I have read or seen. Except for “weird for weird’s sake,” is there a common, real world use for these modes?
Btw, “multiply” is a fast & easy way to drop out a white background.
Thanks, Larry. Great stuff as always.
Hi Larry,
Can you tell me how to achieve this blend mode (having multiples of one person be in the same shot, I’m assuming, overlaid in post?): https://vimeo.com/24739074
Courtney:
I’d have to experiment. This was a clever scene – I’d start with Multiply, but it could also be done with green-screen.
Larry
“Wow! I never knew I could do that!”
Wanted to know if there is a way or shortcuts to cycle through blend modes in FCProX?
Hi Larry,
Is there a way of using adjustment layers in fcp x to remove moire?
Best, Jonnie
Jonnie:
No… because I don’t know any filter in FCP X that removes moiré. Moiré is an optical illusion caused by low resolution and closely spaced lines.
Larry
And where are there luminance, color blend modes? The most important one.
Replying to an old thread here and ‘Jonnie’.
FCP X now has a Gaussian filter listed under ‘Blur’ in the Effects pane that allows you to ‘defocus’ the image a little (especially half tone photos) – the trade off is a softening of the image.