
While Soundtrack Pro is discontinued, Adobe Audition is going strong. And, for audio mixing, Audition is a very capable program.
Although Adobe Audition and Premiere Pro are designed to work smoothly together, that doesn’t mean you are limited to only using Premiere Pro with Audition. In fact, there is a very nice, very fast, way to move projects between Final Cut Pro 7 and Audition, which I want to show you here.
EXPORTING FROM FINAL CUT PRO 7
There are two ways to get audio files out of FCP for use in other applications:
And, believe it or not, the older technology of OMF is actually the better choice!
NOTE: The recommended technique illustrated here will work with FCP HD, 5, 6, or 7.
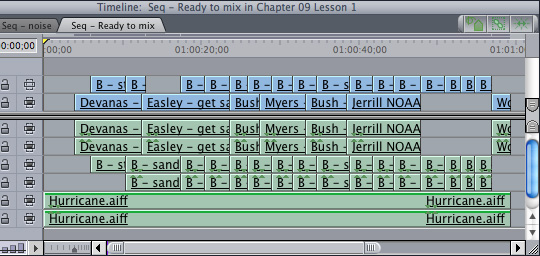
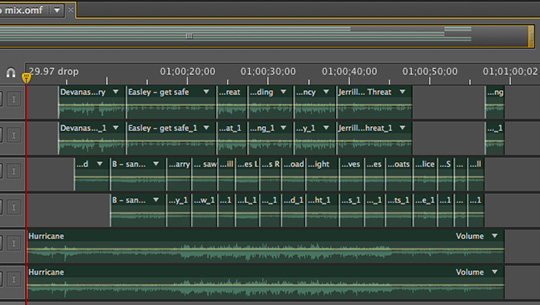
Here’s a sequence inside Final Cut. Multiple clips on multiple tracks.
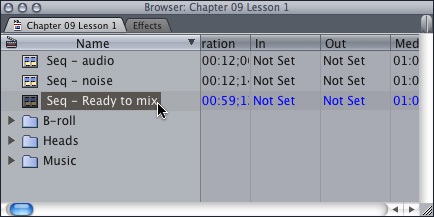
When exporting files out of Final Cut, I’ve developed the habit of always exporting from the Browser, I’ve found it to be more reliable. So, select the sequence you want to export in the Browser. (While the system allows you to export multiple sequences at once, I’ve found it best to do one sequence at a time.)
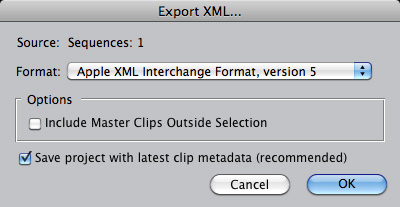
To export an XML file, select File > Export > XML.
Select the highest level of XML supported by your version of Final Cut. In the case of Final Cut Pro 7, this is XML version 5. The XML file contains all your media as individual clips – both audio and video – as well as all levels, pans, and transitions.
Find a location and save the file. Even complex sequences save blindingly fast.
Exporting XML – that’s option #1.
The other option is to export an OMF (Open Media Format) file. This format died long ago and hasn’t been developed or supported by anyone for the last century or so. Naturally, that means we use OMF every day in professional post-production to move files from Point A to Point B. Weird, but true.
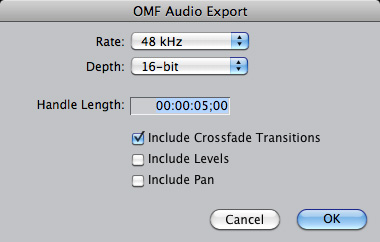
To export OMF, select File > Export > Audio to OMF.
In the resulting dialog box, leave the Rate set to 48 kHz and the Depth to 16-bit.
However, change the Handle Length to at least five seconds. Many audio engineers prefer 10 seconds or more. This setting tells Final Cut how much extra audio (“handles”) to include before the In and after the Out of each clip in the Timeline. (Provided, that is, that there actually IS extra audio before the In and after the Out, otherwise this setting is ignored.)
I’m of two minds about the bottom three check boxes. Generally, even for projects that I’ve edited, when the files are loaded into the audio application, I tend to remove all levels, pans and transitions that I applied in the video editing application and redo them as part of the audio mix. So, in my case, I leave the three bottom check boxes unchecked.
Checking them won’t hurt anything, it simply means that you are passing these settings from FCP to Audition. However, most audio engineers assume that the levels set in the video editor are only rough and reset them back to their default settings as they are getting the file ready to mix. It’s your choice.
Click OK, give the file a name and location and save it.
OMF files, unlike XML, only contains audio. If you want to see the video from your edit as an aid to the audio mix, you will need to export it as a separate process.
EXPORTING YOUR VIDEO
The video you export for Audition does not need be good quality. All you are using it for is timing. So, don’t worry about making the video full-size or perfect quality. Speed is the key word here. So is simplicity.
Again, select your sequence to export in the Browser.
Select File > Export > Using QuickTime Conversion.
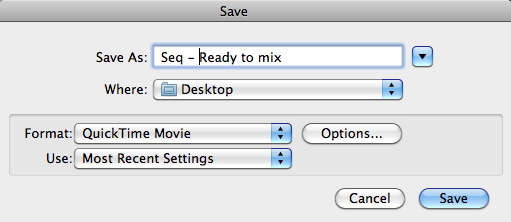
The default settings are fine, but if you want to get fancy – or faster – you can make the following changes.
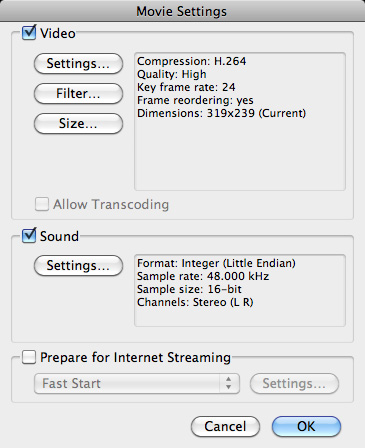
Click the Options button.
Uncheck Prepare for Internet Streaming. That isn’t relevant when you are playing the file from a hard disk.
Click the Settings button in the video section.
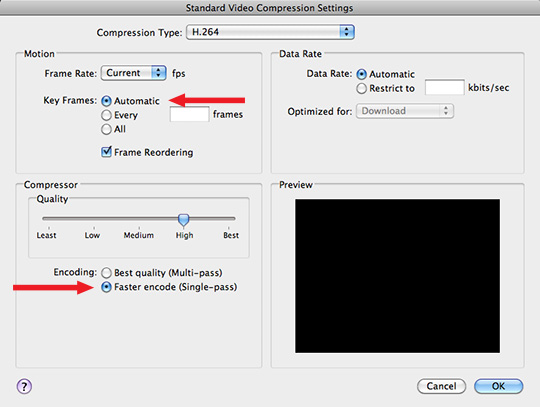
Set Key Frames to Automatic
Set Encoding to Faster Encode
Leaver everything else alone. Well, OK, yes. You can change things and tweak. But it isn’t necessary. This is just a temp file, used only for audio mixing. Don’t waste your time here.
IMPORTING XML INTO AUDITION
You would think that, because it is newer, XML is the best choice for bringing audio into Audition. You would think so, but you’d be wrong. The problem with using XML is that only the first video clip comes across and most of your audio files have broken links.
To import an XML file, open Audition and select File > Import > Files. Audition is smart enough to know this is an XML file and brings everything in.
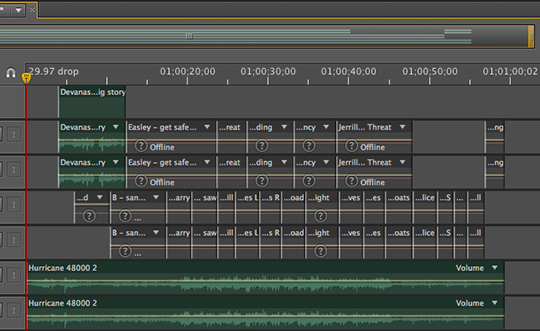
Notice in the Timeline only one video clip is in the V1 track. And most of the clips in A1, A2, A3, and A4 tracks are off line – indicated by a dark gray box. While XML does support transferring both audio and video, in actual fact, its a mess.
IMPORTING OMF INTO AUDITION
A much better way to work is to use OMF – which is why this works for so many versions of Final Cut, because OMF has been around for a long time.
To import an OMF file, open Audition and select File > Import > Files. Navigate to where you stored the OMF files and select Open. Audition senses that this is an OMF file and springs into action.
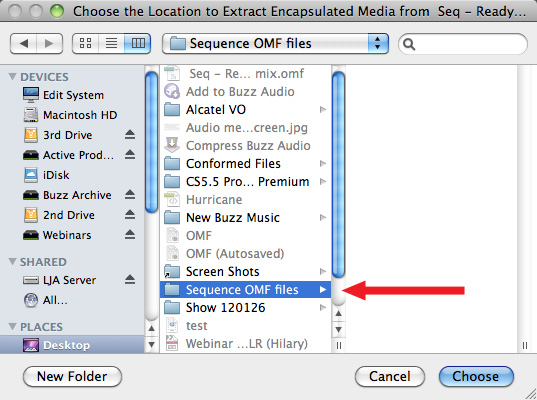
Audition needs to create local copies of the transferred files, so it asks where it can store them. I created a folder called “Sequence OMF Files” (you can call this anything you want) and I selected it in this window.
Very, very quickly, Audition copies the files into this folder, then creates a series of technical files called “PKF”, which it uses as part of the Timeline in Audition.
After a few more seconds – and this really does move quickly – all the clips are displayed in the Timeline, ready to edit.
Without question, OMF is the preferred way to move files from FCP to Audition.
IMPORTING A VIDEO FILE
Except…. there’s no picture.
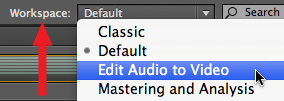
Change the Workspace to Edit Audio and Video. This allows you to see the video clip, once you add it to the Timeline.
To add the video file we exported earlier to your Audition multitrack sequence, select File > Import > File, navigate to the video file and select it.
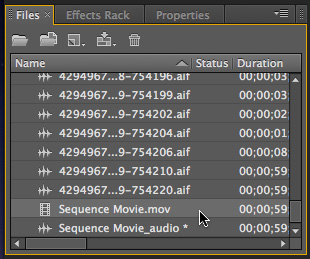
Notice, in the Files pane, your movie now exists as two files – one video and one audio.
Right-mouse-click the video file and select Insert into Multitrack > [ project name ]
The video file is inserted at the position of the playhead into the video track of Audition, and the picture appears in the Video tab in the top left corner of the interface.
You are now ready for editing.
NOTE: This OMF transfer process works the same for any video editing application that supports OMF, not just Final Cut. You simply need to export in two stages: audio first, then video.
SENDING FINAL AUDIO TO FINAL CUT PRO
When your audio editing and mix are complete, select Export > Multitrack Mixdown > Entire Session.
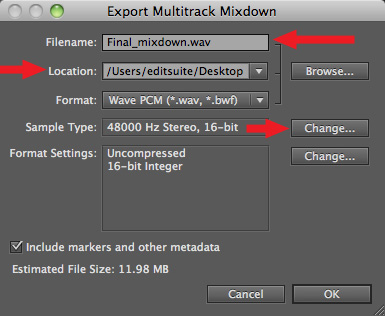
This dialog determines the final specs of your exported audio.
Give the file a name and location.
Leave the Format as WAVE – this is the default format of Audition. It is fully uncompressed, totally supported by Final Cut Pro, and exports FAR faster than AIFF.
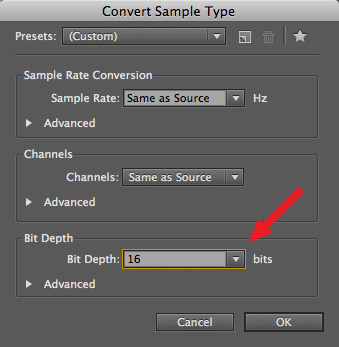
Click the Change button next to Sample Rate and change the Bit Depth to 16-bit.
Click OK to create a WAVE file of your entire Audition project.
Reopen your video edit in Final Cut Pro and select File > Import > File. Select the file and, after importing, edit the mix into the lowest audio track in your timeline.
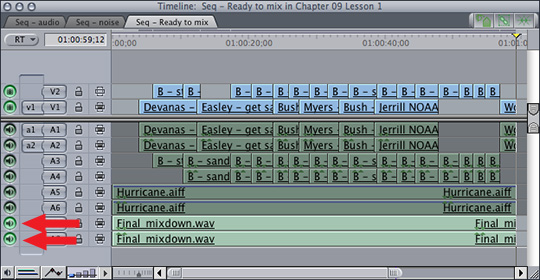
Keep all the original clips, in case you ever need to remix your audio. Then, turn on JUST the two green visibility lights for the mix tracks, and turn off all the rest. This mutes all tracks except for your mix.
Output and you’re done.

2,000 Video Training Titles
Edit smarter with Larry Jordan. Available in our store.
Access over 2,000 on-demand video editing courses. Become a member of our Video Training Library today!
Subscribe to Larry's FREE weekly newsletter and
save 10%
on your first purchase.
7 Responses to FCP 7: Send Projects to Audition
Larry, is there a route to moving audio from FCPX to Audition (and back again)?
FROM FCP X TO Audition, use the X to 7 utility (Mac App Store) to create an FCP 7 compatible XML file. Then, open that XML file in Audition.
Or, open the XML file in FCP 7, export an OMF file, which you can open in Audition.
Then, export a stereo mix from Audition and import into FCP X.
Going back is easy, getting into Audition takes an extra step.
Larry
Great Article I’m really glad you made this and I found it it is super helpful. I was just wondering why you prefer OMF to XML, like what are the benefits and drawbacks of each?
Nathan:
XML is faster, but also includes video clips. Since Audition can only display one video clip at a time, you still need to create a separate movie file for import into Audition.
You can use XML, it works. OMF does not contain any video, so you don’t need to delete clips or tracks when you use it.
Either will work.
Larry
Larry, as a subscriber I have been benefiting to a large extent from you tutorials. Trying to export a project from Final cut pro x via xto7 to audition. But it drives me mad. Unsyc. Audio of the various clips says ?offline. Can not get the individual Audio clips as separate clips, only as one single audio clip. A short tutorial would be of great interest since I was not able to find any tutorial within the web.
Thank you for your kind answer.
Franz
This was HUGELY helpful…why it took me so long to stop using STP I don’t know. Thanks Larry!!!
Hi Larry, thanks for the article. I’m just dipping my toes in the water with Audition and I’ve been doing some testing with OMF’s from FCP7… If you do leave the volume checkbox checked and bring in the volume metadata with the OMF, is it possible to globally reset the clip volume settings once you’re in Audition? I can’t seem to find an obvious way. I realise I can just bring in the OMF without volume settings, but sometimes it’s nice to have the option. Cheers!