
In looking over my library, I realized that the last time I wrote about chroma-key, also called green-screen, was four years ago. So this is the first of two articles on chroma-key. This article shows you how to chroma-key using Final Cut Pro 7. In this article, I show you how to chroma-key using Final Cut Pro X.
GETTING STARTED
First, the best thing you can do to improve the quality of your keys is to improve how you shoot them. Here are seven basic production rules:
- Actors should be at least 10 feet in front of the green screen. This avoids light from the background “spilling” around their body or shoulders.
- In general, don’t cast shadows on the green screen. Be very careful shooting feet.
- The green background should be as smooth as possible. Paint is always better than fabric; avoid wrinkles and folds.
- The green background should be lit smoothly, both from side to side and top to bottom. I try to have the green background display between 40-50% level on the waveform monitor.
- There is NO relationship between how the background is lit and how your actors are lit. This example will illustrate that.
- Light your background for smoothness. Light your actors for drama.
- Don’t worry about having the green background fill the frame. It only needs to completely surround the edges of your actors. Garbage mattes are used to get rid of the junk.
SETTING UP THE KEY
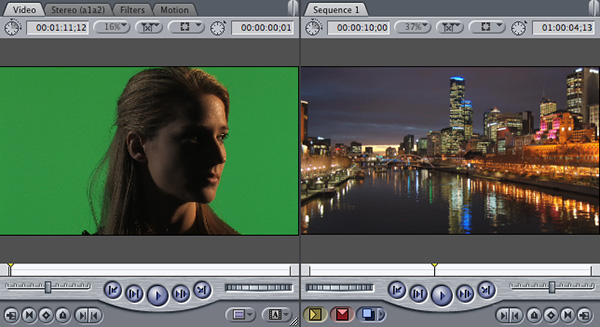
Here are my two elements – a dramatically lit Lisa in front of a green-screen background, and the night scene I want to key her into.
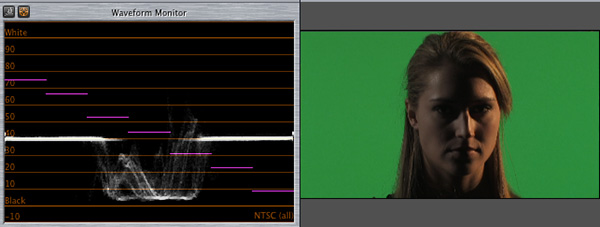
Just to illustrate, look at how flat the background is on the scope – right around the 40% level. Notice that there is no relationship between how Lisa is lit and how the background is lit. (This was a painted background. She is about 9 feet in front of it.)
FCP 7 now includes the Primatte RT filter – which is the preferred built-in keyer to use for green screen work. However, it has problems with translucent objects – such as water glasses and gauze – and shadows cast on the background. If you need more powerful keying, consider buying:
CREATING THE KEY
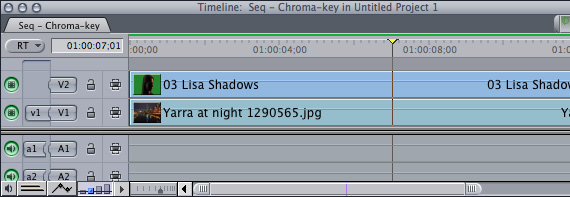
1. In Final Cut Pro, put the background clip in the Timeline on V1 and the foreground (green-screen) clip on V2. Put your playhead on top of the two clips and select the V2 clip.
2. Apply Effects > Video Filters > Key > Primatte RT. Don’t panic, your image will look terrible at this point.
3. Double-click the V2 clip to load it into the Viewer.
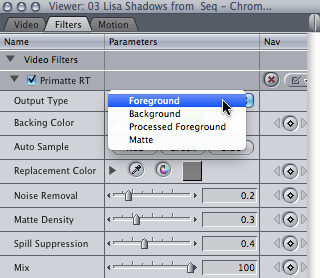
4. Click the Filters tab and set the Output Type popup to Foreground, then use the eyedropper next to Backing Color to select a representative color of your chroma-key background. Pick a portion of the background that is near to the face, but be CAREFUL not to get too close. (You don’t want to accidentally select loose hair or an edge of skin.) Selecting a color makes sure you are selecting the shade of green that matches your background, rather than using a default green setting.
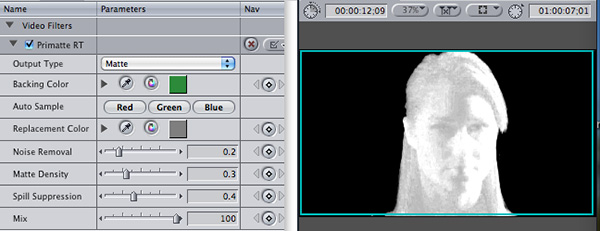
5. Now, set the Output Type popup to Matte. The goal to creating a clean key is to make the foreground solid white and the background solid black; switching the view to Matte allows to you see how well you are doing.
6. Slide the Noise Removal slider all the way to 0.
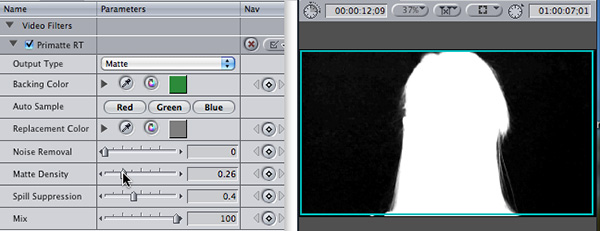
7. Slowly slide the Matte Density slider until the foreground you want to retain goes solid white, indicating foreground opacity. Each key requires a different setting, however, you ALWAYS want the foreground to be solid white, with no shadows.
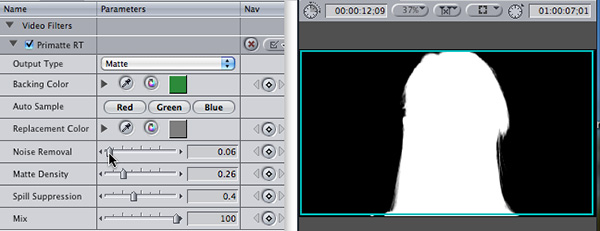
8. Next, slide the Noise Reduction slider slowly to the right until the background you want to make transparent becomes solid black; be careful to eliminate any light “dust.” The Noise Reduction value is ALWAYS less than the Matte Density slider. The better your background, the closer this setting will be to zero.
9. Set the top popup to Processed Foreground.
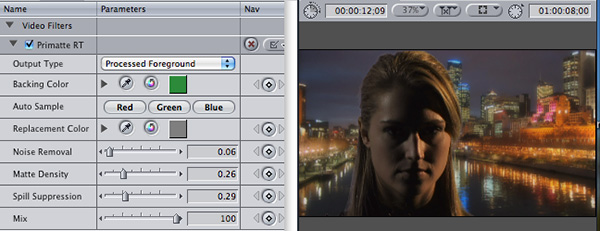
10. Adjust Spill Suppression until the color looks normal. Use the Vectorscope to accurately set skin tones. Here’s an article on reading scopes.
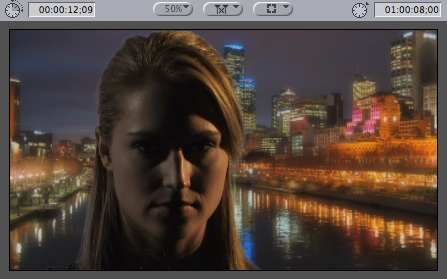
Look at how the lighting on Lisa is designed to reflect the night feeling of the background. This reinforces what I said earlier that as long as you separate the actor from the background, you light the background for smoothness and the actor for drama.
Done.
NOTE: If your green-screen doesn’t cover the entire background, you use a garbage matte to remove the portions of the image you need to hide. Here’s an article that describes how.
LEARN MORE: Want to learn more about keying in FCP 7 – or want to see it in action? Check out this webinar that covers this subject in more detail.

2,000 Video Training Titles
Edit smarter with Larry Jordan. Available in our store.
Access over 2,000 on-demand video editing courses. Become a member of our Video Training Library today!
Subscribe to Larry's FREE weekly newsletter and
save 10%
on your first purchase.
29 Responses to FCP 7: Green-screen or Chroma-key
Newer Comments →-
 Rob Tapscott says:
May 28, 2012 at 9:01 am
-
 Luke Price says:
March 26, 2013 at 4:51 pm
-
 ezzat says:
April 1, 2013 at 10:40 pm
-
GREEN SCREEN EFFECT | says:
May 21, 2013 at 7:22 am
-
 AJ Koz says:
April 27, 2014 at 8:40 am
-
 Larry Jordan says:
April 27, 2014 at 10:27 am
-
 AJ Koz says:
April 27, 2014 at 12:07 pm
-
 Larry Jordan says:
April 27, 2014 at 12:12 pm
-
 Joseph says:
August 16, 2014 at 9:01 pm
-
 LarryJ says:
August 16, 2014 at 11:03 pm
-
 DanisH says:
June 3, 2013 at 8:49 am
-
 Trevor says:
September 26, 2013 at 8:26 am
-
 David says:
October 9, 2013 at 12:08 pm
-
 Mike says:
July 5, 2014 at 6:40 am
-
 Larry Jordan says:
July 5, 2014 at 7:53 am
-
 maria says:
July 15, 2014 at 1:16 pm
-
 Larry Jordan says:
July 15, 2014 at 2:22 pm
-
 Karl K says:
August 30, 2015 at 8:55 pm
-
 Larry says:
August 30, 2015 at 11:50 pm
Newer Comments →I’ve been putting of doing any kind of green screen work but, now the time has come for a special project. Thanks for all the great tutorials available right when I need them!
I was struggling with a really poor green screen attempt shot by a client, but thanks to this simple but effective tutorial, I have managed to get a result I and my client are happy with. Thanks Larry
thanks so much I heard apout green screen but this the first time I feel that it is easy and interesting thank you
[…] http://www.larryjordan.biz/fcp7-greenscreen/ Search for: […]
I just finished a round of 15 interviews that are each over 30 minutes in length against a green screen. Each will be edited down to 3-5 minutes. Should I edit first and then key? or Key first. I have to key over 30 angles as each interview had 2-3 cameras depending on how many subjects were interviewed at one time. Should I just suck it up and key each angle and have hours and hours of render time before I edit? Or should I edit first and then pull keys? I only ask because no one ever tells you if you should edit first and key second or key first and edit second.
Thanks.
AJ:
I would edit first, then key. Editing is the hard part – so keep your timeline as clean and simple as possible until you figure out the best way to tell your story.
Next, apply the chroma key filter to the first clip and make it look perfect.
THEN, and this is the cool part, copy that entire clip in the Timeline. Select all the remaining clips and choose Edit > Paste Effects. The chroma key effect is instantly pasted into all the other clips. All you need to do now is add the background image.
Very fast and very efficient.
Larry
Thanks for the quick response. Now, Is there are difference between using Primatte in FCP vs AE vs Motion? Or does it not matter which program it’s used in? I’m having issues with the clothing flickering and I’m not sure how to fix that.
AJ:
All keyers are different and handle textures differently. So, yes, there would be a difference. And there is no “best,” so try keying in all your applications to see which delivers the best results.
Larry
I have mastered FCP7 Thanks to your mentorship. You have an incredible ability to simplify challenging tasks, using a delightful economy of words that a child can understand. The quality of my life has been enriched beyond words. WIth eternal gratitude,
Sincerely,
Joseph
Joseph:
(blush…)
Thank you for your VERY kind words. Personally, I think my success is due to the quality of my students.
Larry
Thank you so much
Larry – you just saved my ass. 🙂
Thanks so much for posting this.
Thank you so much for posting this Larry! A lot of us still use FCP7 and today I did my first green screen. Your tutorials are always very straight forward and relevant. Thanks for this.
Hey Larry,
thanks for your tutorial you are amazing, but I have some problems.
I have the primatte keyer 5 for mac and I use Final Cut Pro 7, but it looks much different than yours.
For example I don’t have the backing color and other options.
Do you know what the problem could be.
thanks!
Mike:
You are using the big-brother to the keyer I’m using in this demo.
Primatte Keyer 5 has many more controls, though it does allow you to set the background color. I suggest you check out the tutorials on Red Giant’s website – http://www.redgiant.com – to learn how your version works.
Larry
Hey Larry,
Maybe a novice question, but does the Primatte function in FCP 7 work only with a green screen?
A white cyclorama wouldn’t work if the background of the foreground clip is white, too?
Any help is appreciated!
Thanks.
m
Maria:
For white, use a Luma key – chroma keyers work with color, which white doesn’t have.
Larry
Is it possible to use green screen and chroma key for a baby in a crib or playpen, so that the object is both the baby and the crib / playpen. For example, the end result when finished with post production editing would be a baby in a crib floating in the sky or featuring a park-like setting in the background ?
Thanks in advance,
Karl
Karl:
Yes, easily. Put the crib and baby in a green “cove,” a curved surface of green extending from the floor under the crib up in back of the crib so that the foreground objects are entirely in front of the green background.
Lighting is crucial – avoid shadows from the crib from falling on the green background and light the green background as evenly as possible. Also, try to get the foreground as much separation from the background as possible – perhaps by suspending the crib over the background. Even 1-2 feet would improve your key.
It is a tricky shot, but totally doable.
Larry