
![]() A few days ago, Jay sent me a question:
A few days ago, Jay sent me a question:
“Do you have a video where you cover the difference between ‘expand audio’ & ‘expand audio components?’ And also ‘detach audio’ and ‘break apart clip items?'”
I checked and I didn’t. So, let me explain these here.
There are four options in the Clip menu:
Let’s look at each of these, starting with the simplest.
EXPAND/COLLAPSE CLIPS
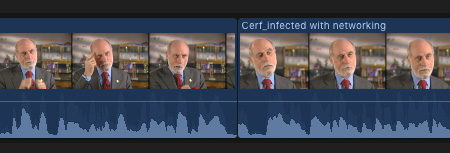
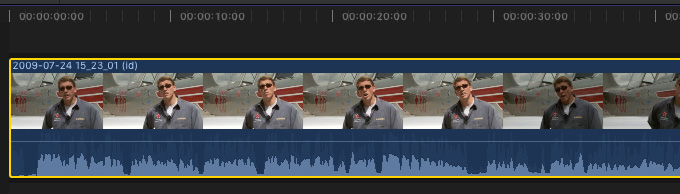
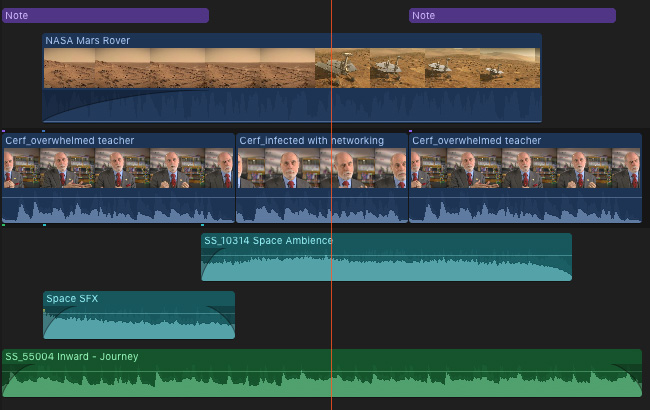
(Footage courtesy: Dr. Vint Cerf)
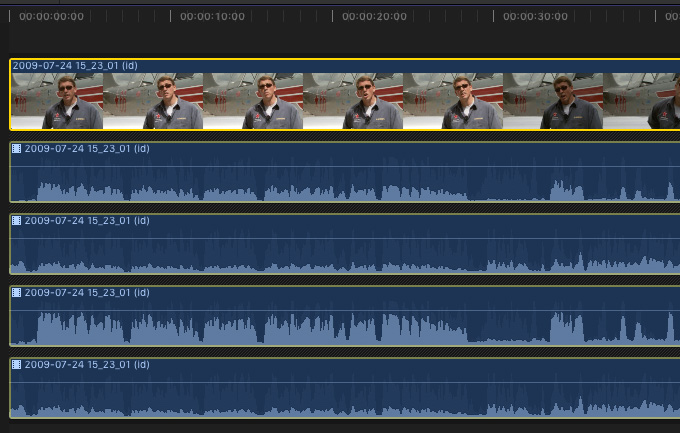
This is a typical interview edit where the audio and video clips are displayed as a single clip in the timeline. Most times, this is enough to create a rough cut.
But… sometimes we need to edit or trim the audio separately from the video, without losing sync.
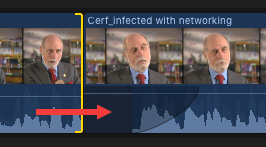
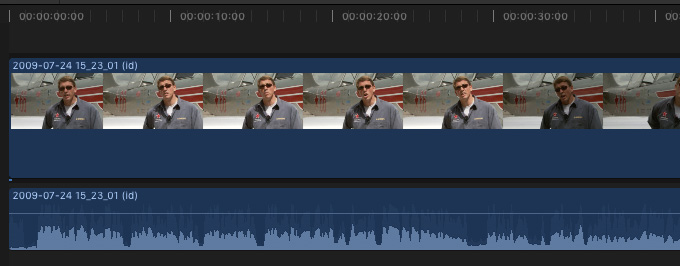
The easiest way to do this is to double-click the audio waveform in the timeline. This is called Expand Audio. (You can also choose Clip > Expand audio.)
This separates the audio from the video, but still keeps it in sync. In the screenshot above, I’ve trimmed the audio of the second clip to the right, while roll trimming the video edit to the left.
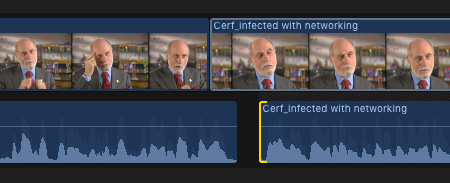
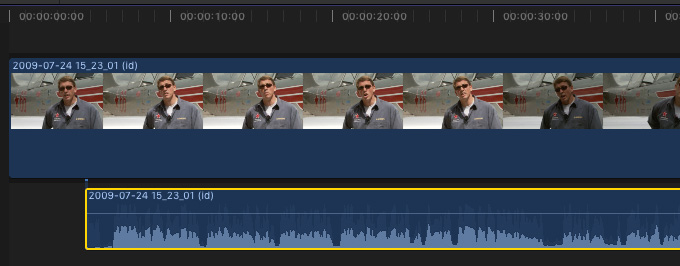
To collapse the audio clips do one of the following:
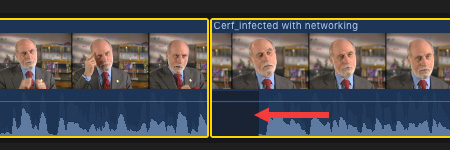
Even though the clips are collapsed, you can still see the gap in the audio in the waveform on the right.
ADDITIONAL OPTIONS
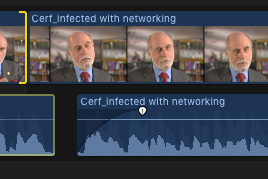
While you can add audio fades when the audio is collapsed into the video, this is often easier to do when the clips are expanded.
At the extreme right and left edges of a selected clip, you’ll see two small fade dots. Drag these to add an audio fade to the In or Out of a clip.
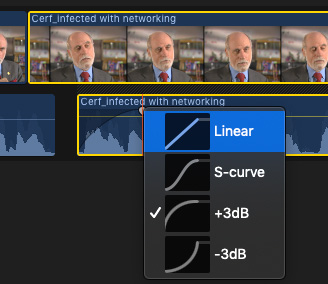
Control-click the dot itself – which can be tricky as other menus will often interfere – to change the shape of the curve. The shapes are:
Again, you’ll see the fade shape reflected back into the waveform when the clips are collapsed.
EXPAND AUDIO COMPONENTS
A “component” is an individual channel inside an audio clip. For example, a stereo clip has two channels – left and right – both stored inside the audio clip.
Frequently, when we record interviews, we record the interviewer on channel 1 and the guest on channel 2. If we are lucky, our gear supports more than two channels, so we could also record a second guest on channel 3 and room tone on channel 4.
Audio components allow us to see each of these channels.

First, you need to tell Final Cut how to interpret the audio. Is it stereo music or individual voices on each channel? Most of the time, for non-music recording, I’m working with a variety of mono clips and channels.
To select the correct setting, select the clip either in the Browser or the Timeline. Then, in the Audio Inspector, select the option that works best for your clips in the pop-up menu for Audio Configuration.
NOTE: Mono clips default to the center of the audio field. You can adjust the pan of an audio clip at any time during the final audio mix in the Audio Inspector.
(Footage courtesy: Hallmark Broadcast Ltd. (www.hallmarkbroadcast.tv))
Once you have more than one audio channel in a clip, audio components come into play. When you expand audio components, you see each channel separately in the Timeline. To do so, choose Clip > Expand Audio Components (shortcut: Control + Option + S).
NOTE: You can assign channels in the Browser, but you can’t see them until the clip is edited into the Timeline. You can also preview channel audio by skimming them in the Audio Inspector.
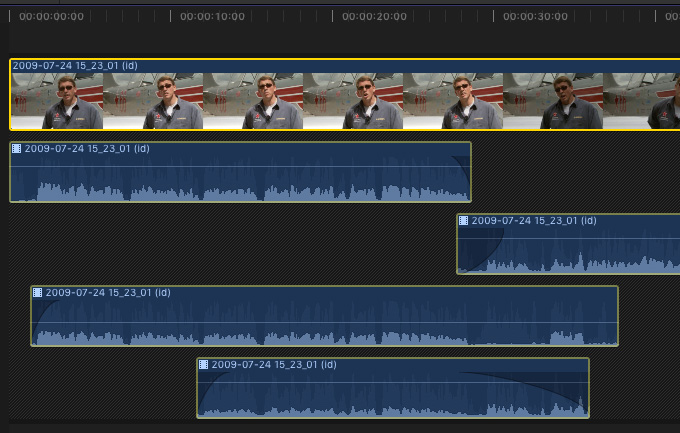
Working with individual channels allows you to adjust levels independently for each channel, as well as trim and add fades for each channel – all without losing sync.
To close all the components into a single clip, but still retain all your changes, select Collapse Audio Components. Unlike collapsed audio, collapsed audio components don’t show trimming or fade settings within the clip.
DETACH AUDIO
This is a dangerous option! Unlike expanding audio or components, detaching audio breaks the sync connection between audio and video. This allows you to remove unneeded audio or video, but there’s no way to resync a clip, except for Undo.
Worse, from my point of view, if you move an audio clip – even by accident – there are no indicators that show how far out of sync the two clips are. And there’s no easy way to move audio back into sync with the video except for playing both clips and getting the lip sync to look “right.”
NOTE: You can use compound clips to “link” the audio and video together, but that isn’t the same as resync’ing. And, again, there’s no indicator that shows audio is out of sync.
My recommendation is to avoid using detach audio when all you want to do is make the audio silent. Instead, keep the audio linked and drag the volume all the way down. That way, you have the audio in sync if you ever need it in the future.
BREAK APART CLIP ITEMS
Although this is next to the audio options, this isn’t an audio setting. Instead, it’s designed for compound clips.
NOTE: A compound clip is a collection of audio, video and/or still elements stored in a single clip. FCP 7 called it a “nest.” Avid calls this a “sub-sequence.”
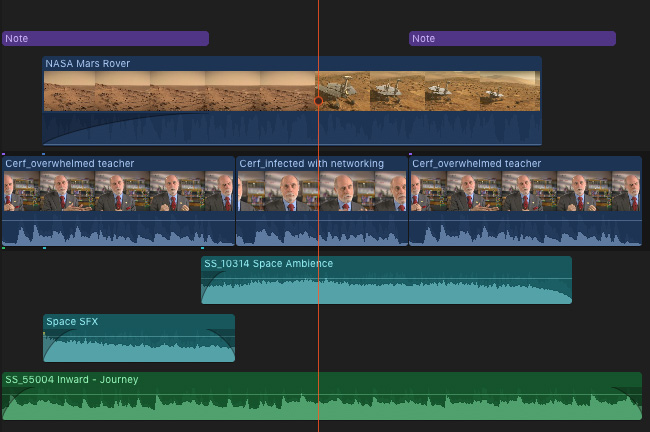
For example, here’s an edit with multiple clips. (The colors occur when assigning Roles to the clips.)

Select the clips you want to group, then use File > New > Compound Clip to group them into a single compound clip. (Shortcut: Option + G)
Then, use Clip > Break Apart Clip Items to deconstruct the selected compound clip back into its original elements. (Shortcut: Shift + Cmd + G)
SUMMARY
Each of these settings allows us greater control over the elements in our project. I use expand clips in every edit, while I rarely use compound clips. Plus, the flexibility and control that audio components provide make editing and adjusting multichannel audio recording simple.

2,000 Video Training Titles
Edit smarter with Larry Jordan. Available in our store.
Access over 2,000 on-demand video editing courses. Become a member of our Video Training Library today!
Subscribe to Larry's FREE weekly newsletter and
save 10%
on your first purchase.
11 Responses to FCP X: Understand Audio Clip Options
There is a simple way to resynch a clip when you have detached the audio. Select the detached video, click reveal in browser and do a replace edit with the browser selection
Barry:
Great tip! A fast way to reveal a timeline clip in the Browser is to put the playhead in the timeline clip, select it, then type Shift + F.
Thanks,
Larry
Jay, Thanks for asking about how to make full use of these audio options. And Larry, thank you for the wonderfully informative tutorial. I have often wondered how these options worked and suspected that if I knew, that knowledge would make editing easier and save time. Much appreciated!!!
its very useful for me , I have this doubt, now am clear, thank u for Larry and Jay
As I do a lot of orchestral videos and multi cam via audio, sometimes the various cameras get a little out of synch with the separately recorded and mastered audio sent to me while I do my edits. My work around is to just place a marker on the video and audio at the very beginning of when they are detached. I use 1 for the first audio where it’s originally audible and then where ever I am about to break them apart I sequentially place markers 2,3,4 as needed. Then if it ever gets out of synch I just make sure the option is on (I forget the name of this option but it’s next to the hear audio when skimming the cursor) to move to and lock to markers to other markers or starts or ends. Works very simply and you can have many of them for a 2 hour concert where you break it all up into individual segments and fades with titles as seen on PBS stations late at night.
Larry:
The ideal option is to provide timecode sync to all audio and video devices during recording using something like Tentacle Sync — https://tentaclesync.com
However, in editing, you don’t have that option. I like your solution.
Larry
Hi Larry,
I am working on a project now and notice that on a Multicam clip on my timeline the clip’s volume level is set to 12dB when viewing with collapsed audio components, but when I hit “expand audio components” and view the clip’s channels (It had two channels, but one was silent so I deleted it) the remaining channel’s volume is set to 5db. Again, when I hit “collapse audio components” the clip audio level reads 12dB…but the audio level on the same clip reads 5dB when expanded. Why are these not the same? I would expect them to match.
Can you explain what is going on here? Should I be adjusting audio level for this clip from the expanded audio components view or the collapsed view?
Thanks in advance for your help!
Katy
Katy:
This behavior strikes me as correct. Let me explain.
Imagine you have a microphone plugging into an audio mixer. Each mic has its own fader, then, say, all the drum mics are grouped into a submix, then the submix is sent to the master fader for final output.
Each fader along the way – mic to submix to maser – can adjust the level and each has its own setting.
This is similar to what is hoppening here. The clips INSIDE the compound clip have one level adjustment. Then, the compound clip, which acts like a submix, has its own volume setting.
So, if you want to adjust levels for individual elements, do that INSIDE the compound clip. If you want to adjust levels for all the clips inside the compound clip, do that from the compound clip.
Hope that helps.
Larry
Hi Larry, I have some archives footage I retimed that I detached audio from and then I deleted the audio but it is still showing as dialogue when I click on the video clip.
Hey Larry, I think we’ve met a few times. I’m a former President of ChiFCPug. I took office after Gary.
Anyway, I’m no chump, but I’ve been stumped. A buddy of mine (Avid to FCP7 to Premier to FCPX) hit some command, and now all of his clips come onto the timeline as detached from the audio. Sure, I can fix it on a clip basis, but I can’t find a command that allows for this situation, or a command to fix it. Thanks.
ALSO…appreciate your contributions over the years. Thanks for being the ‘go to’ guy.
– Chip E.
Chip:
Good to hear from you!
This is a keystroke I don’t know. Still, the fastest way to fix this is to trash FCP X preferences:
That should reset everything to square one. (Remember, that the list of past libraries will be cleared, but the libraries are still intact on his hard disk.)
Larry