
![]() Sometimes, in spite of all your planning, an unexpected “surprise” ruins an otherwise perfectly great shot. In these situations, we need to find a way to take out the “garbage.”
Sometimes, in spite of all your planning, an unexpected “surprise” ruins an otherwise perfectly great shot. In these situations, we need to find a way to take out the “garbage.”
Let me show you several ways to do this in Final Cut Pro X. (This technique is also called using a “garbage mask.”)
NOTE: The key to fixing problem shots is having a second shot you can use in the fix. It is always wise to shoot a clean, ideally locked-down, shot that you can use in making repairs.

All images courtesy Amy “Catfox” Campion – www.AnticsPerformance.com)
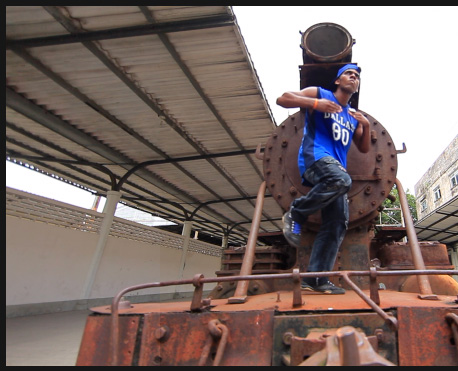
Here’s the problem. An overly enthusiastic photographer just ruined the master dance shot.

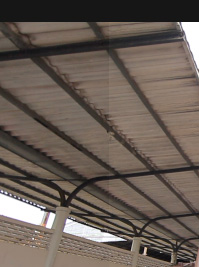
Fortunately, we have a different take that does not have a photographer in it. In this case, this second shot is video, but, if nothing in the background is moving, you could use a still frame or still image.
NOTE: If the master shot is hand-held, life gets a LOT more complex. Your best option is to reshoot the scene, if you are still on set, or use a different take if you are in editing.
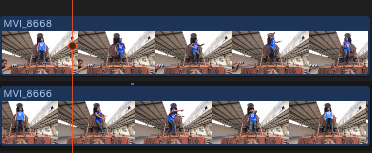
Stack the two clips in the Final Cut timeline, with the clean background clip on the bottom.
NOTE: The stacking order doesn’t really make a difference, the effect works either way; you just need to change the settings. However, I find it easiest to put the clean background on the bottom.
Put the playhead in the clip you want to fix, select the top clip in the Timeline, then, fix the problem using one of several options:
In all cases, you will probably need to make a color adjustment due to changes in lighting.
Let’s see how each of these works. I’ll add the lighting adjustment to the first effect.
CROP > TRIM
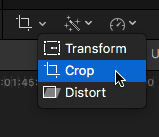
With the top clip selected, click the small icon in the lower-left of the Viewer and choose Crop.
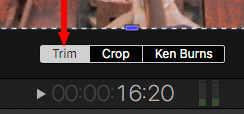
Then, at the bottom of the Viewer, click Trim. This allows you to trim the edges of a clip without changing it’s size.
NOTE: Crop will trim the edges of a clip, then resize it to match the size of the project.
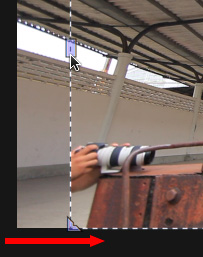
Drag one of the blue dots in a corner, the edge or both, to get rid of the “garbage” in the shot. (Here you can see half a photographer.)

Only remove enough of the top image to fix the problem. When you are finished, click Done in the top right corner of the Viewer. This hides the Crop interface and prevents additional changes to the clip.
FIX THE LIGHTING
The problem is that there is a difference in lighting between the two clips. See how the left side is darker than the right? The color is the same, but the gray scale values are different.

To fix this, again, make sure the top clip is selected, click the Color icon at the top of the Inspector. While we can fix this with either the Color Board or Color Wheels, this is an easy fix which we can do with the Color Board.
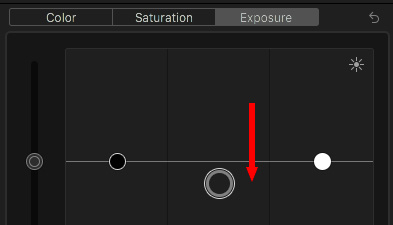
The problem is in the mid-tones, which is most often the case in these fixes. In the Exposure tab, drag the middle puck down until the seam disappears. This darkens the mid-tones in the selected shot.
NOTE: You can use the scopes for this, but your eyes are much better at matching the two sections. You’ve done it correctly when you can’t see the seam.
Here’s the final result: No seam and no photographer.
SHAPE MASK
Using a Shape Mask is another way of making a portion of the frame transparent. The benefit to a shape mask, unlike cropping, is that a shape mask can be “feathered,” or softened, at the edges.
The general rule, when making portions of a clip disappear, is to remove the smallest area possible. This minimizes potential matching problems, such as color or movement.
Again, stack the two clips, with the good background on the bottom. From the Effects Browser, drag Masks > Shape Mask on to the top clip.
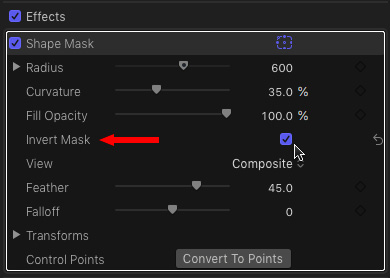
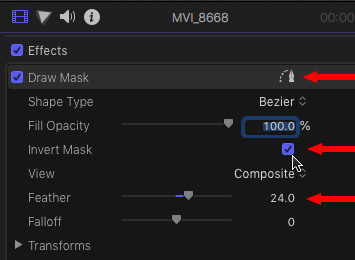
A series of red rounded rectangles appears in the Viewer. Before you start dragging them, go to Inspector > Video and click Invert Mask inside the Shape Mask settings.
This means that anything inside the two red rectangles will become transparent.
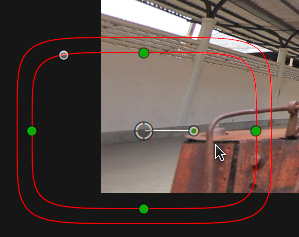
Click inside the red lines and drag the shape until the photographer disappears. Click and drag a green dot to resize the shape. The distance between the inside and outside rectangle determines the amount of feathering. Most of the time, for this type of work, the default is fine.
NOTE: To make the shape more circular, drag the white dot in the top left corner of the Shape Mask.
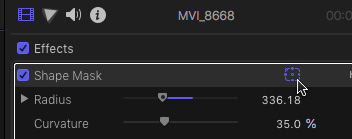
Click this icon in the top right of the effect in the Inspector, to hide the red lines.
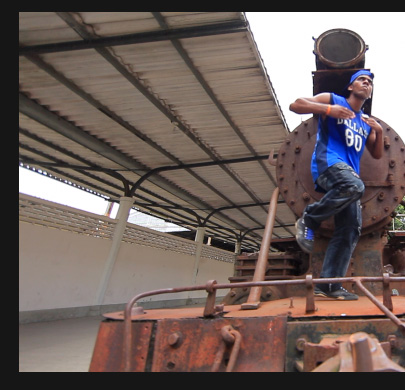
Here’s the finished effect. Because of the feathering, adjusting the color or gray-scale isn’t really necessary. In this case, I made a small gray-scale adjustment, about 20% of the change I made earlier in this tutorial
DRAW MASK
When using Crop > Trim, I can create rectangular masks. When using Shape Mask, I can make rectangular or elliptical masks with feathering. When using Draw Mask, I can create just about any shape, including curves, that also include feathering.

Again, drag the Draw Mask effect from Effects Browser > Masks > Draw Mask and drop it on to the top clip.
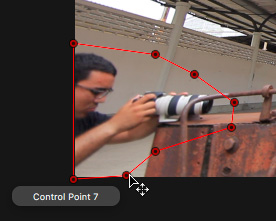
Here I simply clicked on the image to insert control points into the top clip. This can be any shape you want. To add a curve, drag the mouse at the same time you click to create a curved control point.
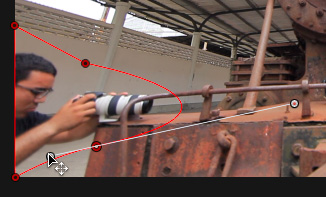
To adjust the shape of a curve, click any dot to select it, then drag a white control dot.
NOTE: Watch what happens when you drag while pressing Shift or Option. Each of these keys constrains the movement of these Bezier control dots.
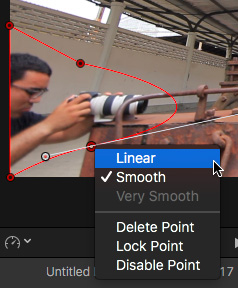
To convert a dot between a corner (“Linear”) or a curve (“Smooth”), Control-click the dot and select the option you want. You can also use this menu to delete control points.
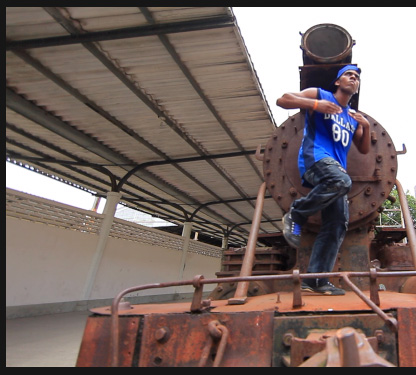
Here’s the finished result. Again, I made a slight gray-scale adjustment to the midtones to better match the two shots.
SUMMARY
Garbage masks have been with us a long time and Final Cut gives us multiple ways to apply them. The KEY is to have a clean shot you can use for the background. The action doesn’t need to match, but the backgrounds do.
And, just for the record, my philosophy is to use whatever technique is the fastest that fixes the problem. In this case, I’d try the Crop first, because it is quick and, with a simple color correction, the missing piece becomes invisible.

2,000 Video Training Titles
Edit smarter with Larry Jordan. Available in our store.
Access over 2,000 on-demand video editing courses. Become a member of our Video Training Library today!
Subscribe to Larry's FREE weekly newsletter and
save 10%
on your first purchase.
2 Responses to FCP X: Take Out the Garbage
Crop in FCPX would be more useful if it also had feathering, which can help cover a lighting change s well… That’s why I like to go with Draw mask myself.
Shape masks with straight lines and 90-degree angles can be easier to spot than an irregular-shaped drawn mask, so I think drawn masks that take advantage of edges and angles in a shot make for a less visible masking job, but as you say, use the tool that works best for the specific need.
If it’s a locked-off shot, I’ll first export a frame to Photoshop and clone stamp/heal brush to remove the offending item, then put that in the top layer in FCPX as my mask source.
Mark:
These are all good ideas. Thanks for sharing.
Larry