
![]()
In Final Cut Pro X, you can apply more than one effect to a clip, group of clips, or compound clip. However, when you do this, you need to pay attention to the “stacking order” of the effects in the Inspector. The final look will change as you change the stacking order of the effects applied to the clip.
This isn’t bad or good. FCP X needs to process effects in some logical order, so once you understand what that is, it is easy to adjust your effects to compensate for the stacking order.
Here’s an example.

Here are two cheerful young girls on a merry-go-round. (The black edge is added so you can see the boundaries of the image.) I want to make this look like a photograph, so I’ll add Effects Browser > Stylize > Simple Border.

A simple white border now appears around the image.

Because the girls look so happy, I’ll change the border color to “Happy Summer Sunshine.” (Um, no, that’s not a setting, that’s just my description of the color.)

Because I want this to look like an old photo, I’ll apply Effects Browser > Basic > Black and White.
NOTE: Don’t use the 50’s TV effect. That effect intentionally distorts white levels and damages the highlights. For simple desaturation, use “Black and White,” instead.
Hmmm… This looks like an old photo, all right — even the edges have gone gray. This is not what I want, I want the photo to be black and white, while the edges have color.
To fix this, we need to understand the “stacking order” of effects.
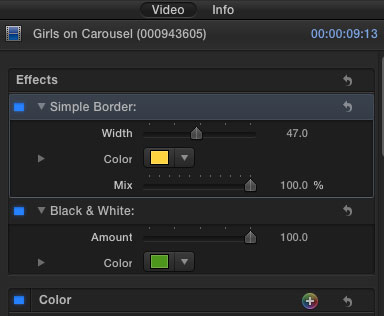
In Final Cut Pro X, effects are always displayed at the top of the Inspector. And Final Cut always processes effects from the top of the Inspector to the bottom.
So, in this example, the Simple Border is listed first, which means the border is applied and the yellow color is added before any other effect is processed.
Then, the output of the Simple Border effect becomes the input to the Black and White effect.
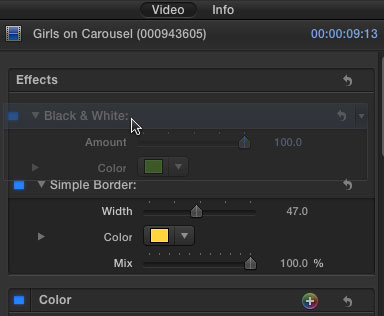
To change the stacking order of effects, so that these effects process in a different order, drag the name of the clip you want to move to the location where you want it to move.
In this example, I’m dragging “Black and White” up so that it processes first, then add the “Simple Border.”

Now the effect is what I want – a black and white photo surrounded by a color border.
NOTE: You can’t change the stacking order of effects so that effects process after Inspector settings. Inspector settings always process after effects are processed. However, here’s an article I wrote that explains how to create a work-around for this.
If you only apply one effect to a clip, you never need to worry about stacking order. But, when you start to apply multiple effects to your clips, pay attention to the stacking order and see how your effects change as you change the order in which effects process.
Visit our website to see Final Cut Pro Training & more!

2,000 Video Training Titles
Edit smarter with Larry Jordan. Available in our store.
Access over 2,000 on-demand video editing courses. Become a member of our Video Training Library today!
Subscribe to Larry's FREE weekly newsletter and
save 10%
on your first purchase.
15 Responses to FCP X: Stacking Multiple Effects
Ihave a clip to which two effects are attached, The effects are Draw Mask and Color Correction. For some reason that I don’t understand, these two effects are linked in a manner which prevents me from changing their stacking order. Any attempt to click on one and move it caused both to move simultaneously as a unit. Whwt to do?
Jon:
I suspect, because I can’t see your project, that you don’t have two effects applied to the clip, but only one: Color Correction. The draw mask is most likely a shape mask which is part of the Color Correction clip. This would prevent you from changing the stacking order, since both effects are part of one clip.
If you truly DO have two effects applied, try unchecking the blue square to disable one of the filters. If it can’t be disabled then there’s something more seriously wrong with your system and its time to call Apple Support.
Larry
You have nailed it, Larry. Thanks so much!
I am producing a specific kind of classical music clips that require many effects stacked over each other in 4K ProRes HQ. Most effects use multiple masks and an intersecting color mask to apply the effect only to a specific part/color of the frame.
My MacBook is struggling hopelessly with this task and so I am looking to upgrade.
My goal is to upgrade to the “minimal” Machine that will be capable of doing what I need until the iMacPro becomes available end of this year.
Do you think an iMac i7 with 8GBRAM is sufficient or does it have to have more memory?
Gabriel:
These are not trivial effects that you are creating. The KEY thing you need is a high-performance GPU, plus more RAM. I recommend at least 16 GB.
Any computer is going to struggle with this – so nothing will render this instantly. But, yes, a high-end iMac will be faster. The iMac Pro should be faster yet.
larry
I am trying to keep the fake blood (sprayed on snow) in a scene red while adding a cold steel effect to the rest of the frame. I used a color mask to select the red on the snow, but despite duplicating and stacking, changing order, etc., the cold steel is turning everything to “cold steel”. What am I doing wrong?
Helene:
I’m not sure.
Make sure that you are creating the mask in the color look and that it applies OUTSIDE the mask. That should preserve the red, while making everything else blu-ish.
Larry
Wondering whether I can apply 2 effect presets please? For example “aged Paper” plus “fish eye” – I only seem to be able to choose one or the other
Fiona:
yes, absolutely.
But you need to apply them one at a time.
larry
When sharpen is applied after color wheels FCP puts it automatically below color wheels in the stacking order.
Should I manually move it above color wheels?
Is sharpen at the top (above color wheels) or below color wheels for best results?
Jay:
Since sharpening only affects the contrast between edges, while color grading changes overall color values, I really don’t think it makes a difference. Try it both ways and see which appeals to you more.
Larry
Hi–and thanks in advance,
A couple of things–you say above, ” Inspector settings always process after effects are processed.” Please forgive me I don’t understand. I get the effects part but what, for example, would the inspector settings be?
I’m working on effects intense with multiple stacked clips projects. In one I am trying to float a video green screened head around the screen through scattered photographs over a preset cloud background with the photos coming and going. As I add keyframes to move the floating head around there is a faint but visible line corresponding to the transform box size. How do I get rid of it? If you wish to see it it is here: https://youtu.be/CrQIOspWVnM Rob
Robert:
This is a very cool effect – nice work!
You are correct, my writing is a bit sloppy here. What I should have written was: “Effects which you apply to a clip from the Effects Browser process before settings you make in the Transform, Crop or Distort windows, which are located below any applied effects.”
And the reason you are seeing the edges of the bounding box is due to the glow you are applying to the moving head. Either decrease the glow or nest the keyed head in a compound clip then, apply the glow to the compound clip.
Larry
Hi Larry, I am trying to add an effect to a single clip in a stack, without the effect occurring in the primary (or any other clips) in the stack. I am not succeeding. I have masked the clip higher in the stack, and want to add a motion effect to it, without adding the motion to the other clips in the stack. Any advice would be appreciated. Thank you
Jerry:
This may depend upon what effect you are applying. Some of the Apple-developed clips affect all layers. Send me a screen shot of the Inspector showing the effects you are applying, along with the timeline.
Send them to: Larry [ at ] LarryJordan [ dot ] com
Larry