
![]() Fade dots allows us to add fades to the audio at the ends of a clip. Fades between clips can be symmetrical or asymmetrical, and we can even control the shape of the fade.
Fade dots allows us to add fades to the audio at the ends of a clip. Fades between clips can be symmetrical or asymmetrical, and we can even control the shape of the fade.
Let me illustrate.
A SIMPLE EXAMPLE
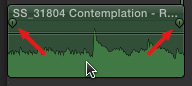
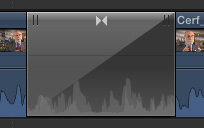
Here’s an audio clip. When you place the cursor inside the clip, whether the clip is selected or not, two fade dots appear; one each in the top right and top left corners. The top left dot controls the audio fade in to that clip, while the top right dot controls the audio fade out.
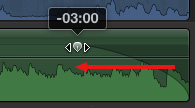
Grab one of the dots (because you can’t grab them both at once) and drag it. Here, I’m dragging the dot at the end of an audio clip to create an audio fade from the dot to the end of the clip.
NOTE: The numbers indicate the duration of the fade you are creating.
FADE SHAPE
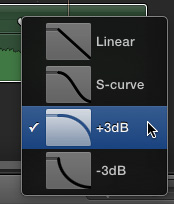
Right-click (or Control-click) a fade dot and four shape options appear:
The default setting is +3 dB.
NOTE: Because audio levels are logarithmic, rather than linear, when you create a linear cross-fade between two clips that have a steady sound – for example, crickets and an air conditioner – the audio levels sound like they get a bit softer in the middle of the transition. The +3 dB cross-fade compensates for that apparent dip and makes the audio levels sound consistently smooth across the duration of the cross-fade.
FADE DOTS AND TRANSITIONS
Now, we could select the end of an audio clip and type Command+T to add a default cross-fade (or fade to black, if there is only one audio clip touching the selected audio edge) to the selected edit point, clip edge, or clip.
However, the limitation to audio transitions is that, while we can adjust their duration, we cannot adjust the shape of the fade.
Adding an audio transition is faster, but fade dots are more flexible.
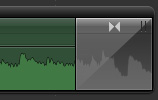
If we add a transition to a video clip which also contains audio, and the audio in the clips is not expanded, the dissolve will automatically include a +3 dB cross-fade between the two audio clips.
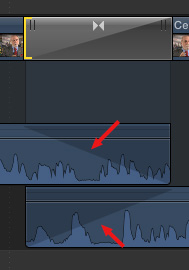
Expanding the audio from the video better illustrates the automatic cross-fade that was applied to each clip. We can manually alter this cross-fade by dragging the fade dots for each clip.
NOTE: Here’s an article that goes into more detail on how to trim underneath a transition.
SUMMARY
Fade dots provide more control over the fades at the end of an audio clip. While not as flexible as the fade boxes and lines in Adobe Audition, these are much more flexible than just using a simple keyboard shortcut for an audio transition.

2,000 Video Training Titles
Edit smarter with Larry Jordan. Available in our store.
Access over 2,000 on-demand video editing courses. Become a member of our Video Training Library today!
Subscribe to Larry's FREE weekly newsletter and
save 10%
on your first purchase.
2 Responses to FCP X: Control Audio with Fade Dots
Great explanation.
Question: is there a way I can change the default setting? Lets say I want the fade to be “linear” all the time instead of +3 dB
Thanks.
Juan:
Great question, but I don’t know of a way to change this default.
Larry