
![]() [Updated Aug. 13, 2020, with with revisions due to FCP X 10.4.]
[Updated Aug. 13, 2020, with with revisions due to FCP X 10.4.]
This week, I seem to be thinking a lot about color correction. So, here’s another tip. This is a little-known trick that allows you to color correct a clip without first editing it into a multicam clip or the Timeline.
Why use this? Because this allows you to color correct a clip once, then have those settings apply to every use of that clip in either the Timeline or a multicam clip. This can save significant time over copying and pasting settings between multiple clips.
The benefit to this technique is that you can apply this change once and it appears everywhere that clip, or a portion of that clip, is used.
The disadvantage to this technique is that, while you can reverse these changes, you need to reverse them for every iteration of the clip in the Timeline.
Here’s how this works.
OPEN IN TIMELINE
This technique revolves around the ability to open a clip in the Timeline. This is NOT the same as editing a clip into the Timeline. Instead, you are opening the clip itself and making changes to it. For example:
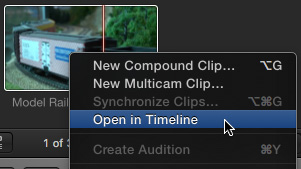
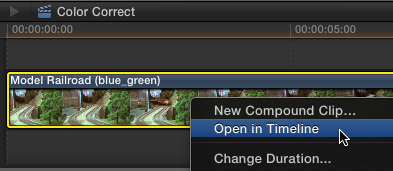
Here’s a clip we want to color correct. Right-click, or control-click, the clip in the Browser and choose Open in Timeline.
UPDATE: In FCP X 10.4, Apple removed this option from this menu. Instead, select the clip, or clips, and choose Clip > Open. The rest of this article is correct.
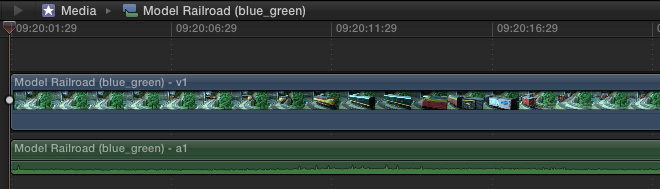
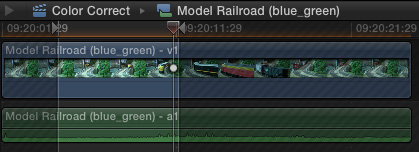
The clip appears in the Timeline, but this is NOT a sequence. This is the clip itself, with all its components (like video and audio) revealed. Notice the name and icon at the top of the Timeline – this indicates it is the source clip itself.
For instance, if you deleted the audio track once you “open” a clip in the Timeline, all the audio for that clip is deleted permanently. The only way to get it back is to reimport the clip from your hard disk into FCP X.
NOTE: This is a good reason not to delete anything when you have “opened” a clip into the Timeline, unless you want it to be deleted permanently.
In our case, because we want to color correct this clip, once it is “opened” into the Timeline, apply the Color Correction filter and make adjustments the same as you would any other clip.
EXITING “OPEN IN TIMELINE”

When you are done making changes, you MUST click the small left-pointing arrow in the top left corner of the Timeline to close the clip and exit “Open in Timeline.”
Otherwise, whatever changes you make are applied to the clip, not to an edited project.
UPDATE: The Timeline History arrows are just to the left, or right, of the clip name in the top center of the Timeline.
EDITING THIS CLIP
Once you’ve exited Open in Timeline mode, you edit the modified clip the same as any other, it’s just that now, all your color changes have been applied to and travel with the master clip into the Timeline when you edit it.

For instance, here I edited three different segments into the Timeline from the master clip in the Browser that we just color corrected. Notice that all three clips have orange render bars at the top of the Timeline, indicating that each segment contains effects which need to be rendered. (Note, also, that the icon and name at the top of the Timeline indicate we are in a project, not a clip.)
Also, while multiple sections from this clip were edited into the Timeline, the same color correction settings were applied to all.
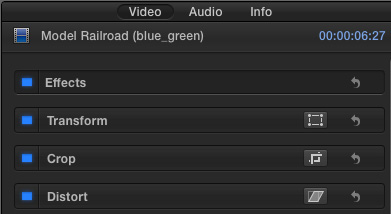
However, when you select one of these Timeline segments, then open the Inspector, notice that no Color Correction effect is visible. That’s because the effect was applied to the master clip in the Browser, not the child clip in the Timeline.
REMOVING THESE SETTINGS
While deleting portions of a clip – such as the audio track – are permanent, making color changes – or adding other effects – can be reversed.
If you have not edited any portion of the corrected master clip into the Timeline, you can remove the color correction effect by selecting the master clip in the Browser, and choosing Open in Timeline.
UPDATE: Again, in FCP X 10.4 and later, this option no longer exists. Instead, choose Clip > Open.
Select the opened clip in the Timeline, go to the Inspector and remove or modify any effects you want.
However, once a clip has been edited into the Timeline, changing the master clip won’t affect the clip in the Timeline.
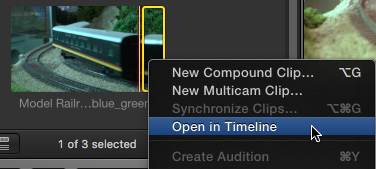
To remove effects applied to a modified clip after it is edited into the Timeline, right-click (Control-click) the clip in the Timeline and choose Open in Timeline.
FCP X opens the clip and highlights JUST the portion of the clip that you selected in the Timeline. At this point, go to the Inspector and remove or modify any effects that were applied to the clip.
However, your modifications only apply to the selected portion of the clip, not the entire clip itself.
Next, click the left-pointing arrow in the top left corner of the Timeline to get out of Open in Timeline mode and return to the original project. (This is a CRITICAL step and very easy to forget!)
Then, repeat this process for all iterations of the clip edited into the Timeline that you need to modify.
MULTICAM CLIP EXCEPTION
From my point of view, if you are doing multicam work, it is better to color correct clips as part of the multicam sequence rather opening them in the Timeline.
The reason is that, when you color correct a multicam clip, the changes you make to each angle are instantly reflected throughout that multicam clip, regardless of how many edits you made to it.
NOTE: This assumes that you have edited a multicam clip into the Timeline, then double-clicked the multicam clip in the Timeline to open it in the Angle Editor. Once a multicam clip has been edited into the Timeline, changing the master clip in the Browser has no effect on the clip in the Timeline.
SUMMARY
I don’t use this technique very often. And, when FCP X first shipped, it took me a long while to figure out how this worked.
Still, this technique can save a lot of time if you are editing the same clip multiple times into a project and the color corrections you need can be applied to the entire clip.

2,000 Video Training Titles
Edit smarter with Larry Jordan. Available in our store.
Access over 2,000 on-demand video editing courses. Become a member of our Video Training Library today!
Subscribe to Larry's FREE weekly newsletter and
save 10%
on your first purchase.
7 Responses to FCP X: Color Correct Using “Open in Timeline” [u]
This will be helpful to me, especially for audio problems or situations that can easily affect an entire (master) clip. It has taken me ages in the past to change each clip. Thank, Larry!
Larry,
The “Edit in Timeline” technique seems to be useful only you add the effect BEFORE editing the clips to the project. I tried editing first and use this technique later but the edited clips in the project timeline did not change. Did I do anything incorrectly or that’s how it works?
Thanks
As always when I’m stuck, Larry, you have the answer! Maybe the most important thing you say is when you open the TIMELINE segment in the Inspector “no Color Correction is visible.” That confused me.
BTW same thing applies when do multicam corrections in the Angle Editor. Won’t show in the timeline inspector
George:
Thanks for pointing this out. In the 10.4 update, Apple removed this option. Instead, select the clip you want to adjust and choose Clip > Open.
I’ve corrected the article.
Larry
Thanks Larry!
This workflow is perfect!
You are definitely the “FCPX GURU” for sure!!!
Cheers,
John Debrincat
Melbourne, Australia.
@jdstrobist
Larry,
I’ve been editing color in a range within a clip which is very handy to me. But I find that after I close the range, the corrections are applied to the whole clip. The adjustments still show on the color board and are applied to he clip. The part of the clip that was corrected looks fine, but the rest of the clip lookd awful. How can I fix this?
Richard:
Hmm… I’m not sure I understand what “coloring in a range” means to you. Normally, if you create a range using a mask or Hue selection, you leave it in place. So, I’m not sure why you are removing the range – but if the boundaries of the color correction are removed, the correction would naturally expand to include the entire clip.
Send me a screen shot directly to: Larry@LarryJordan.com – and show me what you’re doing. I’m happy to help, once I better understand what you are doing.
Larry