
![]() The chroma-key filter in Final Cut Pro X was totally rewritten from FCP 7 and the new version is simply amazing. Using only the default settings, FCP X can pull a key where other filters often can’t. I am very impressed with its capabilities.
The chroma-key filter in Final Cut Pro X was totally rewritten from FCP 7 and the new version is simply amazing. Using only the default settings, FCP X can pull a key where other filters often can’t. I am very impressed with its capabilities.
[ For an article on how to use the chroma-key filter, click here. ]
With the 10.0.3 release, Apple added a variety of specialized controls to further extend the power of this filter. This article looks at these advanced controls and how to use them.
NOTE: In point of fact, Apple also updated the Luma key filter with Light Wrap and Matte tools. However, since both of these are also part of the chroma-key filter, I’ll discuss them below.
THE NEW FEATURES
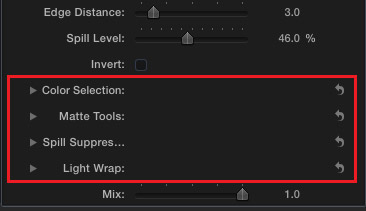
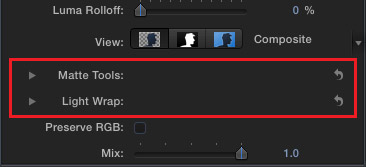
For example, the red box highlights the new features added to the chroma-key filter:
NOTE: When Apple updates a filter with the release of a new version of the software, that does not update earlier versions of the filter which were applied to a clip in an existing project. To apply the new filter, remove the old one and apply the new one. This is true of all filters and built-in effects.
Once an effect is applied to a clip, it won’t update unless you do it manually. This is a good thing, because otherwise, all effects in existing projects would change without you knowing about it.
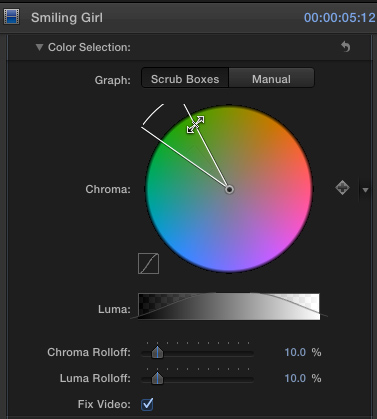
Color selection allows you to fine tune the range of colors you are selecting for a background. Your goal is to keep this wedge as narrow as possible, while still maintaining a clean key.
The wider the angle, or the greater the range of saturation values, the distance from the center, the more likely you are to start keying out colors on your talent or punching holes in your foreground.
For example, twirl down the Color Selection arrow. When Scrub Boxes is selected, dragging one of the edges of the selection angle allows you to adjust the edge softness of your foreground. This can really help tweak hair detail by narrowing the size of the color wedge.
Before clicking Manual, make sure the Strength slider at the top of the filter is set to any number greater than 0. In Manual mode, you can adjust both edge softness and core background transparency.
NOTE: Don’t switch between settings. Once you’ve switched to Manual mode, don’t switch back to Scrub Boxes. That can cause a kind of internal feedback that will create serious problems with your key.
In Manual mode, you can adjust the exact angle of the background color you want to select, along with saturation and variance in the color; just by dragging inside the color wheel. Remember, the smaller the selection area, the better.
Since every key is different, the easiest way to discover what this does is to play with it. I was struck by how well this brought back hair detail in a very tricky key.
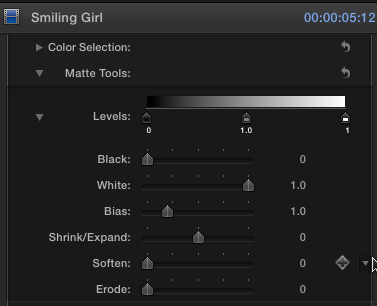
Matte Tools allow you to adjust for the translucency of an object. For instance, dragging the center Levels slider will make a translucent object more, or less translucent.
For example, twirl down Levels and drag Bias to adjust translucency. Drag Shrink/Expand to adjust the sharpness of edges. Drag Soften to feather the edges of your key. Drag Erode to increase edge transparency.
These settings will principally help when dealing with translucent objects; such as a glass of water, hair, smoke, or gauze. As always, every key is different, so feel free to play and see what happens.
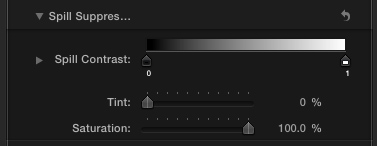
Spill Suppression compensates for talent that is positioned too close to the green background by removing the green halo around the edges of the key. It does this by adding magenta, the opposite color to green, to the image. Magenta cancels out green.
Ideally, the way to prevent green edges around your talent is to position them at least 10 feet in front of the green screen during production. If that fails, use Spill Suppression to hide the green halo. However, be sure to monitor your settings using the Vectorscope to make sure your skin tones are correct.
(Here’s an article the explains how to read the video scopes in FCP X.)
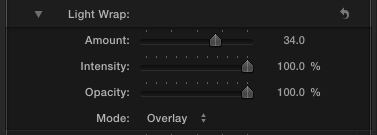
For me, a truly exciting feature is Light Wrap. This blends the colors of the inserted background with the foreground to make it look like both are sharing the same space.
This is subtle, but effective. I’ve found that changing the Blend mode to Overlay often creates more pleasing results. Try different blend modes on your key and watch the results. Whichever looks the best, is the best.
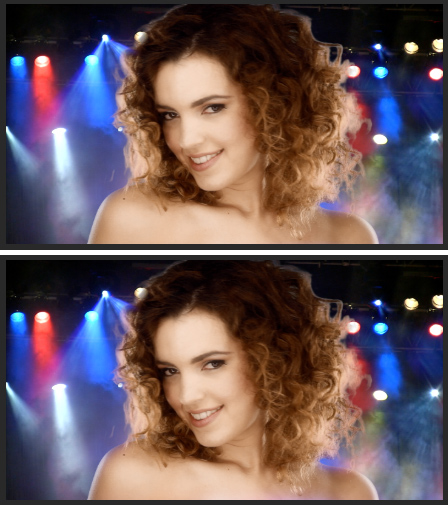
Here, the top image doesn’t use light wrap, the bottom does. Light wrap affects the edges of the foreground object. You can see this most clearly in her hair on the right side of the image and the edge of her camera-right shoulder.
THE RESULTS
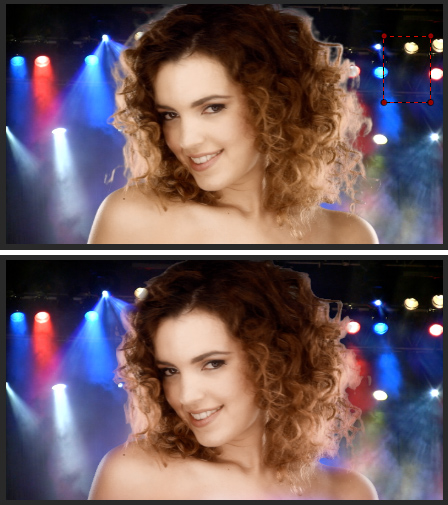
These controls create subtle differences, as these two screen shots illustrate. The top key uses the default settings for the filter. The bottom image was tweaked using the advanced controls.
In the top image, notice the white halo at the top of her head, the white blooming in the edges of her hair, the lack of background color blending over her shoulder, and the yellow cast to her skin tone. The lower image, which uses the advanced controls, is subtle, but much better.
All-in-all, the new controls inside the Chroma-key filter allow you to create some truly clean keys very quickly and modify them easily. (By the way, the FCP X Help files have lots of good tips on using all the settings in this filter.)

2,000 Video Training Titles
Edit smarter with Larry Jordan. Available in our store.
Access over 2,000 on-demand video editing courses. Become a member of our Video Training Library today!
Subscribe to Larry's FREE weekly newsletter and
save 10%
on your first purchase.
2 Responses to FCP X: Chroma-key Advanced Features
What’s the best way to solve the issue with fizzy hair? when the effect is on, the hair looks all grainy and moving, it is distracting, which tool could I use to better fix it?
Alexandra:
Sigh… Hairspray.
Seriously, frizzy hair is impossible to key – it will always tear out, especially on wider shots, with movement or at lower frame sizes. It’s a mess.
This is where some time spent planning the talent’s costume before shooting would solve a ton of problems in post. You MAY want to experiment with other keying software – Primatte is an excellent one – but my guess is that regardless of what software you use, you are not going to be happy.
Larry