 Personally, interlacing can’t go away fast enough to suit me. Unfortunately, interlacing will be with us for many more years, so we need to learn how to deal with it.
The process of converting an interlaced clip to a progressive clip is called “deinterlacing.”
Interlacing began in the earliest days of television to solve problems related to displaying moving images, and continues today because it reduces the bandwidth necessary to transmit or cablecast HD video.
NOTE: The web always prefers progressive video. However, many cable and broadcast outlets require interlacing, which is why this problem persists.

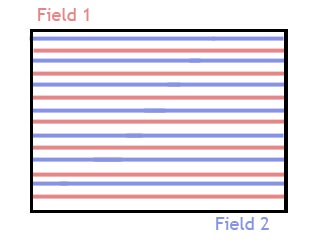
What interlacing does is divide an image into two “fields,” where all the odd-numbered lines in the image are in Field 1, while all the even-numbered lines are in Field 2. In and of itself, fields are not a bad thing. The problem is that when we shoot an interlaced image, there is a slight time difference between when the two fields are recorded. For stationary images, this isn’t a problem. But, moving objects in the frame develop thin horizontal lines corresponding to the time difference between Field 1 and Field 2.

Here’s an example of interlacing. Notice the thin lines radiating horizontally from the speaker’s moving hand?
NOTE: This is why, whenever you shoot video, always shoot progressive images. It is very easy to convert progressive to interlaced. Converting interlaced to progressive – though FCP X makes it easy – always diminishes image quality.
ADD PROGRESSIVE VIDEO TO AN INTERLACED TIMELINE
Adding a progressive clip to an interlaced timeline is easy. Just edit it in. Final Cut automatically converts it to interlaced and there is no drop in image quality.
NOTE: UHD and 4K images are always progressive.
ADD INTERLACED VIDEO TO A PROGRESSIVE TIMELINE
In either the Browser or the Timeline, select the interlaced clips you want to deinterlace.
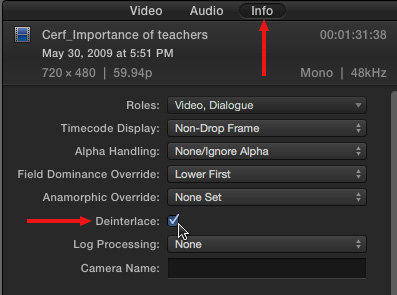
Open the Inspector (Cmd + 4) and click the Info text button at the top.

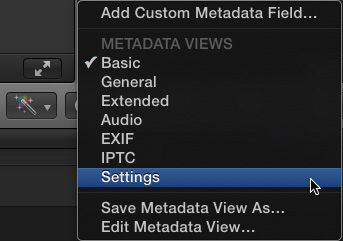
In the lower-left corner, change the popup menu to Settings.

Then, check the Deinterlace checkbox.
Fixed.
NOTE: Selecting the Deinterlace setting causes the frame rate of the selected clips to double. For example, if the original interlaced clips have a frame rate of 29.97 fps, the deinterlaced clips will have a frame rate of 59.94 fps.
VERIFY YOUR CLIPS

As you can see in this screen shot of a moving hand, deinterlaced clips will, most often, appear a bit softer than a progressive image. This is the result of the deinterlacing process.
To verify that the interlace artifacts are gone (i.e. those thin horizontal lines) set the Viewer to 100% view, Better Quality, then press the left or right arrow keys and look at the image in the Viewer.
Depending upon the speed of your system, deinterlaced clips may require rendering.
2,000 Video Training Titles
Edit smarter with Larry Jordan. Available in our store.
Access over 2,000 on-demand video editing courses. Become a member of our Video Training Library today!
Subscribe to Larry's FREE weekly newsletter and
save 10%
on your first purchase.
51 Responses to FCP X: Interlace and Deinterlace
← Older Comments-
 Matt says:
March 25, 2018 at 12:10 am
-
 Larry says:
March 25, 2018 at 9:21 am
-
 Robert Post says:
November 15, 2018 at 1:31 pm
-
 Larry says:
November 15, 2018 at 2:19 pm
-
 swstanton61 says:
February 23, 2019 at 11:02 am
-
 Larry says:
February 23, 2019 at 11:32 am
-
 Gretta Wing Miller says:
April 8, 2019 at 5:35 am
-
 Reshma GHosh says:
June 5, 2019 at 2:24 am
-
 Larry says:
June 5, 2019 at 8:19 am
-
 David Coiffier says:
April 14, 2020 at 7:24 am
-
 Larry says:
April 14, 2020 at 8:25 am
-
 John Placencia says:
May 27, 2020 at 2:28 pm
-
 Larry says:
May 28, 2020 at 7:17 pm
-
 Marina says:
October 14, 2020 at 2:09 pm
-
 Larry says:
October 14, 2020 at 2:22 pm
-
 Pawan Parkash Janveja says:
April 14, 2023 at 7:24 pm
-
 Larry says:
April 15, 2023 at 5:48 am
-
 Pawan Parkash Janveja says:
April 16, 2023 at 12:35 am
-
 Larry says:
April 16, 2023 at 4:54 am
-
 Pawan Parkash Janveja says:
April 16, 2023 at 5:40 am
-
 Larry says:
April 16, 2023 at 5:46 am
-
 Pawan Parkash Janveja says:
April 16, 2023 at 6:22 am
-
 Alexander says:
April 27, 2023 at 5:03 am
-
 Larry says:
April 27, 2023 at 5:13 am
-
 Alexander says:
May 1, 2023 at 11:25 pm
← Older CommentsHELLO.! ANYBODY??
So just spent 6 weeks editing a big job..using edits from my old imac and FCP older version..I exported the projects to the new FCPX 10.4 and new mac..Went to export the final edit and the interlace issue was SHOCKING!! I never had this problem with the same project/clips in the old mac/FCP…Does anyone know the workflow starting with formats to record to on my Canon 5D and then to the new FCP 10.4 to avoid the interlace issues??…any suggestions appreciated as I’m going to lose my mind with it due to the fact I need to hand over the job in 4 days..thanks in advance
Matt:
Actually, you did have this problem with the old version of FCP 7, however, QuickTime Player 7, by default, never displayed interlacing. It only displayed one field, which made it look like nothing was interlaced, when, in fact, it was. You needed to change an internal setting to display interlacing. Quicktime Player X defaults to showing interlacing. The problem was there, all the time.
You can solve this issue two ways:
* Edit and export your interlaced footage as normal. Then, use Compressor to deinterlace. Here’s an article that explains how: https://larryjordan.com/articles/compressor-how-to-deinterlace-video/
* Or, you can select all the clips in the timeline, go to Inspector > Info, open the Settings menu and check “Deinterlace.” This will deinterlace all clips in the Timeline at once.
My general preference is to deinterlace during compression, but try both and see which one works the best.
Larry
Hi Larry,
First off, thank you so much for this post!
I’m having a problem getting horizontal lines (which I assume is an interlace issue) off some older footage that I imported into FCP 10.4. The footage is SD 720 x 480 from a canon xl1. I’ve tried checking the ‘Deinterlace’ box under Info, but it doesn’t change a thing to the footage.
You mentioned that “the project also needs to be set to deinterlace,” but I can’t find anywhere to set the project to deinterlace.. not sure what I’m missing here, but it’s driving me nuts.
Any help is much appreciated!! Thank you again for posting such great content.
Best,
Rob
Robert:
I’ve found it best to import and edit interlaced footage as interlaced. Export a master file that’s also interlaced. This way, you have the highest quality image possible edited and saved for the future.
Then, remove interlacing during the compression stage. Compressor is good for this, as is Adobe Media Encoder and other compression applications.
Larry
Can anyone tell me where the deinterlace option is located in FCP X 10.4? Still trying to find things with the new menu layout!
SWStanton61:
Deinterlacing happens automatically when you drop an interlaced clip into a progressive project.
If you need to preserve interlacing, make sure the project, itself, is interlaced. For example, a 1080i project is interlaced. A 1080p project is progressive.
Larry
“Deinterlacing happens automatically when you drop an interlaced clip into a progressive project.”
This is exactly opposite of what you said in the body of the article!
Hi Larry ! Your articles have been a great help – exporting from FCP x for a Singapore Boradcaster and they need the master in an interlaced format. I’ve followed your instructions and changed the project timeline to interlaced so that should help. So in the Inspector – for the Field Dominance Override – I’ve selected ‘off’. Hope that shouldn’t be an issue? Pl. let me know, Thank you !
Reshma:
This should be fine – but running a quick test to make sure is always a good idea. Deliver a sample video to your broadcaster ahead of deadline and make sure it meets their specs.
SD is lower-field dominant. HD is upper-field dominant.
Larry
Hello Larry, just to bring some more light here, you stated that “SD is lower-field dominant. HD is upper-field dominant”. That is unfortunately NOT true from my point of view, and needs some corrections/additions at this point.
All SD formats are actually upper field first, at least in Europe. I don’t know about NTSC, but I’d love you to tell me. That means all analog formats (BVU, Betacam, VHS, betamax, etc…) are ALL upper field first. Even the digital formats, like D1 or DigiBeta, are all upper field first. The only exception I’m aware of is a very specific format that is DV. This one has been engineered for not real reason as such, and when you transfer data between tape and computer, you keep this lower field structure. But if you decide to digitize your tape with a regular VCR, thru its SD video output, then your dominance will be the one of your video board, that is in general upper. That means that a DV thru firewire will stays lower, but a DV digitized with regular board will become upper…
David:
Thanks for writing. I’m always happy to learn more.
Larry
Hi Larry,
I’m editing sd footage that I’ve had to un-squeeze and add a new letterbox to. When I render and then play the footage the letterbox on top and bottom are moving a bit (up and down-ish). I’m guessing this is a field issue maybe? I’ve checked the Deinterlace box and that gets rid of the letterbox movement. As a result, the footage looks interlaced, even though I checked Deinterlace.
I’ve also unchecked Deinterlace and unchecked the Color wheels or White balance. This too will get rid of the letterbox movement, but then I lose white balance and/or color wheel effects.
Any ideas on how I can fix this? I’m hoping to keep white balance, color wheels, and it be deinterlaced all without the letterbox moving.
I know you’re very busy and I greatly appreciate your time and efforts.
John:
Hmm… I’m really surprised the letterbox is moving.
Only check Deinterlace if you are editing interlaced footage. Otherwise, leave this alone.
Try this:
* Select all your clips
* Choose File > New > Compound clip
* Apply the letterbox / crop settings to the compound clip.
see if that works.
Larry
Hi Larry!
Thank you so much for your articles. When I add a progressive clip to an interlaced timeline the Final Cut do converts it to interlaced, as you said. However, in order to do that, Final Cut duplicates some frames and the television channels does not accept files with duplicated frames. Do you know any other way to convert progressive clips to interlaced without the duplicating issue?
Marina:
I don’t think FCP is duplicating FRAMES, that would screw up the timing of all of your edits.
It may be duplicating FIELDS, however. Check with your distributor to see if they have a recommended software tool or service provider who can handle this conversion for you.
Larry
Hello Mr. Jordan. Hope you All are Well.
Your videos and posts are quite helpful.
I’m a travel vlogger, and I mostly have edited my YouTube videos on Final Cut Express, which is quite similar to Final Cut Pro 7. I have experience using FCPX as well. Since my MacBook Pro 2011 has some major startup/graphics issues, I have switched to an M1 Max MacBook Pro. I probably won’t be able to use Final Cut Express anymore. I have been making newer videos with my iPhone, but a lot of my pending videos were shot in 1920 x 1080 60i (older cameras). De-interlacing videos on Final Cut Express/Final Cut Pro 7 was quite easy, but I have not been able to find much about that with the new version of Final Cut Pro.
To my understanding, I would just need to export 60i video as 1920 x 1080 29.97p to de-interlace the video (as opposed to applying an actual de-interlace filter like on Final Cut Express). Is this correct? Is 29.97p right or does it need to be 30p? For example, 60p is usually just 59.94p, but since I have shot in Full HD 1920 X 1080 60p on at least any recent iPhones I have used, I will export in 60p not 59.94p.
While using Final Cut Express with the 60i footage, the Timeline would be for 1920 X 1080 60i (exported to match 60i), and then the de-interlace filter would be applied to each video on the Timeline. While using 60i footage in the new Final Cut Pro X, does the Timeline need to be set as 1920 X 1080 60i, or does it need to be set at 30p/29.97p?
While De-interlacing on Final Cut Express, I would have to make sure the filter was only applied to the video footage, and not to the entire project, since text would even get messed up. In the case of the initial question, will anything else in the project be messed up, since an individual de-interlace filter won’t be applied?
While using Final Cut Express, I would often use freeze frames from videos to make thumbnails. After taking a freeze frame, I believe I wouldn’t be able to just apply a de-interlace filter, and export as .JPEG. It would not fix the interlacing issues. I believe I would have to take a freeze frame, export as .JPEG, apply the de-interlace filter, and export again (with any text) to get the final product. It was more work, but I am not sure if that issue was possibly a glitch. If I need to get a freeze frame from the footage on Final Cut Pro X, would I need to export twice as I was doing on Final Cut Express, or will once be enough (as in the same process as with de-interlacing video footage)?
Sorry for the long post. Most people probably don’t even record in 60i anymore, and it makes sense as to why I was not able to get much information for de-interlacing on Final Cut Pro X. Any assistance would be appreciated.
Thanking You,
Pawan
Pawan:
Hm… good questions. I haven’t actually played with 1080 interlaced footage, mostly because I dislike interlacing so much. However, here are some thoughts:
1. There is no “deinterlace” filter in FCP X
2. To remove interlacing in Final Cut Pro, right-click a test clip in the Browser and choose New Project. This creates a project exactly matching the specs of your video.
2a. Open the Project Properties (Cmd + J) then click the blue button in the Inspector and change the frame rate from 60i to 60p.
If you have the budget, an excellent deinterlace utility is Topaz Video AI, from TopazLabs.com. I’ve been using this for the last month and it delivers excellent results. Here’s my review:
https://larryjordan.com/articles/review-topaz-video-ai-a-deinterlace-and-up-scale-wonder/
See if that helps.
Larry
Thank You for replying, Mr. Jordan. I believe I had emailed You in the Past (perhaps a Year or more before), but I apparently did not get a response. This seems to be better to communicate with You!
I agree, interlaced footage is annoying. In my initial Time of Vlogging (I’ve been Vlogging since 2010), I did not know about interlaced videos, and was uploading without de-interlacing. When I started using Final Cut Express, I found out about it, since I noticed the uploaded video looked out (I believe it took me 2 Years or so to find out about interlaced videos).
If I add it to the project, would it set the Timeline as progressive or interlaced?
Isn’t 60i actually 30p or 29.97p? Wouldn’t exporting to 60p double the frames?
To my understanding there are two methods. Either I could check off a deinterlace checkbox and then export the video (which is apparently only good if I just want to convert an individual clip from interlaced to progressive), or I could apply the 60i footage to a 30p/29.97p Timeline, and export as progressive without checking off the deinterlace checkbox. It seems the latter is correct for YouTube. What do You suggest?
Final Cut Express/FCP 7 had it so I could just apply a de-interlace filter. In Final Cut Express, the Timeline would be set as 1920 X 1080 60i, I would apply the filter to the videos, and export the project. If the Timeline is set in 60i, the exported video would apparently still be interlaced.
Thank You for the suggestion. I actually do not wish to spend more money with all this. I am happy with the results I have gotten in the Past. Hopefully, the current version of FCP will have no issues. Also, I just want everything to be handled by FCP. I am glad iPhones shoot in Progressive Mode. Too many issues with interlaced video.
For my Full HD 60p videos shot on my iPhone, should the Timeline/Export be set at 59.94 FPS, or 60 FPS? I was told by someone over the phone in Apple Support that since iPhone shows 60 FPS, I should export in that format in FCP. Does it make a difference?
Sorry for putting “Hope you All are Well” at the beginning of my initial post.
I really appreciate All the help!
Thanking You,
Pawan
Pawan:
These are all excellent questions.
60i takes two field to create a single frame. So 60i (which is actually 59.94) creates a frame rate of 29.97.
When 3rd-party software deinterlaces, they create a complete frame for each field. When FCP deinterlaces, it blends the two fields into one.
So, for interlaced footage, CREATE the project first, then add media to it. Otherwise, the project will conform itself to your footage:
Specs:
Video: 1080p HD
Resolution: 1920 x 1080
Rate: 29.97
Rendering ProRes 422
For video shot on an iPhone, the easiest is to right-click a video clip in the Browser, then choose New Project. It will create a project that exactly matches your iPhone footage.
Larry
Thank You, Mr. Jordan! This is All Valuable Information!
I think a lot of my confusion comes from assuming that 30p is the same as 30fps. I thought 30p meant 30fps in progressive mode. Could be a mistake. In Your opinion, for YouTube, while setting the Timeline format, should I let it automatically set it or choose the format on my own (for 1920 X 1080 60i footage)?
Would You set the Timeline at 30p/29.97p or 60p/59.94p?
Then should the export format match the Timeline format?
I just don’t want to mess this up.
Thank You.
Pawan
Pawan:
If you want to force interlaced footage to progressive, create the project first using Custom Settings, then add media. For interlaced footage, set the frame rate to 29.97 fps.
If you want the project to match your media, right-click a clip in the Browser and select New Project. For progressive footage shot on an iPhone, the frame rate should automatically set to 30 fps.
Finally, do a test. Export a short test file that you think looks good, then post it to YouTube. Watch it there. If it looks good, it is good. Once your test is complete, delete that file and do it for real.
Larry
Thank You, Mr. Jordan. I did not see a reply option on Your previous reply, so I decided to reply here.
That does make sense! I will have to do some tests, and decide.
On my iPhone, I shoot in Full HD 60 fps. I personally think 60 fps is better than 30 fps, especially for Travel Vlogs.
Thank You for All the help!
Pawan
Dear Larry, I really was suprised interlaced Formats are still in use, but now I hope to find some answers with your expertise: I created Videos for an exhibition and want to play them on LG-Displays. I did not manage to present the short clips in the display´s webbrowser fluently. The Tech-Department now told me, I should transfer the progressive Files to interlaced. I was shocked, because I remember I did this 20 years ago a lot but the other way round.
Do you have an idea how to convert and what to keep an eye on? I am using FCP X, Compressor…
Thanks, Alex
Alexander:
I don’t trust the answer from your tech department. NO computer monitor requires interlaced video. OLD, and I mean 20 year old, TV sets require interlaced, but nothing newer than that.
While computer monitors can play interlaced, they don’t require it. They all support progressive playback. So, first, I would get a second opinion.
Compressor can easily create interlaced video from progressive but it will look the same. (Use the 1080i compression setting.) The timing offset of interlaced fields happens when the video is recorded, not when it is played back. This is why film transfers to interlaced video always look good. Technically, the video may be interlaced, but it looks progressive.
I would investigate your playback problem more thoroughly. Based on what you’ve told me, I don’t think you are being given accurate information.
Larry
Thank you very much for your profund answer and taking care of my problems. I will dig deeper….