I first wrote this article when Apple Final Cut Pro X was in version 10.2. Since then, FCP X has gone through a major interface overhaul, and many minor tweaks. So, I decided to take the first article and update it for today.
NOTE: Here’s a link to the original article from 2014.
Did you ever have a problem where the audio levels you recorded for your talent are too low, or vary wildly in level? Yeah, me too. All the time. We can add audio keyframes to each clip and try to smooth things out, but, frankly, life is too short. Though, truthfully, keyframes are the most accurate way to change audio levels – they just take a lot of time.
A while ago, I discovered and audio effect that can make this task a LOT easier: the Limiter. In this article, I’ll show you how to use it in Final Cut Pro X.
NOTE: Personally, while the audio processing effects in FCP X aren’t too bad, I find that the precision and control Adobe Audition provides is superior to both. While learning an audio app can be intimidating, the time you invest pays major dividends in making your audio sound really, really good. (Here’s a link to my training on Adobe Audition.) ProTools is another excellent audio package, but I’ve never had success working with their iLok copy protection so I haven’t used it in years.
EXECUTIVE SUMMARY
The Limiter effect is my tool of choice in FCP X for boosting and smoothing levels, combined with roles and compound clips. What we will do is assign roles to all dialog clips, then build that role into a compound clip and apply a Limiter filter to it.
Also, while it is a good idea to boost and limit dialog, interviews and narration, it is generally not a good idea to do the same with either sound effects or music.
NOTE: Here’s a companion article I wrote that is the second half of the “good audio” equation: using EQ to shape your sound to make it warm a voice and make it more intelligible.
BACKGROUND
The human voice is unquestionably a challenging instrument to record. Whether singing or speaking, it has a huge dynamic range; meaning that it can vary from loud to soft back to loud in an instant. If you are lucky and working with professional voice actors, that dynamic range is fully under control. Most of the time, though, we’re just hanging on for dear life.
There are two key rules you need to keep in mind about audio when you are mixing:
This means that during our final audio mix, we need to make the levels consistent so that we can clearly hear what’s being said, yet make sure all levels always stay below 0 dB.
AN ASIDE ON MEASURING AUDIO
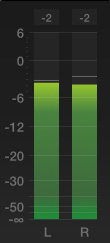 Audio pros, and those folks that need to deliver audio for professional distribution (broadcast, cable, or digital projection), measure levels using “average levels,” or the relatively new standard of LKFS. Current standards in both the US and Europe mandate that levels not exceed a specific LKFS for program content; generally around -24 LKFS for a broadcast program.
Final Cut Pro X does not provide built-in meters for measuring average levels, though it should. I consider the lack to be a major limitation. However, there are plug-in effects from MeterCast and Waves among others that you can use.
NOTE: Premiere and Audition both provide LKFS and peak audio level measurement built into the application. This is one of the reasons I prefer using Audition for my mixes, rather than Final Cut.
For this reason, this article will talk about “peak” levels, which are suitable when mixing audio for the web. Final Cut measures peaks using dBFS; which stands for “deciBels Full Scale.”
GET STARTED
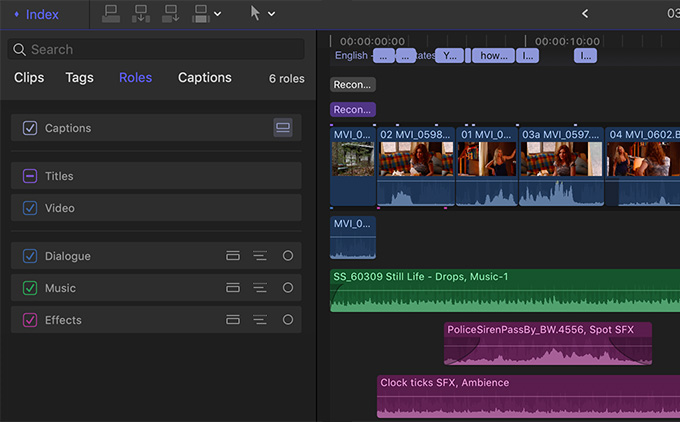
Here’s a portion of a short dramatic scene. It has a dialog track synced with video, along with multiple effects and music tracks. I’ve assigned a role to each clip: dialogue, effects or music. (This technique can be used for far more clips and tracks, I’m just keeping this simple to explain the process.)
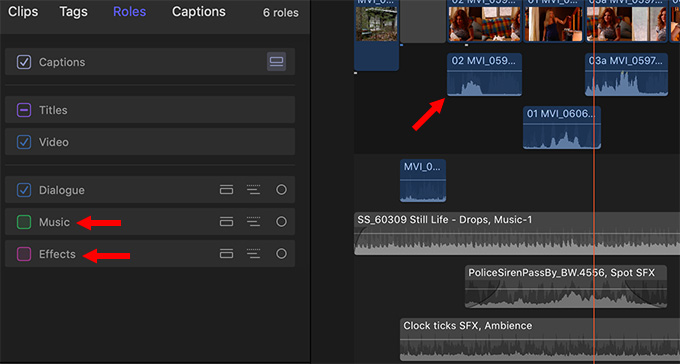
Once you’ve assigned Roles, a fast way to get a sense of your levels is to uncheck both Music and Effects roles. This silences all clips assigned to that role, allowing you to hear just the dialog. Since dialog is what we tend to be most concerned about, this is good way to make sure levels are set correctly.
NOTE: Changing audio roles has no effect on video clips.
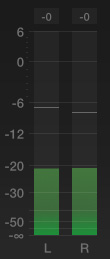
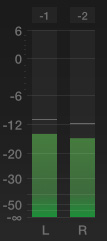
When I played the project, the selected audio levels peaked around -20 dB. This is WAY too soft for principle dialog!
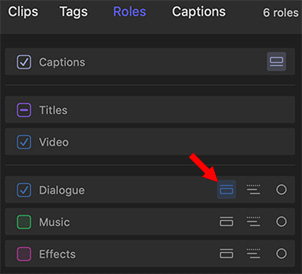
Here’s where roles can really help. Click the Show or Collapse Lane button for Dialogue in the Timeline Index.

This groups all the dialog clips together.

Select them, then choose File > New > Compound Clip.

In the Compound Clip dialog name this group something that makes sense to you. If you are creating a lot of these, put them all in a “Compound Clip” event. For simpler projects, like this one, I’ll store them with project files.
The selected clips in the Timeline are now replaced by the compound clip.

Now that we’ve prepped the clips, it’s time to apply and adjust the Limiter effect.
NOTE: You can still access the individual clips in a compound clip by double-clicking the compound clip. This opens it for editing. To permanently break the compound clip, select Clip > Break Apart Clip Items.
WHAT THE LIMITER EFFECT DOES
What the Limiter effect does is boost softer passages of audio more than louder passages, without having any audio level exceed the maximum level you specify in the effect. (This is where it gets it’s name: it “limits” how loud your clips can get.)
In our example, limiting has the effect of making all dialog levels louder and more consistent, without any risk of distortion. AND, without affecting any of the music or effects audio.
There are two limits that I recommend:
NOTE: The reason I don’t limit to 0 dB is that I’ve been told that MP3 compression is optimized for levels around -6 dB. Also, leaving a bit of headroom is always a good idea in general.
APPLY AND ADJUST THE LIMITER EFFECT
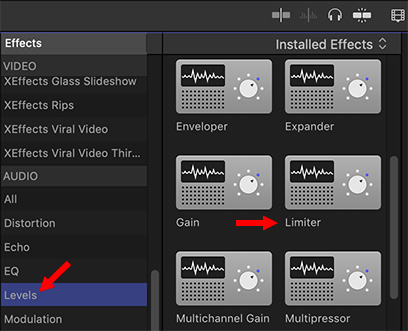
Select the compound clip, if it isn’t still selected, and open the Effects Browser (Cmd+5). Scroll down and select the Levels category. Drag the Limiter effect on top of the selected compound clip.
NOTE: There are several “Limiter” effects. Pick the one that is NOT at the top of the list.
This applies the effect to the group of clips contained by the selected compound clip.
NOTE: You could also apply this effect to individual clips. The problem is that you would need to adjust the settings of this effect for each individual clip. Using a compound clip allows you to apply the effect once and have it apply to all clips in the compound clip.
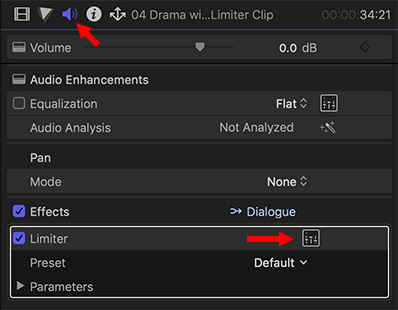
Again, with the compound clip still selected, click the Audio Inspector button at the top of the Inspector. Click the small icon to the right of the Limiter effect.
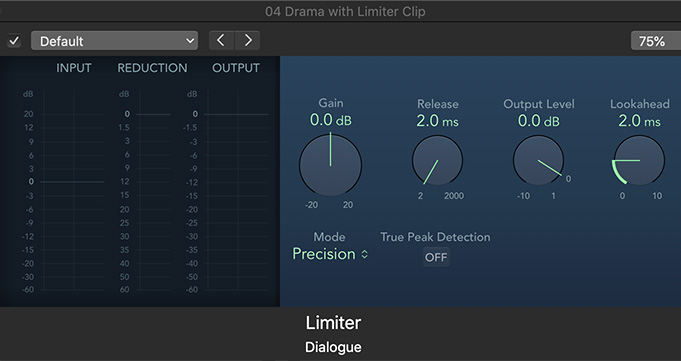
This opens the Limiter effect interface.
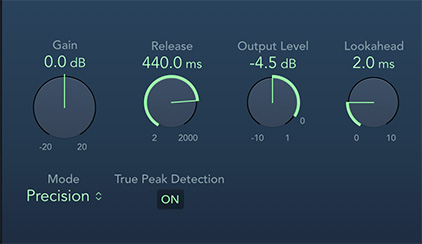
There are six settings we need to tweak:
There are two critical settings that vary with each project:
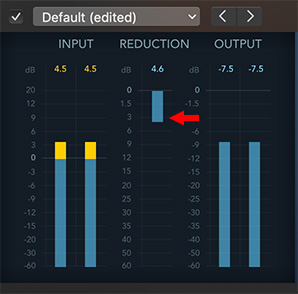
Here’s the secret to adjusting the filter. Play your clips. Then, while the clips are playing, adjust the Gain so that the Reduction setting, in the middle, is bouncing around 1 – 3 dB. This provides maximum amplification, without excessive limiting, which can sound fat and “blatty.”
That’s it. Try this and you’ll be amazed at how much better dialog, interviews and narration can sound.
NOTE: Remember to adjust the filter when all other tracks are silent or muted.
EXTRA CREDIT
In some cases, you’ll still need to adjust a few individual clips which may be a bit loud or, more likely, soft. The good news is that now, you are only adjusting for the exceptions, rather than the entire mix.
What I generally do is open the Compound clip and adjust the clips inside as necessary. I almost never apply keyframes or adjustments to the Compound clip, just the clips inside it.
SUMMARY
I am a huge fan of the Limiter effect and its cousins, the Compressor and Multi-band Compressor, because they simplify the process of setting levels and preventing distortion. While I prefer to use multi-band compressors in Audition, I’ve found that, in Final Cut, the Limiter effect is more effective to use.
For simple projects like this, creating compound clips and applying the Limiter effect makes my audio life easy and helps me get projects done on time and without excessive audio stress.
31 Responses to FCP X 10.4: Boost and Smooth Audio Levels – Revised
← Older Comments-
 Jefrey Siler says:
September 18, 2020 at 2:06 pm
-
 Larry says:
September 18, 2020 at 2:33 pm
-
 Jefrey Siler says:
September 20, 2020 at 3:29 pm
-
 Laurentiu Prisacariu says:
October 7, 2020 at 1:46 am
-
 Mary says:
October 23, 2020 at 6:46 am
-
 Larry says:
October 23, 2020 at 7:04 am
-
 Andrew says:
July 26, 2021 at 4:58 am
-
 Larry says:
July 26, 2021 at 8:39 am
← Older CommentsHey Larry great article. Would you suggest a ballpark of certain db’s for the
* talking head
* music bed?
Thx!
Jefrey:
For talking heads:
https://larryjordan.com/articles/final-cut-pro-x-how-to-use-eq-to-improve-your-audio/
For music, I would not use limiters or compressors, but I would use a Channel EQ to shape the sound for voice:
https://larryjordan.com/articles/channel-eq-makes-narration-sound-great/
Larry
Thanks Larry! yer the best
super mega useful. thanks a lot a lot a lot 🙂
Super helpful as always!!! I am still peaking with the input level causing distortion. I have followed your instructions.
Mary:
Your note doesn’t give me enough information to be helpful. Take some screen shots of your setup and contact me directly at: Larry@LarryJordan.com.
Thanks,
Larry
Any idea why the Limiter output meter and my audio level meter in the main display are not showing the same levels? I set the limiter to -4.5 and on my limiter output meter this is where it is hitting and not exceeding as expected, but on my main level meter it is much lower, peaking at around -20. I was expecting them to both be displaying the same output level in which case I don’t understand the discrepancy. Thanks.
Andrew:
It is not unusual for levels to vary ±3 dB due to the differences between stereo and mono. But 20 dB is just wrong! I don’t understand this discrepancy either. Time to call Apple Support.
Larry