
![]() The last time I wrote about creating freeze frames (also called “still frames”) was about two years ago. Since that time, Apple has added new features to Final Cut Pro X that make creating freeze frames faster and more flexible.
The last time I wrote about creating freeze frames (also called “still frames”) was about two years ago. Since that time, Apple has added new features to Final Cut Pro X that make creating freeze frames faster and more flexible.

In fact, there are three ways we can create freeze frames in the application today:
Each has its uses and here’s how they work.
NOTE: To illustrate this process, I’m using footage shot by Jim Walker and Lobsters Gone Wild Productions. Thanks, Jim!)
CREATE HOLD FRAMES
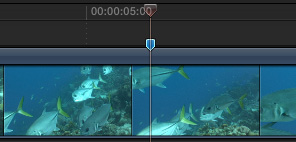
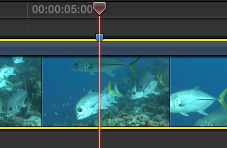
To create a Hold frame, put your playhead (or skimmer) on the frame in the Timeline that you want to hold. (To keep from driving all of us nuts, I will use the terms “Hold,” “Freeze,” and “Still” interchangeably; unless I’m referring to a specific menu option.)
NOTE: The marker is completely unnecessary to this process. I’m using it here so that I can find the same frame again.
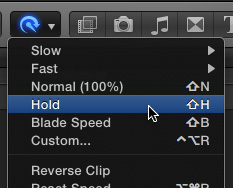
Select the clip containing the frame you want to freeze, then choose either:
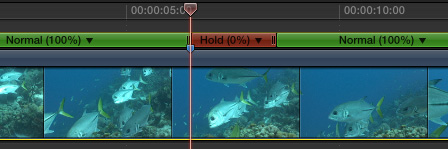
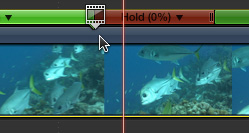
This creates an in-line Hold frame – indicated by the red bar above the clip – starting at the position of the playhead. It has a default duration of two seconds.
The benefits of a Hold frame are:
The disadvantage to this technique is that you can’t move the freeze frame somewhere else in the Timeline. It is not a stand-alone clip.
MAKING ADJUSTMENTS

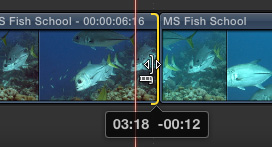
To adjust the duration of a Hold frame, grab the “thumb” on the right side of the red bar and drag.
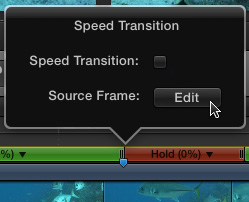
To change the frame being held, double-click the “thumb” in the green bar just before the start of the red bar. Then, click the Edit button.
NOTE: If you are using a marker to indicate the frame, as I am, you may need to remove or navigate around the marker to successfully double-click the green “thumb.”
Then, and this is VERY cool, drag the small window icon left or right to change the selected Hold frame. This is FAR easier than creating new freeze frames, as you’ll learn below.
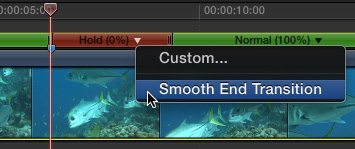
If you want to have the freeze frame gradually return to normal speed, click the small, downward pointing arrow in the red bar and select Smooth End Transition.

This creates a short speed-ramp from still to 100% speed (or to match the speed of the following segment). You can change the duration of that ramp by grabbing an edge of the ramp in the Retime bar and drag it left or right.
To hide the display of the Retiming Editor, either click the “X” in a circle next to the Retiming Editor, or type Command+R to toggle the display on or off. Hiding the Retiming editor does not alter or remove any of your speed changes.
To remove a Hold frame do one of the following:
All-in-all, Hold frames are the fastest and most flexible way to create a freeze frame in a clip. But, when you need to create a freeze frame that’s a separate clip, we have two other options.
NOTE: This process works for clips in the Primary Storyline or as a connected clip. The key point is to select the clip containing the frame you want to freeze before creating the Hold frame.
CREATE A FREEZE FRAME IN THE TIMELINE
Another way to create freeze frames in the Timeline is to put the Playhead (or skimmer) on the frame you want to freeze, then type Option+F (or choose Edit > Add Freeze Frame).
Final Cut instantly creates a separate clip containing the freeze frame, with a default duration of four seconds; or whatever duration you’ve set as the still image duration in Preferences.
You trim the clip the same as any other clip, by grabbing the edge and dragging. However, you can’t change the frame that gets frozen, as you can with a Hold frame.
The benefit to this approach is that you have a separate clip containing the freeze frame, which can be moved elsewhere in the Timeline.
The disadvantages are:
You remove a freeze frame the same as any other clip.
However, there’s a third option which provides the most flexibility, but takes a couple of extra steps.
CREATE A FREEZE FRAME IN THE BROWSER
As with the other two techniques, start by placing the playhead (sigh…, or the skimmer) on the frame you want to freeze. Then, select the clip containing the frame you want to freeze.
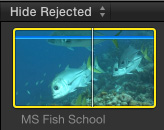
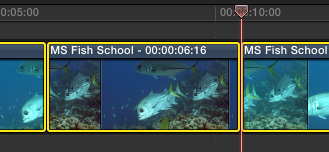
Type Shift+F. This selects the source clip of the Timeline clip in the Browser and matches the position of the In, Out and Playhead. This also selects the Browser.
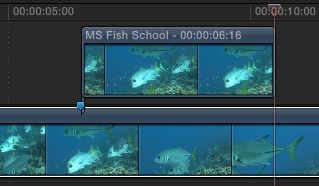
With the Browser selected (active), type Option+F (or choose Edit> Connect Freeze Frame). This edits a freeze frame based on the Browser clip, matching the position of the playhead in the Timeline, into the Timeline as a connected clip at the position of the playhead. (Try it and you’ll see this is easier to see than to describe.)
As long as you don’t move the Timeline playhead after you type Shift + F, you have a perfectly placed freeze frame as a connected clip. (Note how the start of the connected freeze aligns with my marker? Again, the marker is just an indicator and not needed for this effect to work.)
This technique provides a stand-alone clip containing the freeze frame, which can then be moved anywhere in the Timeline, without breaking the original Timeline clip.
The benefit to this technique is that you have a separate clip containing the freeze frame which you can trim, move, adjust or add effects to just like any other clip. I often use this technique when I need to use a still frame to cover video that I don’t want the audience to see, but I still need to hear the dialog.
You remove a connected freeze frame the same as any other clip.
The disadvantages are:
NOTE: If you’ve deleted a freeze frame and want to rejoin the two segments of the clip that were cut when the freeze was inserted, select the clip on either side of the edit and choose Trim > Join Clips. The edit is healed.
SUMMARY
I use a LOT of still frames in my training videos to illustrate specific points. So, I use these techniques a lot. I’ll use the Hold frame when I want the still integrated into the main clip. And I’ll use the Browser freeze frame when I need a separate clip to cover material below it.

2,000 Video Training Titles
Edit smarter with Larry Jordan. Available in our store.
Access over 2,000 on-demand video editing courses. Become a member of our Video Training Library today!
Subscribe to Larry's FREE weekly newsletter and
save 10%
on your first purchase.
8 Responses to FCP X 10.1: Create Freeze Frames
Awesome. I have been using either hold or share which is a real pain. This is really good stuff. Using it already
Excellent. Simple, clear and useful.
Thanks for the description of these 3 techniques. I’ve used the 2 freeze frame techniques in film animation work (e.g. replace scratched frame with a good one following or preceding it).
With the freeze frame technique in the timeline (select + opt-f), there are 2 artifacts I’ve noticed. One: the frozen frame clip replaces the frame at the playhead, so if the freeze frame clip is removed, there is one frame missing and the Trim/Join clip won’t work unless the missing frame is first added back. Two: the frozen frame clip contains all effects permanently– the effects present in the selected frame are also frozen in the new clip and no longer adjustable.
With the freeze from the browser (Shft-F, Opt-F) there is no removal of frames from the timeline, and a copy and paste of attributes (if any effects are used) from timeline to new connected clip is needed to match.
I have resorted to screen grabs of a desired frame in the Viewer to generate a freeze frame that does not ripple the Timeline. I wish a shortcut to creating a connected freeze frame clip were in the Edit menu!
Les:
It isn’t in the Edit menu, its in the Clip menu. Clip > Retime > Hold frame. This creates a connected freeze frame at the position of the playhead in the selected clip.
Larry
I might add that the Hold frame also allows you to alter the image ie effects added or color board, etc. and the hold frame will be altered as well.
Point is if you create a freeze frame via Add Freeze Frame Approach FCPX makes a new hunk of media with the current status of the clip it came from so if you had an effect on it, that gets “baked into” the freeze. making changes to the image and the freeze difficult at best.
I didn’t have much difficulty doing the freeze frame, pretty straightforward, but when I do, the audio keeps playing and becomes out of sync by the amount of time I hold the frame. Is there an easy way to hold both audio and video at the same time and edit the length of both so that they remain in sync?
Jordan:
The problem is that freeze frames, by definition, are not linked to audio. You might see if a Hold Frame works, but only if the audio is synced to the video. If the audio is a separate clip, you’ll need to cut the audio – or extend it – to maintain sync.
Larry