
![]()
[ Updated July, 2014, with additional details indicated below. ]
With the 10.1.2 update to Final Cut Pro X, Apple has further enhanced media management within the app. In this article, I’ll show you the latest features and compare them to the earlier version in 10.1.
In spite of its lowly version number, the 10.1.2 update actually packs in a lot of new features. While this article discusses media management, future articles will showcase other new goodies Apple added. Read this article for a bullet list of what’s new.
THE GOOD NEWS
The good news is that everything you’ve learned about Libraries, Events and Projects is still true. What Apple has done is extend how we save, access, and delete media stored in a Library and what we can do with that media once it is in Final Cut Pro X.
The biggest mistake many editors make in working with media in Final Cut Pro X 10.1 is opening the library bundle and moving or deleting files inside it. While this approach allows access to individual media files, moving files in the bundle didn’t update the FCP X library database which often caused all kinds of problems.
In the 10.1.2. update to Final Cut Pro X, we can now view and set storage locations for each library using the new Library Properties inspector. This gives us the option to store your files inside or outside the library, at the location you choose.
Specifically, we can set storage locations for three categories of files:
These changes mean that we don’t need to do anything different. Instead, they allow us to do more. Let’s take a look at the specifics.
LIBRARY PROPERTIES
In FCP X 10.1.2 we can view and set storage locations for media files, cache files, and library backup files using the Library Properties section of the Inspector. We can also gather all files referenced in a library and store them inside a library (“consolidate”). This makes it easy to put all our files in one place for archiving or to send to another editor.
UPDATE – July 19, 2014
Library Properties are designed to be “Set and Forget.” When you create a new Library, it will inherit the Library Properties of the existing, active library. However, you can change Library Properties at any time (Control+Cmd+J).
NOTE: When Library Properties are changed, existing files are NOT moved. The changed settings only affect new files.
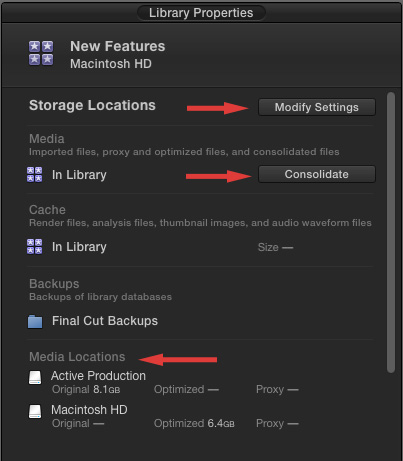
Select a library in the Libraries list, then choose File > Library Properties (Shortcut: Control + Cmd + J) or simply open the Inspector with a library selected. This displays the brand-new Library Properties for the selected library.
Here we can see where media and cache files are stored. However, what I find REALLY useful is the Modify Settings button.
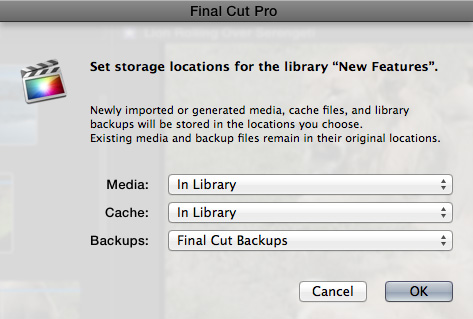
Click Modify Settings to specify where we want to store media, cache and backup files. What’s new is that we can vary the location of all of these files by library. No longer are we locked into system-wide settings.
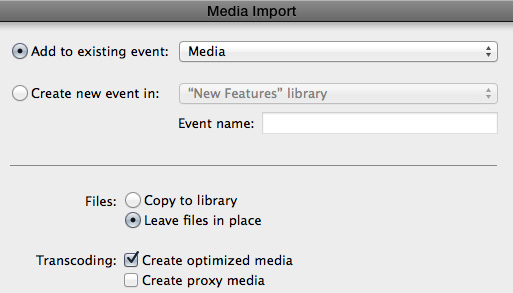
The Media Files location is relevant when importing media. Now, when we select to Copy Files to Library, the files are stored in the location specified in Modify Settings. This is useful when we want to transcode media but need the transcoded media stored outside the library file so that they can be used by more than one editor.
NOTE: Here’s an article that describes how multiple editors can collaborate and share media.
In the past, we would transcode the media, then move it out of the Library bundle manually; this caused all kinds of problems by creating missing or unlinked media.
Cache files are files created by Final Cut, such as render and analysis files. Cache files are unique to each individual library, so they can’t be shared between editors who are editing at the same time. The ability to store cache files externally is very useful if you want to place them on a fast local flash storage for quick read/write access or on a separate drive so you can keep the cache files and media files together for handoff between editors.
UPDATE – July 19, 2014
While, generally, it is a good idea to store cache files inside a library, a benefit to storing cache files externally is to save time when multiple editors need to access the same media, or when a solo editor needs to reference media between two different libraries.
This is especially true for analysis files. Analysis can often take a long time. By storing cache files externally, each editor does not need to separately analyze the files. Instead, one editor can analyze once, then share that data between editors.
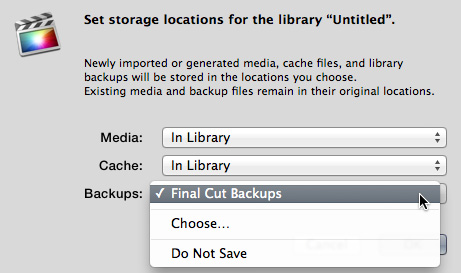
Library backups store copies of library databases, but NOT media, in the location you specify. Library databases include a list of all media and cache file names and locations, as well as event, keyword, and project data. In the past, library backup locations were set globally. Now, we can set library backup locations for each library. (The screen shot above is from the Library Properties panel, which allows us to set locations for library backups and generated media.)
I recommend storing library backups on a different drive from the location of the library. Generally, these backups are small and don’t require fast storage for playback. Most of the time, I store them on my boot drive; but you can store them anywhere you prefer.
UPDATE – July 19, 2014
Once you pick a location to store Library Backups, don’t move the files manually. Library backups store relative path names to all media and cache files. Moving a backup manually can break those links.
Storage locations for any library can be changed at any time. Changing the location does NOT change the location of any existing media, cache or backup files. (To change the location of existing media, see the section on Consolidation further below.)
NOTE: Because media can now be imported and stored separately from the active library, this means that an editorial assistant can import and optimize media and store the resulting files outside their active library. This simplifies the process of editorial teams working on the same media.
RESTORING A LIBRARY BACKUP
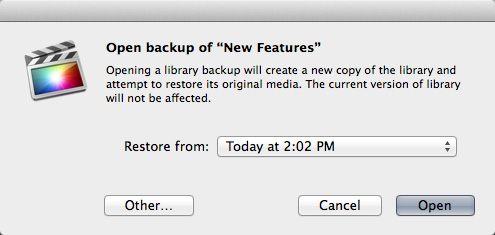
To restore a library backup, choose File > Open Library > From Backup. This creates a new library inside Final Cut which you can use to compare the backup with your existing library and make any necessary adjustments.
CONSOLIDATE A LIBRARY
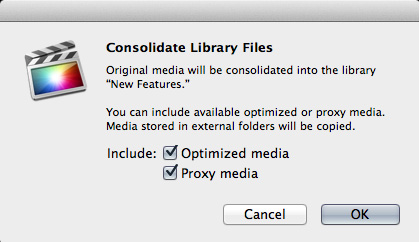
We can consolidate camera original, optimized or proxy media from different locations into a single library bundle by clicking the “Consolidate Media” button, and specifying the media we want to move.
Quoting from Apple’s Media Management white paper: The Consolidate command collects all of the media associated with a particular library, event, or project into a single storage location (which you set in using the Library Properties inspector). This location can be either internal (managed) or external to the library file. Consolidating is an easy way to collect all media for housekeeping or archiving.
The Consolidate button in the Library Properties inspector acts on the current library only, but the File > Consolidate [item] command can be used on a library or on one or more events and projects.
NOTE: You can also consolidate libraries using File > Consolidate Libraries.
MANAGED VS. EXTERNAL MEDIA
The concept of “managed” vs. “external” media remains the same as the earlier version of Final Cut. Managed media is media that is stored inside the library. External media is media that is stored outside the library, but referenced inside it using symlinks.
Managed media is best for new editors that are getting used to editing media, single editors working on smaller projects, or where media does not need to be shared between projects.
External media is best when you need to share or reuse media between editors or projects.

When importing media, if you select “Copy Files to Library,” you are selecting to store your media in the location specified in Library Properties. If that location is inside the library, then you are creating “managed media.” If this location is outside the library, you are creating “external media.” “Leave files in place” always creates external media.
NOTE: “Leave Files in Place” will be grayed out when Final Cut Pro X can tell that the files are coming from a camera card or the volume created by cloning a camera card. It’s not a good idea to leave those files in place, as the files reside within the camera manufacturer’s proprietary folder hierarchy (and metadata structure). Also, editing directly from the SD card does not yield good performance.
In which case, FCP X requires you to copy the files off the card or volume, which is why the option is grayed out. Because FCP X handles that copying in the background, you can begin editing immediately, even though the copying is taking place.
GENERATED MEDIA
Generated media includes render files, optimized and proxy media files. Normally these are stored inside the library, though using Library Properties, we can now store these files anywhere.

New with this release is the ability to delete all generated files; in the past, we could only delete render files. Choose File > Delete Generated Media, then use the check boxes to specify which media you want to delete.
The big advantage to deleting these files using Final Cut is that the library database is updated with the file changes, so that media doesn’t go offline. Also, any generated files that Final Cut needs for your project that are accidentally deleted will be automatically re-created by Final Cut. This is particularly true for render files.
NOTE: In the event render files are not created before export, Final Cut will recreate them as part of the export process.
MERGE EVENTS
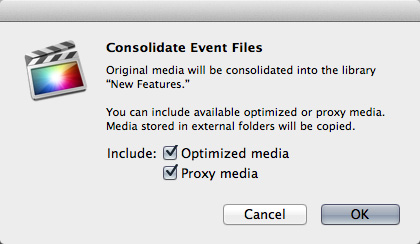
We can also merge multiple events contained in a single project using File > Consolidate Events. This allows us to quickly combine media from multiple locations into one. And, again, this dialog allows us to specify which files we want to merge. This also resolves problems with duplicate clips, in that only one copy will be retained and all links to the duplicated clip will be resolved to point to the single, new copy.
ARCHIVE A PROJECT
While project archiving is not new with this release, as long as we are talking about media management, I want to share the process with you here. You can only archive elements contained within a single library; for example, a project or a group of events. For example, selecting a project includes both the project data and all media used by that project. Selecting an event exports all media, whether it is used or not.
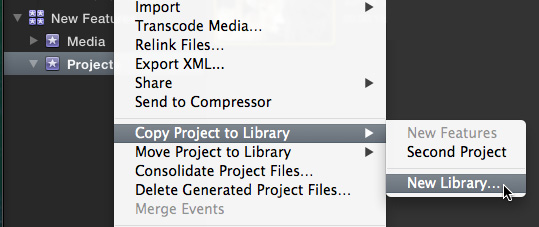
In the case of archiving a project, choose File > Copy [ Project ] > New Library. Give the new library a name and storage location, then click Save. This displays a second dialog box.

Then click OK. Render and analysis files are not copied when you create the new library. Final Cut will create new files if it needs them in the future.
EXPORT AN XML FILE OF AN ENTIRE LIBRARY
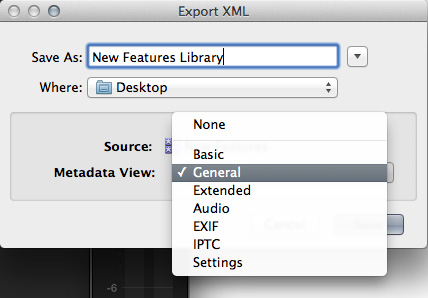
Also new with this version is the ability to export an XML file of an entire library. This is useful when transferring assets from Final Cut Pro X to an asset manager, such as Cantemo Portal.
Select the library you want to export and choose File > Export XML. Since these files are going to asset management software, it is generally a good idea to include metadata. Check the asset management software for which metadata view to select; in this example, I’m selecting the General view.
SUMMARY
This latest version of Final Cut Pro X gives us a lot more flexibility in how we create, manage and delete our media files. What I especially like is the increased options we have when creating optimized media in terms of storage location. This greatly simplifies sharing media between projects and teams.
It is also worth mentioning that these new options also help multiple users share proxy files. Especially over slower networks, this can save a huge amount of time because each user doesn’t have to generate proxy files at their local workstation.
EXTRA CREDIT
Here’s a link to the new features in this version on Apple’s website: http://www.apple.com/final-cut-pro/whats-new/
Here’s a link to a detailed white paper on media management FCP X: http://images.apple.com/final-cut-pro/docs/Media_Management.pdf

2,000 Video Training Titles
Edit smarter with Larry Jordan. Available in our store.
Access over 2,000 on-demand video editing courses. Become a member of our Video Training Library today!
Subscribe to Larry's FREE weekly newsletter and
save 10%
on your first purchase.
49 Responses to FCP X 10.1.2: What’s New in Media Management? [u]
← Older Comments-
 sethjake says:
September 9, 2014 at 7:39 pm
-
 LarryJ says:
September 9, 2014 at 7:52 pm
-
 Boris Jansch says:
September 11, 2014 at 12:10 pm
-
 stefan (from Holland) says:
October 11, 2014 at 1:24 pm
-
 LarryJ says:
October 11, 2014 at 1:26 pm
-
 window cleaning gold coast qld says:
December 15, 2017 at 3:18 pm
← Older CommentsLarry,
Can you take me through the steps of converting a Managed Library into one where all the media is external to the library?
SethJake:
This article explains everything you need to know:
http://www.larryjordan.biz/fcp-x-convert-managed-to-external-media/
Larry
Hi Larry,
I have a real head scratcher of a problem. In a nutshell, I have a managed library containing 18 events! The reason being that each event is a different company, and I make films for the private equity firm that owns these companies. The films reference material from most, if not all, of these events. So the question is how can I create smaller, easily backup-able libraries that don’t slow my system down? Ideally I would have say 4 libraries and one exclusively for projects, but the problem as I understand it is that any clips that I add to the project from external libraries will be copied ie duplicated into the projects library. I could of course just have one massive external media folder and create separate libraries (as you suggest) but that doesn’t help me with the backing up process because I don’t want any libraries over say 1.7TB so that I can easily copy them over to a little passport drive but as it stands, this 18 events library is over 4TB. Any ideas? I’d be happy to send you a screen grab to make it clearer.
Thanks,
Boris
Hi Boris,
I am dealing with similar problems and in addition I want to be able to edit on different computers at the same time as well and use custom made motion templates for each company / event.
So I create a big central raw video repository and link the events media to that. I can copy in between events, and only the reference is copied. So all files are only saved once.
This way I have one big storage and multi libraries / events referencing that storage. In addition I also backup original media to a separate location (saved as a card backup).
Render files are based on a central (local) location on the computer used (SSD) as are the backups.
For backup purposes at the end, you can use the backup / consolidation function of fcpx and save the event/project with the original media used (leave the render fils out of the backup).
maybe this can be of help.
PS I use a central HDD connected with thunderbolt and I connect the laptops used through a thunderbolt bridge. You can not edit on the central drive but files can be referenced (read) OK. All other things are done ‘ locally’ on USB3 hdd. So all material is portable and only the rende files are local and can be rendered again on a different computer if you switch. Resulting libraries are very small compact and easy to move around.
greeting stefan
PS Larry do you concur
Stefan:
This is basically fine. I agree with storing media separate from libraries when the media needs to be shared. However, you don’t need to store everything in a single folder.
Use as many folders as you want. As long as the media is outside the library, any new libraries will link to the media, not copy it into the library – as long as you select “Leave Files In Place,” when importing into FCP X.
Larry
You have got very good info in this article.