
 In this article, I’ll illustrate how to export a clip with a transparent background in both Final Cut Pro X and Final Cut Pro 7.
(The process of saving transparency information with a clip is called “saving a clip with an alpha channel;” where “alpha channel” means “transparency information.” In fact, whenever you hear the term “Alpha” or “Alpha Channel” simply substitute “Transparency,” or “Transparency Channel.” They mean the same thing.)
EXPORT A CLIP WITH TRANSPARENCY USING FCP X
In Final Cut Pro X, we created a transparent background behind this dancing heart.
[ Here’s an article that explains how we created the transparent background behind the dancing heart using Final Cut Pro X. ]
Here’s how to export it and retain the transparent background.
In FCP X, switch to the Project Library and select the project you want to export. (Remember, you always export from the Project Library, not the Timeline.)
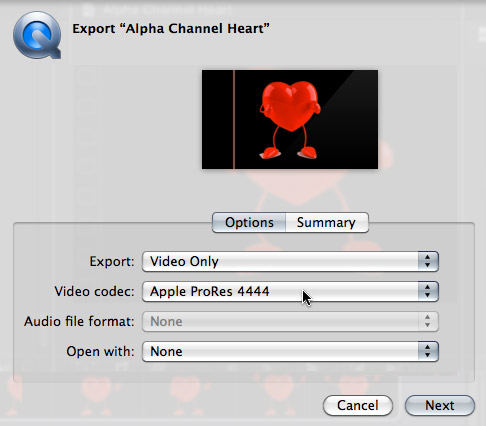
Go to Share > Export and set the Video Codec to Apple ProRes 4444. This is the only video codec that supports alpha channels that is available in this menu. Selecting this video codec is a critical step, because if you select any other, the transparent background won’t be included in the clip.
NOTE: ProRes 4444 generates extremely large files. Only use this codec when you need to include transparency, or to send files between After Effects and FCP. In virtually all cases, ProRes 422 or ProRes 422 HQ will be perfectly fine.
Click Next, give the file a name, pick a location and click Save. Then, see the After Export, below.
EXPORT A CLIP WITH TRANSPARENCY USING FINAL CUT PRO 7
In Final Cut Pro 7, the steps are a bit trickier, but we can achieve the same thing.
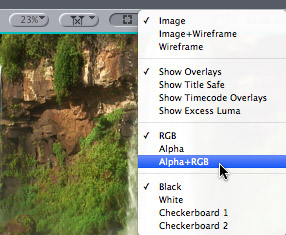
Here’s a cool way to see if a clip has an alpha channel (remember, that’s just tech speak for a clip with a transparent background).
Open the clip in the Viewer or Timeline, then select Alpha+RGB from the top-right popup menu. (You could also select Alpha, but I like seeing the image along with the transparency information. Alpha displays all opaque regions as solid white, and all transparent regions as solid black.)
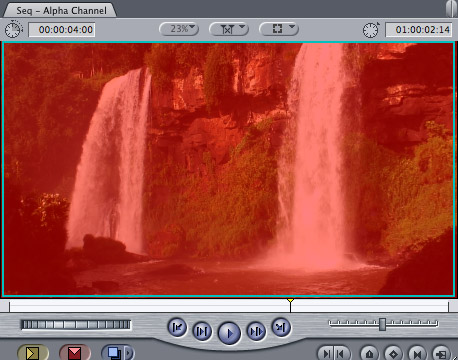
When Alpha+RGB is selected, that portion of the image that is opaque is displayed in red. The portion of the image that’s transparent is displayed in black. By default, all video files are 100% full screen and 100% opaque.
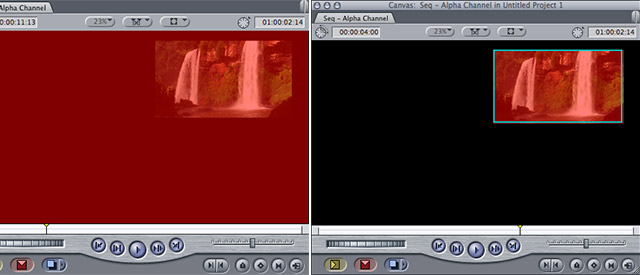
In this screen shot, the image on the left is fully opaque, while the image on the right has transparent sections.
Once you’ve created a clip with a transparent background in FCP 7 – using a green screen key, luma key, mattes, or just scaling a graphic or image, you need to export it.
Either open the sequence in the Timeline, or select the sequence in the Browser.
Then, choose File > Export > QuickTime movie.
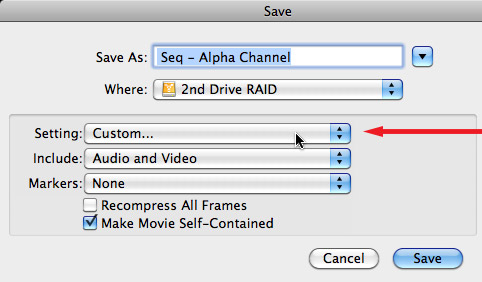
Click the Setting menu and select Custom – this choice is ALL the way at the bottom of the list.
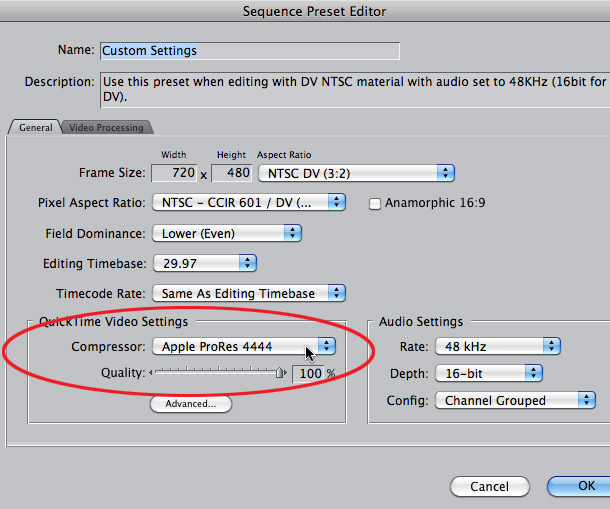
Leave the top settings alone, they will always be fine. We only need to adjust two settings.
ProRes 4444 yields higher-quality files, because it uses 10-bit color. However, Animation files will be smaller, because it only uses 8-bot color.
These are the only two codecs shipped with Final Cut Pro 7 that support alpha channels.
HOWEVER, YOU ARE NOT YET DONE!
Once you changed the compressor, you still need to turn on the alpha channel.
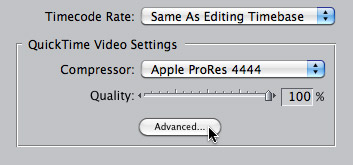
Click the Advanced button – this will be dark regardless of whether you select Animation or ProRes.
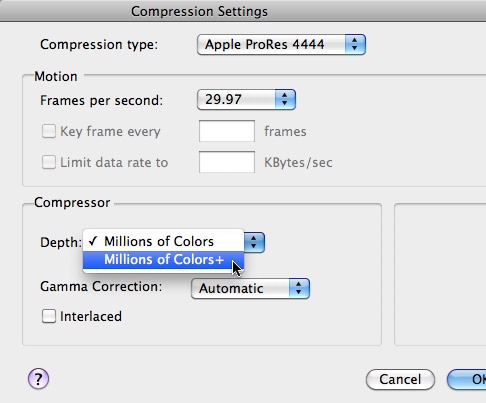
In the next screen, change the Depth setting from “Millions of Colors” to Millions of Colors +. This turns on exporting the alpha channel. Without enabling the Depth, no transparency will export.
Click OK to close the Advanced dialog.
Click OK to close the Sequence Preset Editor.
Click SAVE to export your file.
AFTER EXPORT
Whether you exported from Final Cut Pro 7, or Final Cut Pro X, once the movie is exported, you can bring it into any application and it will recognize the transparent areas of the clip and automatically superimpose your new clip over whatever is in the background.
This is a great technique for repeatedly keying logos over backgrounds with a minimum of fuss and minimum rendering.

2,000 Video Training Titles
Edit smarter with Larry Jordan. Available in our store.
Access over 2,000 on-demand video editing courses. Become a member of our Video Training Library today!
Subscribe to Larry's FREE weekly newsletter and
save 10%
on your first purchase.


17 Responses to FCP: Export Transparent Clips
← Older Comments-
 VP says:
March 11, 2020 at 10:37 pm
-
 Larry says:
March 12, 2020 at 8:00 am
-
 Chris Broadstone says:
April 14, 2020 at 5:50 am
-
 Larry says:
April 14, 2020 at 8:27 am
-
 Paul says:
May 5, 2020 at 1:08 am
-
 Larry says:
July 22, 2020 at 9:27 pm
-
 Larry says:
July 23, 2020 at 8:43 am
← Older CommentsHi Larry,
I’m using fcp 7 ( yes, still in 2020!) and tried everything. I’m trying to import this into a gif maker (I’m using an online one) to convert it to a gif to paste it into Instagram posts… every time it shows up with a black back ground (ugh!) any thoughts?
VP:
If the project you are exporting has transparency in it, you need to use a codec that supports transparency. There are only two:
* Apple Animation
* Apple ProRes 4444
Larry
Larry, I am having the same problem creating the Alpha Channel for an output clip from FCP 7. I change everything you mention––timeline settings plus the Canvas window, and in the Quicktime output. I even tried Quicktime Conversion and changed all settings for 4444, etc. I bring the clip into After Effects and it always has a solid black background. I originally used After Effects to key out the green screen and exported the clip from AE and it is compositing with the background in FCP 7 nearly fine, but I wanted to get a better composite in After Effects, so after color-grading the clip in FCP 7 I need to export it again with the Alpha Channel. But FCP 7 won’t do it. And even if I remove the color-grade and output it doesn’t work either. Nothing I try works. The reason I wanted to try compositing in After Effects is because the compositing in FCP 7 seems to cause the VERY good and tight green-screen-keyed clip to have a slight blurry black outline. I’ve tried fixing this in After Effects and it looks fine until I composite in FCP 7. Any ideas?
Chris:
There’s a setting in some alpha keys allowing you to choose pre-multiplied alpha channel. I can’t remember which works better, but play with that. I know that made a big difference in FCP 7.
Larry
Hey Larry!
Yes, I’m also still happy with my FCP7 😉
Did all the prescribed options (doing a Sin City effect with the green screened subject black & white and red isolated shirt, with a logo behind – all of these layered over more backgrounds hence the alpha channel necessity)
– But for some reason there are vertical lines running down the red shirt?
(PS. also, the Option+W of CarLesGené doesn’t seem to work?)
Hi Larry. I’m using alpha channels in final cut pro 7. Working with three tracks, a solid background, a green screened mid layer Track and a partially transparent foreground track but this transparent foreground track (still image) always reads as opaque with a black background. I’ve tried importing the foreground image as both TIFF and PNG files. They read as transparent in photoshop. Any thoughts?
Larry:
Import them as a layered PSD file with the background layer transparent and you should be fine.
Larry