
Stories are a very powerful technical feature in DVD Studio Pro that allows you to completely alter the normal flow of your movies.
When you select a scene using a chapter marker, the DVD jumps to the chapter marker and plays to end of the video. When you select a story, which also uses chapter markers, the DVD jumps to the chapter marker and plays to the next marker, then jumps somewhere else.
A few years ago. I was creating a DVD project for a hair-care company containing three movies, each featuring a specific model and showing how to cut, color, and blow-dry their hair.
The client wanted to teach hair stylists a new way to cut and color hair. So, the stylists could either watch the entire process for each model from beginning to end, or to compare the cuts, or colors, or blow-dries, jumping from model to model.
There wasn’t enough room on the DVD to store multiple versions of the movies, so the solution was a series of stories.
STORIES BEGIN WITH CHAPTER MARKERS
Chapter markers are the key to creating stories. Whether you add them in Final Cut, Premiere, Compressor, or DVD Studio Pro, you add chapter markers where you want each story to begin. If you need the story to end somewhere OTHER THAN the next chapter marker, set a chapter marker where you want the story to end.
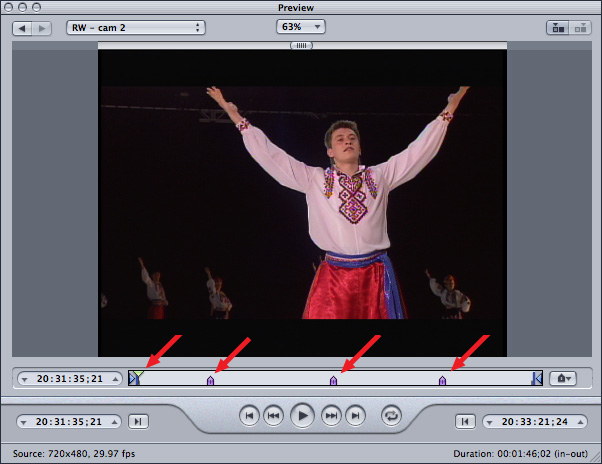
Here, for instance, is a movie with multiple chapter markers placed in Compressor. (See the ADDITIONAL RESOURCES section at the end of this article on how to create chapter markers in Compressor.)
Once the video is compressed and imported into DVD Studio Pro, we cancreate stories.
NOTE: You can also add chapter markers in DVD Studio Pro. Wherever you decide to add chapter markers, the key point is that you need to create chapter markers first, before you start creating stories.
GETTING READY IN DVD STUDIO PRO
Stories are almost always accessed using a menu button. (The only exception is when you are calling them from a script.)
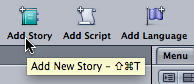
To create a story, first select the video track to which you want to link the story and click the Add Story icon in the Toolbar at the top,
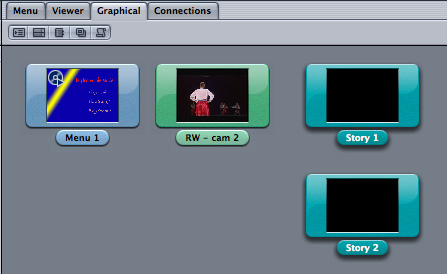
Here, I’ve added two stories, which are displayed here in the Graphical tab. Both stories are linked to the RW – Cam 2 movie. (Um, no, this isn’t the hair style video. I couldn’t get the rights to show it to you.)

Load your video into the Timeline. Notice that the chapter markers came right along with it. We have four markers:
Each of these markers starts a segment that ends the frame before the next marker. These are the segments we use to create stories.
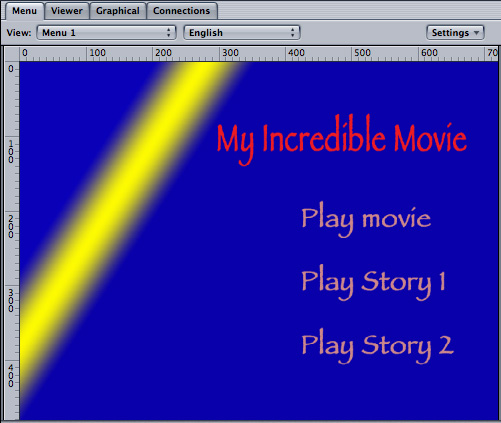
(OK, so this isn’t the greatest menu design ever…) Clicking one of the buttons will cause one of three things to happen:
In other words, Story 1 plays a short segment from the movie, while Story 2 totally reassembles the various segments of the movie into a different order. In this regard, Stories are similar to a playlist in iTunes.
NOTE: Stories are always linked to a specific video track. If you need to jump between segments on different tracks, you’ll need to use scripts, or clever use of end jumps, to switch from a story linked to one track to another story linked to a second track.
CREATE A SIMPLE STORY

There are multiple ways to open a Story for editing. One of the easiest is to double-click its icon in the Graphical tab. You can also select the Story tab and select the Story you want to edit from the popup menu.
In the two column display in the Story tab, the left-hand column lists all the markers in the movie associated with that marker.
NOTE: If you discover you’ve assigned the Story to the wrong movie, delete it from the Graphic tab, select the movie you want the Story to link to, and create a new Story by clicking the Add Story icon.

Drag the marker you want to use to start your Story from the left column to the right. In this case, our first Story consists of just the Solo marker.
What this does is create a “pseudo-movie” that starts at the Solo marker in the video and ends the frame BEFORE the next marker. You can treat this as a stand-alone piece of video, assign end-jumps or scripts, and link to it with a button, just as though this was a piece of video that actually existed.
The cool part is that this doesn’t require any additional storage space on the DVD.
NOTE: If you drag the wrong marker over, select it and press Delete.
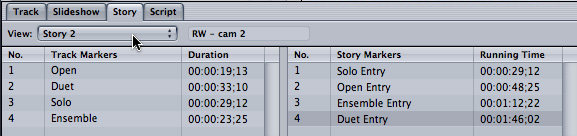
Now, let’s create something a bit more complex. Select Story 2.
Here, I dragged markers from the left side to the right and totally changed the order of the original video. This is most often a disaster for narrative fiction, but a great technique to use in training when you want to have a single DVD with custom content for Sales, Engineering, and Customers.
NOTE: You can’t provide password access, or lock people out of a particular section using stories, but you can help them view just the sections they need to see.
If you need to change the playback order, simply drag the markers in the right-hand column up or down until they are in the order you want.
LINKING STORY BUTTONS
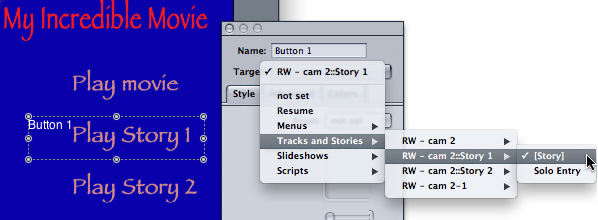
Linking to a Story is the same as linking to anything else. Draw a button region, select that button in the menu, then, in the Inspector, set the Target to the correct story. Here, for instance, we are linking the menu “Play Story 1” to the Story 1 link.
Be sure to select the bracketed term at the top.
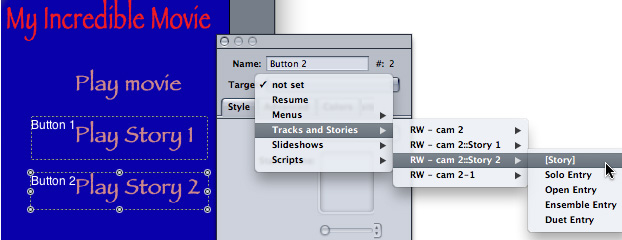
Here, we are linking “Play Story 2” to Story 2.
NOTE: Always select the bracketed term at the top. That means that you are starting at the beginning of the Story. Selecting one of the marker names under it, starts the Story at that marker.
You can have up to 98 stories per track.
I find stories indispensable when creating DVDs, I use them all the time. And, once you start using them, you’ll find all sorts of ways they can make slicing and dicing your DVD content both fun and easy.
ADDITIONAL RESOURCES
Here are some additional articles that can provide additional background.

2,000 Video Training Titles
Edit smarter with Larry Jordan. Available in our store.
Access over 2,000 on-demand video editing courses. Become a member of our Video Training Library today!
Subscribe to Larry's FREE weekly newsletter and
save 10%
on your first purchase.
One Response to DVD Studio Pro: Creating Stories
This helped me a lot with a current project, and I’m sure it will help in the future.
Thank you very much