
![]() [Updated Mar. 8, 2020, with new advice throughout.]
[Updated Mar. 8, 2020, with new advice throughout.]
Late in 2019, Adobe announced it will add support for the Apple ProRes codec family in Premiere for both Mac (which it has always supported) and Windows (which is new). What this means is that a future version of Premiere will probably change the Sequence settings to reflect this. For now, though, creating a ProRes sequence still requires creating a custom sequence. Here’s how to create a ProRes sequence in Adobe Premiere Pro CC.
NOTE: Here’s an article on how to create a ProRes sequence setting in Adobe Media Encoder.
WHAT IS PRORES?
“Apple ProRes is a high quality, lossy video compression format developed by Apple Inc. for use in post-production that supports up to 8K. It is the successor of the Apple Intermediate Codec and was introduced in 2007 with Final Cut Studio 2. It is widely used as a final format delivery method for HD broadcast files in commercials, features, Blu-ray and streaming.
“ProRes is a line of intermediate codecs, which means they are intended for use during video editing, and not for practical end-user viewing. The benefit of an intermediate codec is that it retains higher quality than end-user codecs while still requiring much less expensive disk systems compared to uncompressed video. It is comparable to Avid’s DNxHD codec or CineForm which offer similar bitrates and are also intended to be used as intermediate codecs.” (Wikipedia)
All variations of ProRes have a video bit-depth of 10 bits or greater.
NOTE: Premiere does not ship with the ProRes codecs. The easiest, and cheapest, way to get them is to purchase either Apple Motion or Compressor. Either includes all the ProRes codecs. However, this may change now that Adobe has announced support for ProRes on Windows.
WHICH VERSION OF PRORES SHOULD YOU USE?
This depends upon the video you initially shot. (Remember, ProRes is designed for editing and master files, not for posting to the web.)
NOTE: Converting a lower-quality camera format, such as H.264, to a higher-quality format, such as ProRes 422, does not add more quality. It just means that you won’t lose any quality during the conversion.
THE FASTEST WAY
Codecs are assigned to the sequence, not the project. So, either create a new project or open an existing project.
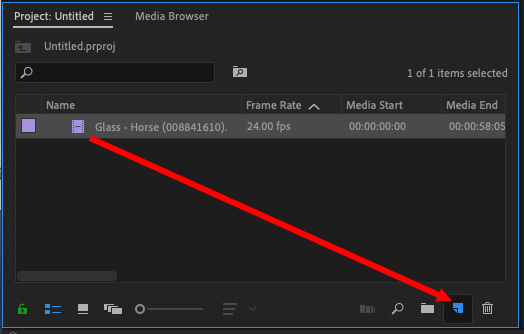
The easiest way to create a ProRes sequence is to take an existing ProRes clip, with the frame size and frame rate you want to use, import it into the Project panel, then drag it on top of the New Sequence icon in the lower right corner of the Project panel.
This creates a new sequence that exactly matches the format of the source clip.
NOTE: You can also use this technique to create a ProRes sequence even when the camera master format is not ProRes. Create a new sequence using this technique and any ProRes clip, then remove the original ProRes clip after you have edited at least one additional clip into that sequence. Once you have at least one clip in a sequence, the sequence settings can’t be changed.
This is very fast way to create exactly the sequence format you need.
THE CUSTOM WAY
In the event you don’t have any ProRes clips to work with, not to worry. Here’s the process.
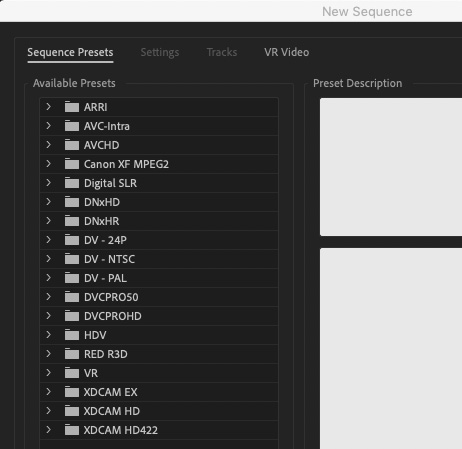
Choose File > New Sequence (shortcut: Cmd + N). As you can see in the screen shot above, there are no ProRes presets.
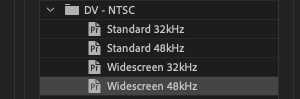
Since I’m going to change the video settings anyway, I’ll pick a format I know well – DV – NTSC, Widescreen 48kHz – because the audio settings are what I need for the new preset.

Click the Settings text button at the top of the New Sequence window
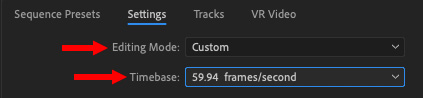
Set Editing Mode to Custom (located at the TOP of the menu). Then, select the frame rate of your camera source material in the Timebase menu.
NOTE: Changing frame rates never improves quality. Try, as much as possible, to shoot the frame rate you need to deliver.
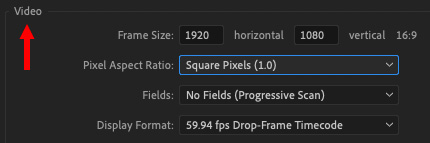
In the Video section, enter:
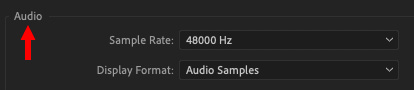
In the Audio section, leave the defaults alone. ProRes uses uncompressed audio.
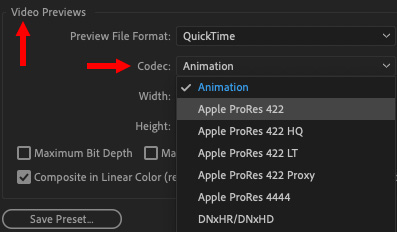
In Video Previews:
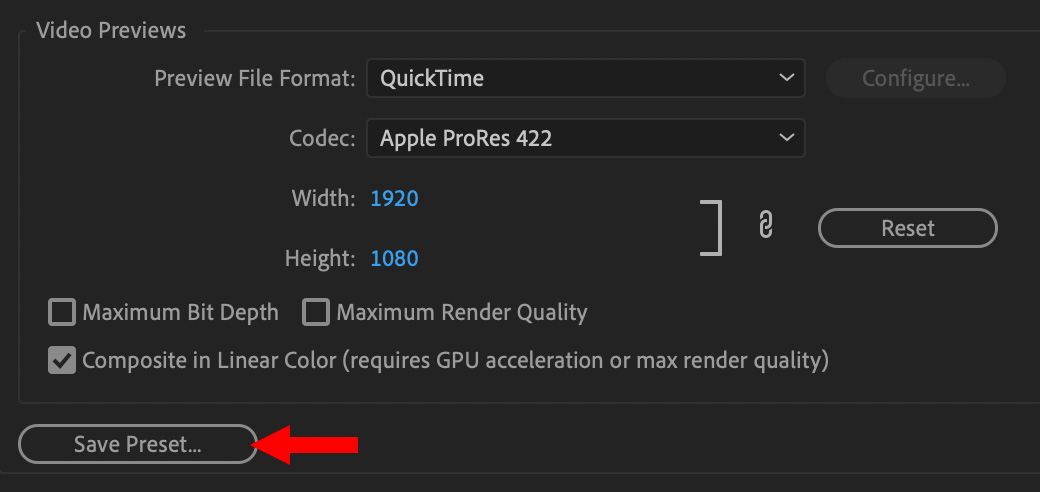
Here’s what my finished settings look like. Then, save your newly-created preset by clicking Save Preset.
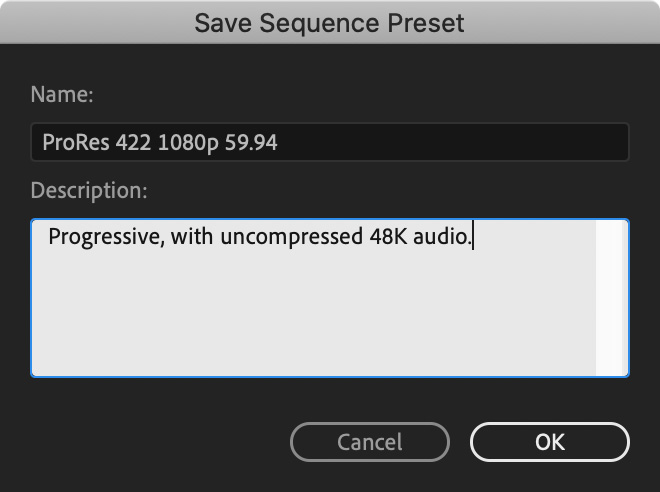
Assign a name and description that make sense to you. Then, to apply these settings to your sequence, click OK, in the lower right corner.
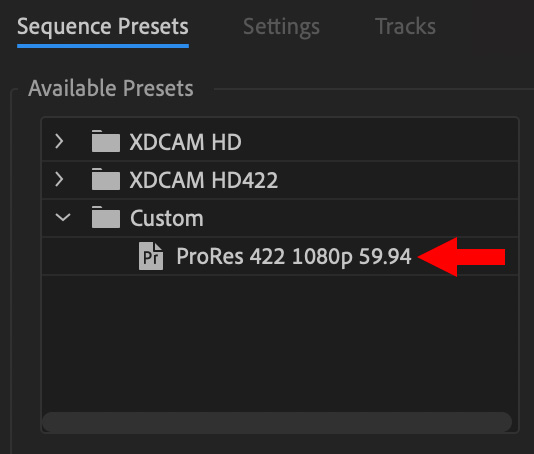
Not only have you created a new, custom sequence, but you’ve also created a preset you can reuse anytime without going through these settings again. You’ll find it in the Custom folder of the New Sequences window.
EXTRA CREDIT

2,000 Video Training Titles
Edit smarter with Larry Jordan. Available in our store.
Access over 2,000 on-demand video editing courses. Become a member of our Video Training Library today!
Subscribe to Larry's FREE weekly newsletter and
save 10%
on your first purchase.
13 Responses to Create ProRes Sequences in Premiere Pro CC [u]
Uh, XDCAM HD? 1440 x 1080 with a 1.333 pixel aspect?
Mike, Mike, Mike:
If I needed to list EVERY aberrant image format that uses non-square pixels, ALL our eyes would glaze over.
Sigh…. You are correct, however. Some versions of XDCAM use non-square pixels. However, other XDCAM formats are square.
It’s enough to cause strong people to start drinking. 🙂
Larry
I’m not sure WHY you want to create a pro-res sequence. I have media from various sources, some RAW, some H.264, some Pro-res, all intended to go into the same sequence. What’s the best sequence setting to use?
Thanks
Pat:
Well… it all depends upon what you are trying to do.
For example, Raw files require a color grade, but have the widest range of color and gray-scale adjustments. H.264, on the other hand, is extremely limited in how much you can adjust color simply due to how it is compressed. Raw files are huge, H.264 are tiny. Raw requires a lot of GPU horsepower, H.264 requires a lot of CPU horsepower.
What transcoding (converting) all your images to ProRes does is provide a consistent color and compression framework for all your edits. If you are doing something quick with limited effects, there’s no reason to convert. On the other hand, if you are adding lots of effects, creating multiple review copies or need to deliver a high-quality master, ProRes is a better choice for efficiency, color and output.
Larry
Relatively new videographer/editor here, so sorry if this question is silly.
We currently shoot with a Sony a6400, previously a Canon 77D. Our workflow to date has been to use media encoder to convert all of our clips to ProRes 422 prior to importing into Premiere. Are you saying that by dropping unencoded files onto a ProRes sequence, we are essentially accomplishing the same thing?
Thanks!
Darren:
No such thing as a silly question. Only questions that we don’t know the answers to.
No, I’m not saying that. Your workflow of transcoding to ProRes, especially with footage shot on Canon or Sony cameras, is very smart. Editing the camera native (untranscoded) files, which are variations on H.264, can be done in Premiere, but it tends to bog down your system and has a limited range for color correction.
Larry
Thanks for the response.
There is no menu SAVE PRESET in my sequence setting
I use Premiere Pro CC 2018
Kinda weird …
Thanks Larry, this is an invaluable tutorial. You’ve helped me a lot!
I like to make a backup of all the custom presets I create in Premiere, because often after updates (or re-installs) my presets go missing. If anyone’s wondering where to find their shiny new ProRes sequence preset on the PC harddrive, it’s here:
C:\Users\[user name]\Documents\Adobe\Premiere Pro\14.0\Profile-[user name]\Settings\Custom
Note this is the PC address, I’m not sure about Mac, and the 14.0 should be replaced with whatever version of Premiere you’re running on.
When dragging a clip onto the new sequence button, with the source being ProRes LT 1080i, a new AVC Intra-based sequence is created rather than one with the codec set to custom Quicktime ProRes. Is this a known/new behavior?
Ian:
This is NOT normal behavior.
Try trashing FCP X preferences to see if that helps – that tends to cure most problems:
https://larryjordan.com/articles/trouble-shoot-your-apple-final-cut-pro-x-system/
If not, time to call Apple Support.
Larr
In my System there no Proress422 Codec.
I’m using Adobe Premier Pro CC 2018.
How to install it please help me.
Yallappa:
For a version of Premiere that old, you will need to contact Adobe support. They may have an option. If you are on Windows, I can’t help, because I don’t know Windows. If you are on a Mac, a workaround is to purchase either Apple Compressor or Apple Motion (both $50). These include the ProRes codecs.
My first recommendation is to contact Adobe Support.
Larry