
![]() Bill Rabkin sent me an email before my recent webinar on animating text:
Bill Rabkin sent me an email before my recent webinar on animating text:
“If you have time to include some guidance about how to add lines, both solid and dotted, above or below text, I’d appreciate that. In several web searches, I was not able to find any way to draw a dashed line in FCP X, but would have found that technique useful in the project I am currently editing.
“This project is a video recording of a lecture. The presenter showed PowerPoint slides and then used his laser pointer to draw attention to various things on the slides. For example, as he moved his laser pointer along the Sudbury River on his map, he said something like, “If you follow the path of the Sudbury River, …”
“We did not “shoot the screen” during the lecture. Instead, I’ve inserted into my timeline an image of each PowerPoint slide, so we don’t have the presenter’s little red dot moving along the river. In the video, a dashed line that grows along the river, with the text “Sudbury River,” would serve the purpose well (and be much more visible to the TV audience than the presenter’s tiny red dot was to the live audience).”
CREATE SIMPLE SHAPES IN FINAL CUT PRO X
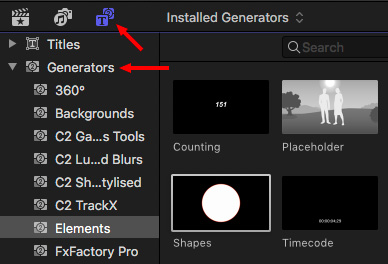
The easiest way to highlight something is to add Generators > Elements > Shapes above the area you want to highlight.
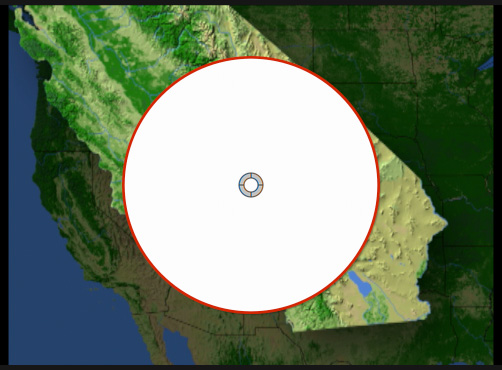
[Map courtesy of Artbeats.com.]
By default, this displays a solid white circle with a red border.
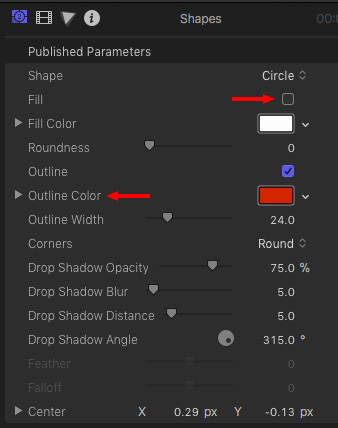
In the Inspector, you can modify it to a hollow circle, turn Fill off, using a border of any color, plus a drop shadow.
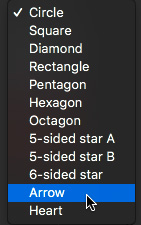
Click the Shape menu, at the top, to choose from a variety of other pre-built shapes.

Use the Transform settings, NOT the on-screen controls, to adjust scale, rotation and position. You can animate movement using Position keyframes.
Adding any kind of custom line, though, can’t be done using the default tool set in Final Cut. For that, you need to move to Motion.
Motion gives us the ability create and animate any type of line we want:
Here’s how.
STRAIGHT LINES
This is the simplest way to create a straight line in Motion, but also provides the fewest formatting options.
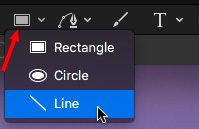
To create a straight line in Motion, select the Line drawing tool at the bottom of the Viewer.
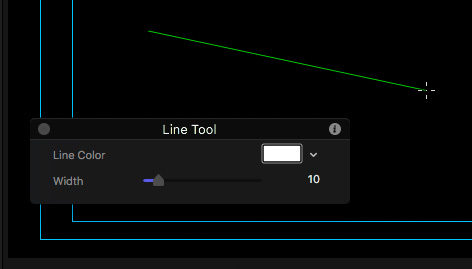
Then, click and drag to draw a line in the Viewer.
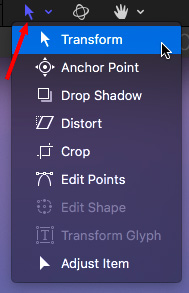
Next, and this is KEY, switch back to the Transform (Arrow) tool. (Shortcut: Shift+S) If you make changes in the floating HUD without changing tools, nothing will happen.
At this point, you can adjust the width and color of the outline (edge), as well as other visual properties in the Inspector.
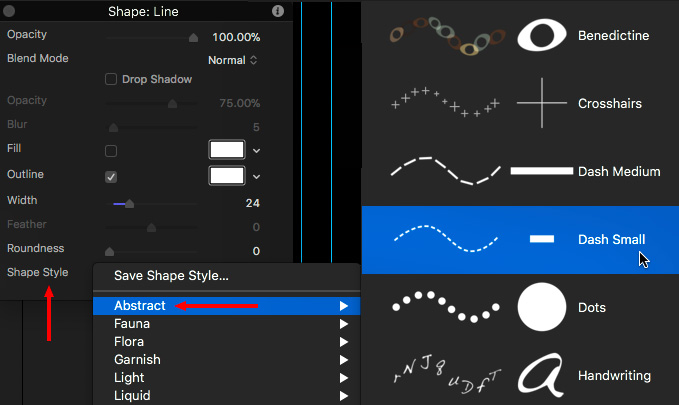
To create a dashed line, choose Shape Style > Abstract and select either Dash Medium or Dash Small.
NOTE: You can use this same menu to choose a huge variety of other textures to apply to your line.

Here, I adjusted the Outline color to red and chose Dash Small.
ADD ARROWS
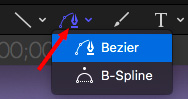
To create a line with an arrow at one or both ends, select the Pen (Bezier) tool. It, too, is underneath the Viewer and right next to the Line tool. The Line tool is easier to use, but the Pen tool provides FAR more options.
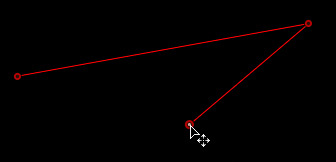
Click the Pen tool where you want the line to start. Then, move the Pen tool – DON’T drag it – to where you want the line to end and click again. You are clicking to set both the start and end points.
NOTE: Dragging creates a curved line, which we’ll cover next.
If you want to create a line with corner, keep clicking until you have the shape you want. Here, for example, I created a line with a sharp corner.
Again, and very important, as soon as you finish drawing the line, select the Transform tool.
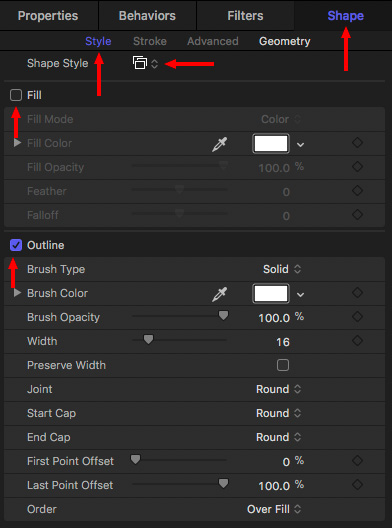
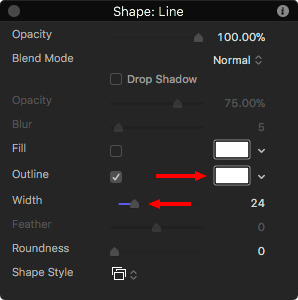
This time, go to Inspector > Shape > Style. Because we are creating lines, keep Fill unchecked. (You can see what Fill does by checking it. Then, uncheck it to stay with me in this exercise.)
In the Outline section, Brush Color and Width change the color and width of the line.
NOTE: If you add a Shape Style, located at the top of the Shape section, you can add dashes or other textures to the line. However, adding a Shape Style takes away your ability to automatically add arrow heads to the line.
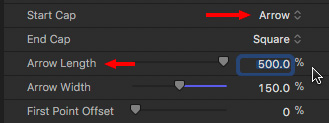
Change Start Cap to Arrow to add an arrow to the starting point of the line, End Cap to add an arrow to the ending point of the line.
NOTE: To get good looking arrowheads, you’ll need to add custom values into both Arrow Length and Arrow Width. The easiest way to do this is to type them in.
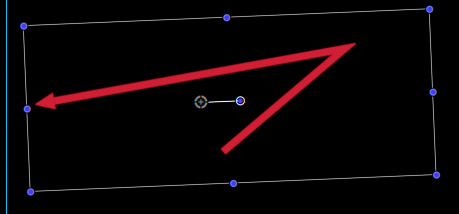
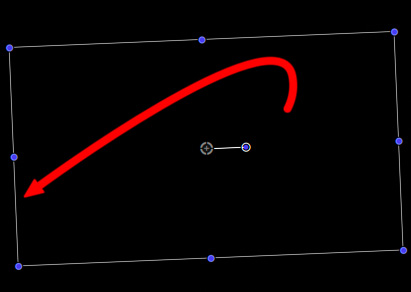
Here, I created an arrow with a corner. The selection box indicates that this line is selected in the Layers panel. The box does not display on playback or export.
CREATE A CURVED LINE
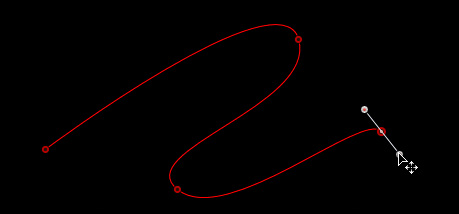
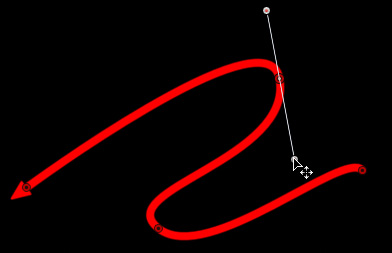
To create a curved line, start with the Pen tool and click a starting point for the line. Next, click the next point BUT, while pressing the mouse button drag and you’ll create a curve in the line.
NOTE: The white lines and dots are called Bezier control points and control handles.
If you want to create a closed shape, double-click the starting point. If you want to create an “open shape” – that is, a line – double-click the last point in the line as if to say: “This is the end.”
Next, select the Transform tool. If you want to create a dashed line, without arrows, use the Shape Style menu to select a dashed line or other texture.
If you want to add arrowheads to a solid line, use the Shape Inspector and change the Start or End Cap.
NOTE: I have not found a way to add an arrowhead to any line that has been styled using Shape Style. Nor have I found a way to add dashes to a line that has an arrowhead. To me, this is a big oversight on the part of the developers.
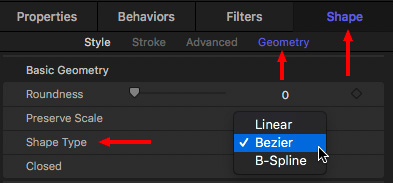
To convert a curved line to one with corners, or a straight line to one with curves, go to the Geometry tab in the Shape inspector and change it between Linear (straight), Bezier (curves), and B-spline (softer curves).
TO CHANGE THE CURVES
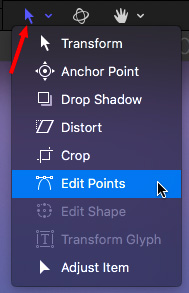
To change the shape of a curve, go to the Tools palette (under the Viewer) and choose Edit Points. This allows you to select individual points on your curve.
Click any control point and the white bars appear. Drag the white dot at the end of the bar to adjust the shape of the curve.
TO ANIMATE A SHAPE
There are multiple ways to animate a shape – far more than I have room for in this article. But the easiest is the Write On behavior. This animates drawing the shape on the screen in the same order in which you drew it.
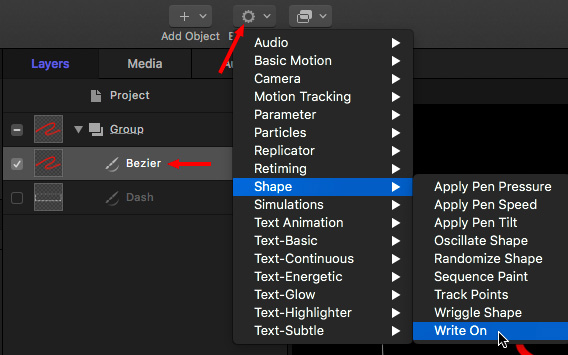
To apply this effect, select the line in the Layers panel, then choose Behaviors > Shape > Write On.
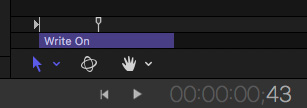
The speed of the effect is determined by its duration in the Mini-Timeline.
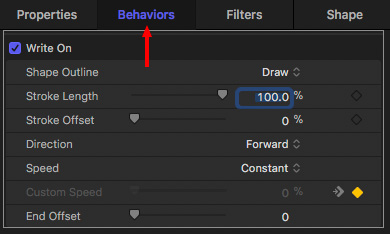
Adjust the effect using Inspector > Behavior > Write On settings. An especially interesting one is to set the Stroke Length to less than 100%. This allows the line to draw itself on, then back off again.
NOTE: To add acceleration or deceleration, modify the Speed setting.
ADDING AN ARROWHEAD

If you really need a dashed line AND an arrowhead, and I find myself using these a lot, you need to create two elements:
Draw the arrowhead with the Pen tool, the same as you drew the line. Then, store them both in the same Group (folder). Then, when you need to move, scale or rotate the line, adjust the Group so that both line and arrowhead change together.
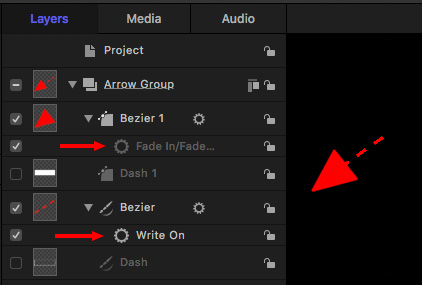
We can’t apply the Write On behavior to a group. So, to animate these two elements, I suggest applying a quick Basic Motion > Fade In / Fade Out behavior to the arrowhead with a duration of, say, 10 frames, then the Shape > Write On behavior to start as soon as the Fade in is complete.
SUMMARY
The shapes inside Final Cut are limited, and lines don’t exist at all. However, by combining Motion with Final Cut you can create any type of animated line you want.
EXTRA CREDIT
If you need to trace your line over an existing video, import the video into Motion and use it as the background as you build your line. Then, delete it before exporting the Motion project.
To move this to Final Cut, export it as a movie, as Final Cut does not import Motion projects. Then, import the movie into FCP X and composite into your project.
Save the Motion project in case you need to make changes.

2,000 Video Training Titles
Edit smarter with Larry Jordan. Available in our store.
Access over 2,000 on-demand video editing courses. Become a member of our Video Training Library today!
Subscribe to Larry's FREE weekly newsletter and
save 10%
on your first purchase.