
 UPDATE: This tutorial shows how to create an effective background for vertical video in a horizontal timeline.
Grace Shafir sent me an email last week asking:
My daughter asked me to make a video for her. Then she dropped on me tonight that it had to be vertical. When I shot vertically, it came into FCP horizontally. Are you familiar with this process and could you please share?
FCP X makes the process of creating and editing vertical video simple. Here’s how.
GET READY
To prepare:
THE EDITING PROCESS
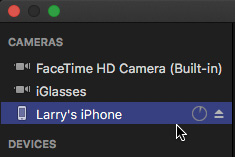
Inside FCP X, I chose File > Import Media (Shortcut: Cmd + I). The connected iPhone appears in the top left corner of the Media Import window. The circle icon indicates that FCP is still acquiring data from the phone and the upward pointing arrow allows me to disconnect, or “Eject,” the phone from the computer.
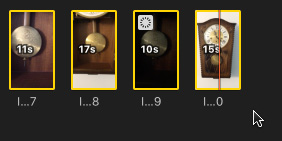
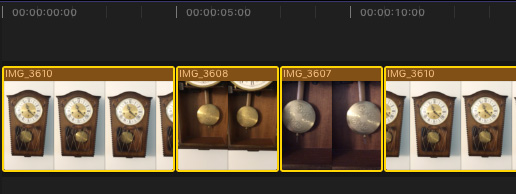
When the iPhone is selected in the side bar, thumbnails of both video and stills appear at the bottom of the Media Import window. Here, for example, I can see the four vertical video clips I shot of a ticking grandfather clock.
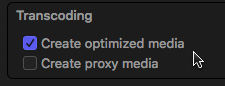
The iPhone shoots compressed MP4 video. If you are editing a simple project, you don’t need to create optimized media. However, if you plan to add lots of effects or include this as part of a larger project, optimizing your media will save you time in the long run.
While not necessary for this training example, I decided to create optimized media.
NOTE: In general, I always recommend optimizing media. If your media is already in an optimized state, FCP X will not create new media.
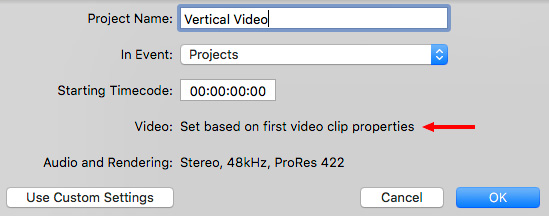
Next, create a new project and use the Automatic settings. (This is the screen where the button in the lower left reads: Use Custom Settings.)
MOST IMPORTANT, don’t change any project settings. Make sure that the text: Video: Set based upon first video clip properties is visible. This is what makes configuring vertical video easy.
Next, edit a vertical clip into the empty, new project. This is important, even if this isn’t the first clip you want the audience to see, because FCP X uses this clip to configure the project settings.
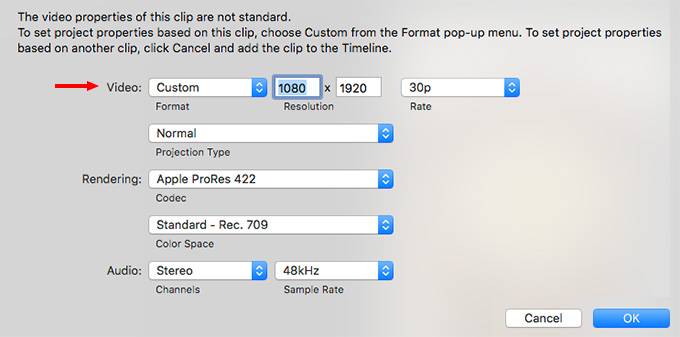
When that first, non-standard video clip is edited into the timeline, this dialog appears. Note that the frame size is already set to match the size of the video you shot on the iPhone.
Don’t change any of these settings. This allows FCP X to automatically configure the project properties to match the specs of this clip.
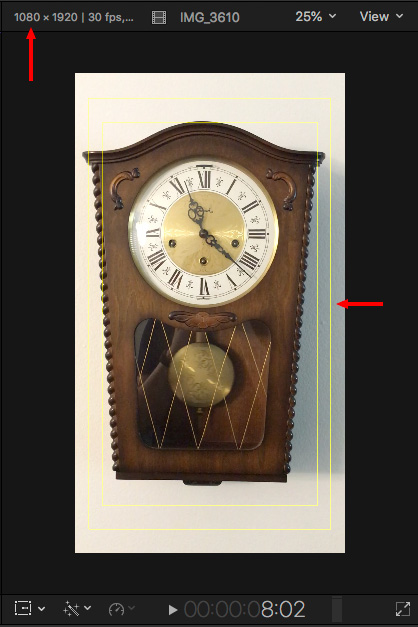
If you’ve done this properly, your clip appears vertically in the Viewer.
Note the video dimensions in the top left corner: 1080 x 1920, 30 fps. This is a 9×16 aspect ratio. Notice, also, that the safe zones (thin yellow lines) are properly drawn for this new aspect ratio.
You edit, trim and rearrange vertical clips the same as any other video material.
You can also add titles and effects the same as any other edit – it’s just that you are working in a new aspect ratio.
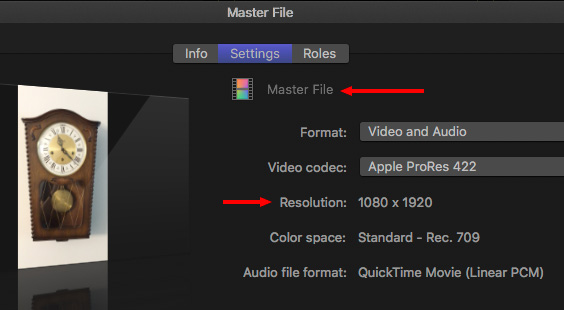
When it comes time to export the final project, choose: File > Share > Master file to create a high-quality master file for compression later.
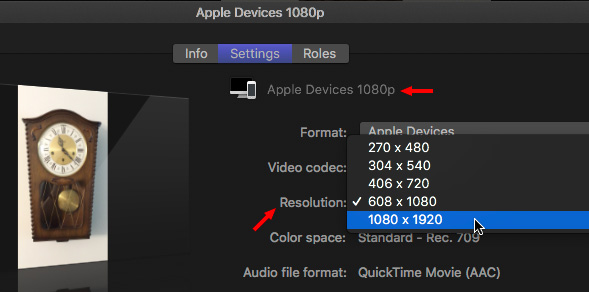
Or, choose File > Share > Apple Devices 1080, then pick the final compressed frame size you need for the final project.
NOTE: Make sure that the aspect ratio of your final export matches the aspect ratio of the original media. Both 1080 x 1920 and 608 x 1080 match for aspect ratios.
SUMMARY
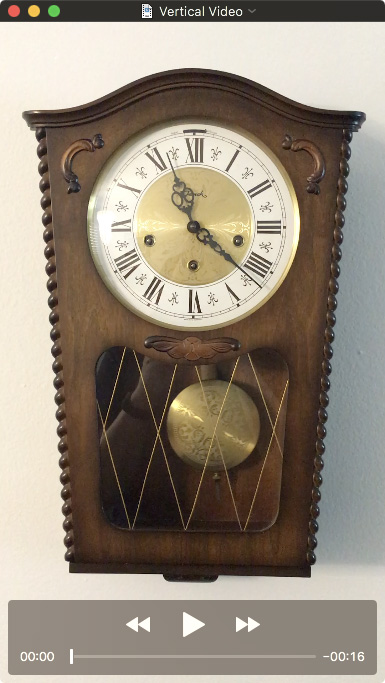
Here’s a still from the finished video: It displays vertically with no pillar boxing.
Working with vertical video isn’t hard, the key is to not outthink the process. Let FCP X automatically configure the project settings to match your vertical clip. At which point, the rest is easy.

2,000 Video Training Titles
Edit smarter with Larry Jordan. Available in our store.
Access over 2,000 on-demand video editing courses. Become a member of our Video Training Library today!
Subscribe to Larry's FREE weekly newsletter and
save 10%
on your first purchase.
18 Responses to Create and Edit Vertical Video in Final Cut Pro X
Newer Comments →-
 Richard Hale says:
July 23, 2018 at 5:07 am
-
 Ron B says:
July 23, 2018 at 5:40 am
-
 Larry says:
July 23, 2018 at 8:36 am
-
 Dmitry says:
January 11, 2019 at 7:27 am
-
 WA Cowgirl says:
October 21, 2020 at 1:56 pm
-
 Larry says:
October 21, 2020 at 1:57 pm
-
 Mark Suszko says:
July 23, 2018 at 8:05 am
-
 Larry says:
July 23, 2018 at 8:38 am
-
 Mark Suszko says:
July 23, 2018 at 11:09 am
-
 Chuck Green says:
July 23, 2018 at 12:13 pm
-
 Randall White says:
August 16, 2018 at 10:43 am
-
 Paul Antico says:
November 6, 2018 at 4:38 pm
-
 Kit Laughlin says:
March 21, 2020 at 3:48 pm
-
 Sandra Anne says:
August 10, 2020 at 6:09 am
-
 Larry says:
August 10, 2020 at 8:27 am
-
 Ryan says:
October 10, 2020 at 7:51 pm
-
 Larry says:
October 10, 2020 at 7:55 pm
Newer Comments →Good Article.
Please no, not you too, Larry. I realize I’m a stick in the mud, and I realize that vertical video is here to stay, but I’m going to fight the good fight as long as I can. I guess I feel like an old English teacher trying to maintain some standards of good grammar.
No vertical video!
Now, excuse me while I go polish my buggy whip.
Ron B
Ron:
I’ve been thinking a lot about your comment this morning and came to an interesting philosophical realization.
When stories are about relationships between people, we need a wide, horizontal frame to fit everyone in. When stories are solely about one person, a vertical frame is fine.
It seems we are living in very narcissistic times these days.
Larry
This approach makes a great point.
We prefer horizontal video because our eyes are side by side, not one above the other.
Smile….
You traditionalist, you.
Larry
Vertical video is of the Devil. I hate it. But it exists and we have to deal with it. There are a few instances where vertical works, but I hate when people default to it for everything. it’s driven by the ergonomics of hand-holding the phone. There’s actually an app you can add to the phone that will shoot landscape no matter the phone’s orientation. if I were king of the world that would be a default in every phone…
Facebook’s default frame is a square, so it looks equally bad in any orientation. Maybe we should put in frame lines and center protect to shoot for square now?
Mark:
I’m beginning to think that the frame orientation is not how we hold the phone, but the subject we are shooting. Many people, especially when shooting selfies, want to make sure they are the star.
Larry
Abel Gance wept
Last week a client asked me to stop mid-project and jump into producing vertical video (vv) for the 1-month old Instagram TV (IGTV). I plunged into learning what I could about filming and editing vertical video, as well as how to prepare video for showing on IGTV (Instagram has several helpful guides for this).
There are a few challenges to deal with vv (including not choking over its aesthetics). Because my video would be recorded outdoors for a significant-sized boating business, iPhone and most DSLR footage would not be good enough: these videos had to be recorded in UHD or full 4K (explanation below) with high dynamic range to look right in most cases.
I ended up with 3 ways of creating vv:
1. Film 16:9 normally in UHD or 4K while keeping the key action inside a narrow, tall “box” which covers only about 1/3 the width of the frame. It took me about 15 minutes to gain some competency at doing this. In FCP X the video will need to be zoomed in to fill the full height of the 1080×1920 frame which Larry covers above. Then the image has to be situated horizontally so the section desired from the original frame is centered in that 1080 width, using the X-axis position tool found under Transform. Roughly 2/3 of the image is being eliminated (full HD footage treated this way would degrade from needing to be enlarged significantly).
2. Record normally in 16:9, and stack 2 or 3 images to fill the 1920 pixel height of the frame. Since the footage was recorded with a height of 2160 pixels, 2 clips or even 3 (some zooming out and adjusting the width may be required) can fill the vertical space, cutting off some of the sides of the images. Not a lot of subjects lend themselves well to this approach, and it of course requires much more footage for a given run time.
3. My favored method: Record with a camera oriented 90 degrees from normal. Some photographer’s tripods have a head which can rotate 90 degrees, but the one I have is only good for a lightweight camera. My primary camera is a Sony FS7, which I’ve customized; fully outfitted it weighs about 14 pounds. I made a simple but very sturdy rig which holds the camera at 90 degrees from normal and allows access to all needed areas of it. I’ll be glad to share photos of the rig, but don’t know how to post them here.
The secret to working with a camera mounted sideways on a tripod for filming vv of any kind of moving subject (the boating videos involved virtually constant motion): mount the viewfinder and/or an exterior monitor so it is oriented vertically, while the camera is oriented horizontally. The VF will look odd, but so does a camera suspended sideways a few inches above a tripod. Otherwise, tilting and panning get quite confusing!
I had a project that I hacked together for a spoof where I wanted to put a video and music on a movie poster for Facebook fun. Facebook has changed their video codecs
I had previously created a hack in standard landscape format and I wanted to simply convert everything to vertical. I just simply created a new Project in FCPX to the poster’s aspect and copied the timeline over. The titling and video adjusted and I tweaked it a bit. Much improved, new tricks for an old dawg…
Shoot in UHD or 4k or even HD and just MASK your flip out viewfinder. Still photogs used to do that all the time.
Larry: thanks, that was extremely useful. When my partner sent me a portrait format video this morning, the first place I looked was here. The only difficulty I had was rethinking how to do titles and supers and, of course, I needed to shrink the viewer down so that I could actually see the handles and controls!
While personally I’m not a fan of vertical format video at all, like many others here, nonetheless we do have to recognise that the IGTV crowd shoot mostly in portrait format. Accordingly, we simply have to adapt.
This is great. I love this, my photographer always shoots some vertical for some reason, and this is a great work around!
However, if combining vertical and landscape in my project, I think I have to separate them. Make a vertical project, save the file, then import into my primarily landscaped project. Anyway around that?
Sandra:
You can incorporate both horizontal and vertical video in the same project, but because the dimensions don’t match, you’ll need to scale one of these to fit. No, you don’t need to export the vertical, or horizontal, video first.
Larry
Hi Larry,
How do I export a video for vertical viewing on iphone?
Thank you
Ryan:
Create a vertical project in Final Cut, then export that. OR, if you have FCP X 10.4.9, you can use the new Smart Conform in Final Cut:
https://larryjordan.com/articles/new-smart-conform-in-final-cut-pro-x/
However, the best way is to create a vertical project:
https://larryjordan.com/articles/create-and-edit-vertical-video-in-final-cut-pro-x/
Larry