
 [Updates: Sept. 8, 2018, with more information on how long it should take to create a second partition. Oct. 19, 2019, with a note on Catalina.]
UPDATE: As you’ll see in Larry Hinkle’s note at the bottom, APFS volumes do not support partitioning. Instead, create a new Volume and install the OS you need into it.
A “dual boot” system disk allows you to run two different operating systems on the same computer. We do this by “partitioning,” or dividing, the internal boot disk into two or more sections, each with its own version of the macOS.
There are three main reasons for creating multiple partitions of your internal drive:
I wrote about this process a few years ago – read it here – when many editors wanted to retain access to OX X 10.6.x to run Final Cut Pro 7 and DVD Studio Pro. I don’t know what applications we have today that we will want to run in the future, but, just in case, here’s how to create a dual boot disk using macOS 10.13.5 (High Sierra). While the concept of creating a partition is the same, the process is different.
NOTE: If you are working this tutorial along with me, please read the entire article first. My initial settings caused an error, which you can avoid by reading this through first, then create a new partition second.
WHAT WE ARE DOING
Dividing the boot drive is perfectly safe – Apple supports doing so in Disk Utility – provided you have enough free space on your internal storage to support creating both partitions. However, it is time-consuming.
By default, your boot disk (that’s the internal storage used by your Mac) is set to a single partition. What we are doing is changing the partition map to divide your hard disk into as many sections as you want.
IMPORTANT NOTE: Adding additional partitions doesn’t increase the storage capacity on your internal drive. If you need more space, buying an external hard drive is a far better option. What this technique is specifically designed for is running multiple operating systems on the same computer system.
IMPORTANT NOTE 2: If you have a Fusion drive, the SSD portion of the Fusion drive is always associated with the first partition. You can’t move this, nor re-allocate it. So, your new partition will not run as fast as a Fusion drive. Partitioning is not a good idea if your goal is to improve performance.
I should also mention that you can only run one OS at a time using this procedure.
In general, you want to leave at least 25% free space on the first partition, as well as have enough room to install both the operating system and essential applications on the new partition. On my system, macOS takes about 70 GB, while my apps take about 60 GB; plus whatever I need for my files and documents. This means a minimum new partition size of around 175 GB. (70 GB + 60 GB + 25% of 130 GB = 162.5 GB; which I round up to 175 GB.)
HOW TO CREATE A SECOND PARTITION
Open Disk Utility (Applications > Utilities > Disk Utility)
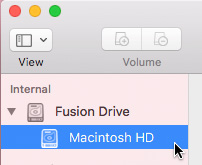
In the left sidebar, select your internal drive. Most commonly, this is often called Macintosh HD.
NOTE: Whether you have an internal SSD, Fusion Drive, or, on older systems, spinning hard disk, I’m going to call this device the “internal drive” because it acts like a traditional hard drive and “drive” is easy to spell.
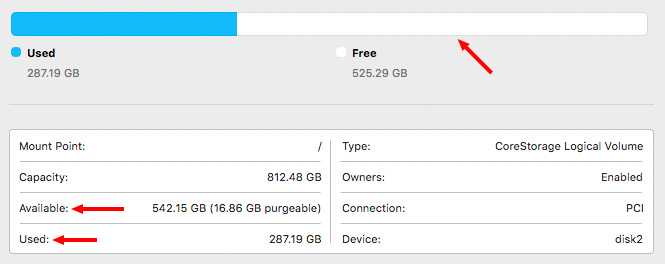
Before you start – and this is IMPORTANT – make sure you have enough free space on your internal drive to create the size partition you want. The bar chart in the middle provides a quick summary, the table at the bottom has the specifics.
In my case, my system has about about 1 TB of total storage, with about 542 GB free.
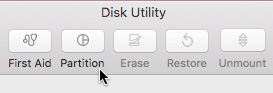
Then, from the toolbar at the top, click Partition.
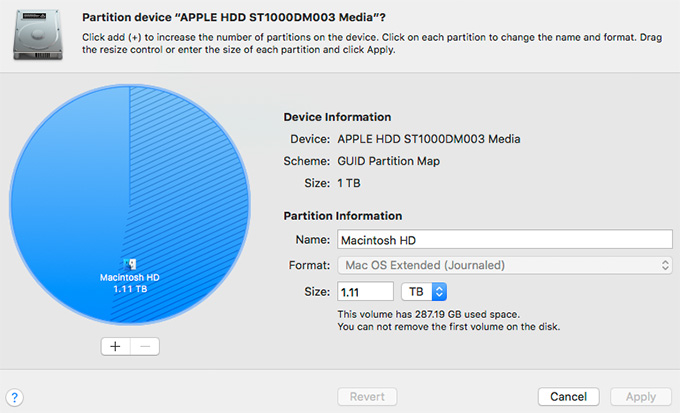
In the Partition screen, we can partition our internal drive into sections. Since I only want to create two partitions – and I already have 287 GB used, which I can’t remove – here are the partitions I want to create:
NOTE: However, as you’ll discover, High Sierra may not allow you to create a partition this small. I will show you both the error and the workaround.

Click the Plus icon under the blue circle to add a new partition.
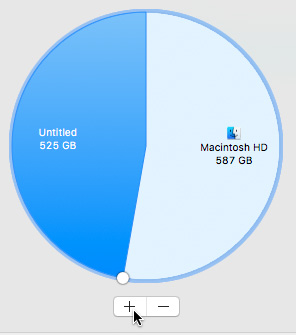
Instantly, your Mac calculates a new partition size; in this case the two sides are relatively equal. The partition on the right is the resized original partition.
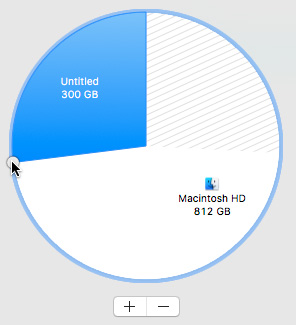
Grab the white dot and drag it to change the size of the new partition. Even though the estimated size of my new partition only needs to be 175 GB, since I have the space, I’ll make it 300 GB.
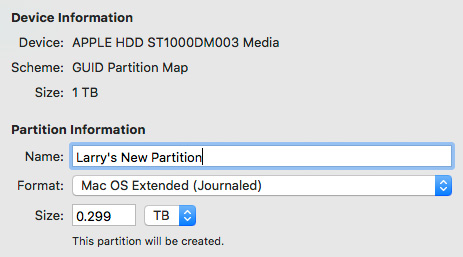
Once you’ve sized the partition, give it a name, this is what will appear in the Finder.
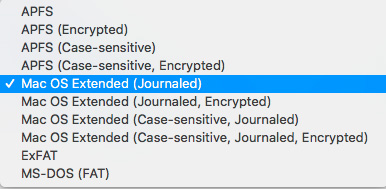
Then, determine how you want it formatted. In general, my suggestion is to match the formatting of the existing partition – unless you are formatting it for Windows or Linux, in which case, consult the recommendations for those operating systems to determine the best choice.
APFS, as of this writing, will not run on Fusion or spinning hard disks, which means that for my example, I’m formatting this to Mac OS Extended (Journaled).
NOTE: For systems which require the maximum in performance, I don’t recommend encrypting your boot drive. My recommendation may change in the future when encryption is handled in hardware.
When you are done making changes, click the Apply button in the lower right corner.
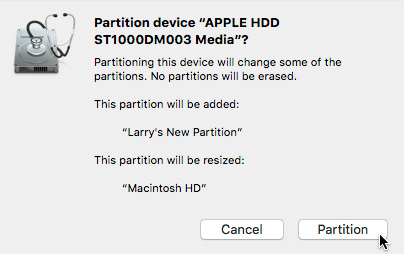
Up pops a confirming message making sure this is what you want to do. Click Partition.
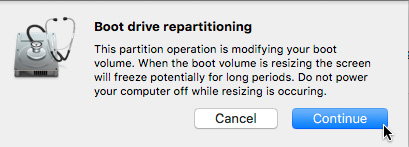
Since any hard disk can be partitioned, a warning message next appears saying that because you are altering the boot drive, everything on your system will slow down while the partitioning process is running.
DEALING WITH ERRORS
UPDATE: Apple Support tells me that creating a second partition should only take a couple of minutes. In my case, this took much longer. This could be caused by a problem with my hard disk.
If you don’t get any error messages and the second drive appears on your desktop, then you are done. If you do get error messages, continue reading.
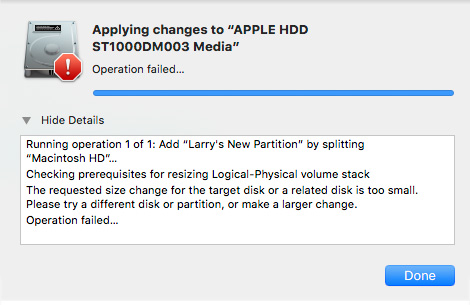
Oops. An error message, our new partition size is too small. Let’s try again, and this time, accept the default size settings.
NOTE: The default settings didn’t work either. I needed to make the new partition even bigger.
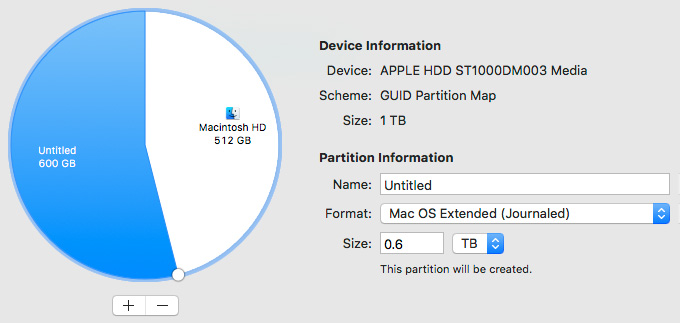
I finally found a new partition size that works. I created a new partition of 600 GB, with the original partition reduced to 512 GB.
Again, give the new partition a name, pick a format, then click the Apply button in the lower right corner. Again, it asks me to confirm my settings.
NOTE: As you can see from the screen shot above, I forgot to rename this partition. Not to worry, you can change the name in the Finder at any time.
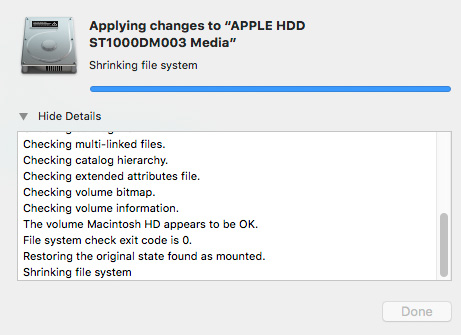
A lot of work has to be done behind the scenes to take all my existing files and move them so they fit into the reduced size of the original partition. This process is not fast – on my system it took about four HOURS to complete! So don’t do this when you are in a hurry. (Most of the time is spent shrinking the file system and copying the boot files.)
BIG NOTE: Apple tells me this is NOT typical. It is probably caused by a problem with my system. Creating a partition should only take a few minutes.
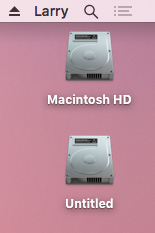
When you are done, you’ll see a new empty hard disk on your desktop. Like any other drive, you can change the name at any time. This is the new partition. You can use it just like any other hard disk – with the added advantage that we can install a different operating system to it, then boot from it.
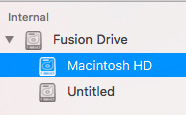
Yet, as you can see from the left side-bar in Disk Utility, both Macintosh HD and Untitled are two sections of the same Fusion Drive.
IMPORTANT NOTE: You must install an operating system onto the new partition in order to boot from it. Creating a partition creates an empty space, you still need to install an OS and applications on it to make it useful.
After installing an operating system, you can boot into the new partition by restarting your Mac. Then, when you hear the chime, press the OPTION key. This displays all the available hard disks.
Use the left/right arrow keys to navigate to the hard disk you want to boot from and press Enter.
REMOVING A PARTITION
Removing a second partition – say when you are done experimenting with beta software – is a similar process
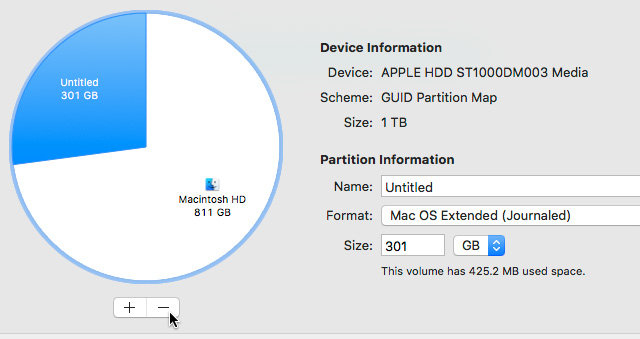
Reopen Disk Utility, select the partition you want to remove (it turns blue) and click the Minus icon under the blue circle.
Click the Apply button in the lower right corner…
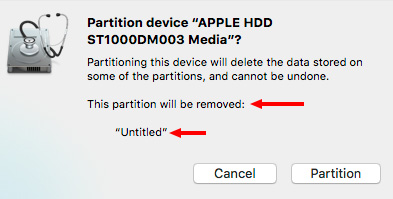
Then click Partition to confirm this is the partition you want to remove (you can’t remove the original partition).
Removing a partition takes about an hour and a half to reconfigure the boot files. Again, not fast.
BIG, BIG NOTE: Removing a partition permanently deletes all data on the partition. You can’t get it back. Only remove partitions when you have safely copied any and all data that you want to keep to a different location.
SUMMARY
I don’t create partitions every day, but I do use them several times a year. It is a very useful technique to know – especially when you want to keep older versions of the macOS running on your system, run different versions of the same app, or install non-Mac operating systems.

2,000 Video Training Titles
Edit smarter with Larry Jordan. Available in our store.
Access over 2,000 on-demand video editing courses. Become a member of our Video Training Library today!
Subscribe to Larry's FREE weekly newsletter and
save 10%
on your first purchase.

26 Responses to Create a Dual Boot System Disk in macOS High Sierra [u]
← Older Comments-
 Gene Massey says:
May 20, 2020 at 7:31 pm
-
 Michael Crochetiere says:
December 9, 2020 at 5:57 am
-
 Larry says:
December 9, 2020 at 9:37 am
-
 Michael Crochetiere says:
December 10, 2020 at 7:50 am
-
 Larry says:
December 10, 2020 at 9:19 am
-
 Michael Crochetiere says:
December 10, 2020 at 11:57 am
← Older CommentsLarry
I have a 2012 macbook pro and a Mac Pro, both running 10.9.5 so I can use FCP7. Unfortunately the browsers are so old they are causing problems and anyway I need to get a new phone with the new IOS, and that will not work with 10.9.5.
What would you charge to take the drives from both macs and create dual boot on both so I can upgrade one partition on each. I prefer cloning both for protection before we do anything and would like a clone of both anyway
Hi Larry – Thanks so much for this article. I have a 2009 MBP running El Capitan. FCP7 works fine. Very stable. But my computer is having big problems with Safari, Facebook, Zoom and watching live stream video. Overheating, crashes. I changed the fan, but I figure my vintage MBP is just too old. I’ve looked into getting a new MBP (M1) but all the current editing programs (FCPX etc) have daunting learning curves, plus they all have black screens with white/gray text, which is hard on my astigmatic eyes. Dark mode. Another issue. So I’m looking at getting a newer MBP (maybe 2015) with dual boot (OS 10.6.8 or earlier) plus whatever the 2015 machine comes with. I’m not that tech-savvy, so I’m hoping to get the genius bar or my local Apple repair shop to help with setting up the dual boot system. I could use two computers, the M1 and my 2009 MBP, but switching back and forth all day would be a major pain. I hope that the dual boot system would make switching back and forth easier. Thanks in advance.
Michael:
If you want to stay with FCP 7, you’ll need to find a newer computer that can still run macOS 10.6.8 or so. Not much past 10.7.
it will be about as awkward running a dual-boot computer as using two computers – my sense is that you should dedicate one computer for gnarl uses – email, web browsing, and business work – while the other is dedicated to editing. That will simplify transferring data between them.
Larry
Thanks very much, Larry. For now, I may go with two computers, as you suggest. FCP7 is very stable on my MBP 2009 and I’m well-backed up, if the Mac fails. I’m an independent writer-filmmaker, not a professional editor. So I don’t edit all the time and learning new software is a major time investment. On the Black UI issue, I’ll keep looking. FCPX, DavInci Resolve and Adobe Premiere don’t seem to have an meaningful alternatives to small dark gray or white text on a black UI. This is no small issue for people with some astigmatism (50% of the population). I’ve included two related links about the black screen issue 🙂
https://adobe-video.uservoice.com/forums/911233-premiere-pro/suggestions/36963772-light-mode-ui
https://www.vice.com/en/article/ywyqxw/apple-dark-mode-eye-strain-battery-life?fbclid=IwAR0VVYxTPsidGQfU6J9KQwpfI0jgPKhr7XztG0AkmxuWPybkHKY57BEC3G0
Michael:
keep in mind that the Adobe apps allow you to adjust the brightness level of the background.
Larry
Thank you, Larry. I’ll investigate!