
![]() Bugs are watermarks in the lower corner of a video which identify the source of the video. Most often these take the name of a websites (i.e. LarryJordan.com). But, Apple Compressor allows us to add animated, color watermarks to our video.
Bugs are watermarks in the lower corner of a video which identify the source of the video. Most often these take the name of a websites (i.e. LarryJordan.com). But, Apple Compressor allows us to add animated, color watermarks to our video.
Here’s how.
CREATE THE WATERMARK
Whether you use After Effects, Motion, Cinema 4D or the graphics software of your choice, create a watermark that contains an alpha channel.
DEFINITION: Alpha channel. That part of an image which is transparent. Almost all video codecs do NOT support alpha channels. ProRes 4444 does.

To illustrate the process, I’ve created a simple, animated 3D image in Motion consisting of three concentric ring gears.

Because I want each ring to move differently, I duplicated and scaled the same Ring Gear 02 effect three times to create the nested image. Note that all three rings are contained in the same group.
I then applied a filter – Color Correction > Colorize – to change the color of each ring.
NOTE: This is just a simple example. You can make the animation as visually complex as you want.
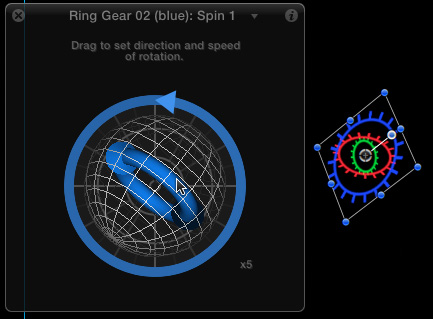
For example, to get an image to pivot on more than one axis, apply a Basic Motion > Spin behavior, display the HUD (F7), then twist the center circle in the HUD to change the axis of rotation.

Finally, select the Group that contains all three rings and move it to the lower right corner. As all of my work ends up on the web, I position the bug against Action Safe. (the outer cyan rectangle) For DVDs, cable or broadcast, I’d position against Title Safe (the inner cyan rectangle).
NOTE: Positioning the animation is critical prior to export. You don’t have the same positioning flexibility in Compressor.
I made sure that this two-second movie looped seamlessly. I don’t want the loop to call attention to itself each time it resets back to the begining.
NOTE: There’s no reason to create a long movie, as long as the loop is seamless.
EXPORT THE MOVIE
This is the most important step. While Compressor can key out black, it does a much better job when the animation has an alpha channel – especially if there are textures, shadows or translucency in the animated image.
In Motion, select Share > Export Movie (Cmd + E).
NOTE: Don’t use a compressed video format, these don’t support alpha channels.
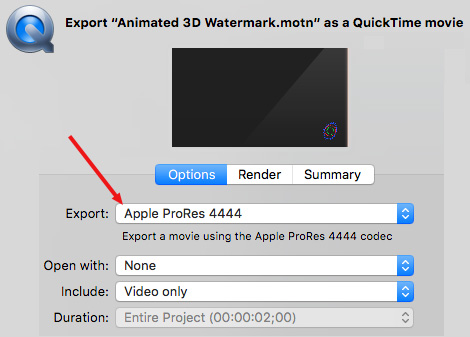
Exporting a high-quality movie defaults to ProRes 4444. (This is the only version of ProRes that supports an alpha channel.)
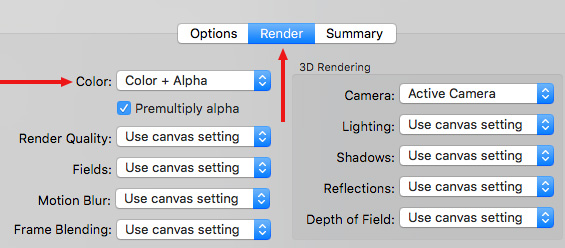
The critical Alpha channel option is also selected by default. Click the Render button and make sure that Color is set to Color + Alpha.
NOTE: If you are using other software, export a high-quality version and choose ProRes 4444, with an alpha channel. This may not be the default export choice.
Give the exported movie a name and location and save it.
ADD A VIDEO WATERMARK IN COMPRESSOR
Import (Cmd + I) the video you want to watermark and compress into Compressor, then apply the compression setting of your choice.
NOTE: Watermarks can be added to any compression setting.
Select the compression setting: either in the Settings tab to make a permanent change to that setting, or the setting applied to the clip to make a one-time-only change to the setting.
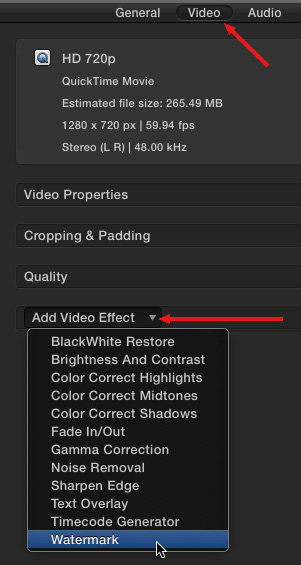
Then, select the Video tab in the Inspector, scroll down to the bottom and choose Watermark from the Add Video Effect popup menu.

Click the Select button to navigate to and select the watermark movie you just exported.

Instantly, it appears superimposed over your source video in exactly the same position you set when you created the movie. (Look carefully and you’ll see it in the lower right corner, right where we positioned it.)
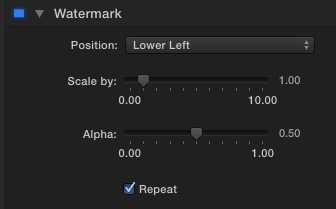
Generally, the Position and Scale options don’t need to change, because you set the position and size when you created the watermark.
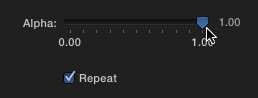
However, I often need to adjust the Alpha setting, which controls the opacity of the watermark over the video.
NOTE: White stationary text is generally set with an Alpha around 35%. Color animation generally needs to be brighter – however, nothing is definite. Pick the alpha setting that looks best to you.
Be sure to leave Repeat checked, other wise the watermark will play once, then disappear. Repeat loops the watermark video until the end of the source movie.
SUMMARY

And that’s it. Compress your file as normal. When you play the compressed file, your watermark will be burned in and animated.
Cool.

2,000 Video Training Titles
Edit smarter with Larry Jordan. Available in our store.
Access over 2,000 on-demand video editing courses. Become a member of our Video Training Library today!
Subscribe to Larry's FREE weekly newsletter and
save 10%
on your first purchase.